Cisco CCNA Cyber Ops SECFND 210-250, Section 9: Understanding Linux Operating System Basics
9.2 History and Benefits of Linux
9.3 Linux Architecture
9.4 Linux File System Overview
9.5 Basic File System Navigation and Management Commands
9.6 File Properties and Permissions
9.7 Editing File Properties
9.8 Root and Sudo
9.9 Disks and File Systems
9.10 System Initialization
9.11 Emergency/Alternate Startup Options
9.12 Shutting Down the System
9.13 System Processes
9.14 Interacting with Linux
9.15 Linux Command Shell Concepts
9.16 Piping Command Output
9.17 Other Useful Command Line Tools
9.18 Overview of Secure Shell Protocol
9.19 Networking
9.20 Managing Services in SysV Environments
9.21 Viewing Running Network Services
9.22 Name Resolution: DNS
9.23 Testing Name Resolution
9.24 Viewing Network Traffic
9.25 System Logs
9.26 Configuring Remote syslog
9.27 Running Software on Linux
9.28 Executables vs. Interpreters
9.29 Using Package Managers to Install Software in Linux
9.30 System Applications
9.31 Lightweight Directory Access Protocol
History and Benefits of Linux
Linux traces its roots back to Unix, which was developed by AT&T labs as an operating system that was meant to improve software development. It did so by addressing problems with existing operating system platforms that traditionally challenged developers, such as file management and portability. However, because Unix was owned by AT&T, using Unix meant having to pay licensing fees and users were restricted by the terms of the license. Nonetheless, it was widely used and well known to developers and computer scientists because licensing fees were made very favorable to certain institutions such as universities, and it was a highly portable and efficient platform in its day.
Linux was started by Linus Torvalds as a project to create a Unix-like environment that he could run on his personal home computer because the systems at the university that he attended ran Unix. His implementation of Unix was completely re-written and he made it openly available to others with very limited restrictions under the terms of GNU public licensing or GPL guidelines. GPL allows the free distribution of software, and grants anyone the ability to modify the code if source code of the modification is made publicly available.
This model helped propel Linux development because code was visible to a wide audience and improvements were made public as well. Linux quickly became a robust operating system platform with large communities of users to support others at no cost.
Benefits of Linux
The open source nature of Linux makes it a highly cost-effective option. In addition to the operating system being freely available, much of the software that you can run on it is freely available. Virtually any application can be found of comparable quality to commercial counterparts.
The popularity of Linux means that there are plenty of resources available to help in the form of user communities, blogs, and discussion forums. There are also many resources that can be found online, including documentation, training, and videos to further extend the support options.
The Linux operating system is very stable and capable of running enterprise-scale production applications.
Linux Architecture
At the core of every Linux installation is the Linux kernel, the heart of the operating system. However, beyond the kernel there are applications that interface with the kernel to get things done. Over time, packages of Linux software have evolved that are maintained by like-minded users or communities. These packages are all based on Linux, but they may favor certain types of software components, desktop environments, or services. These packages have come to be known as distributions, and there are many to choose from. Some of the more common distributions include the following:
- Red Hat
- Debian
- Mandriva
- CentOS
- Ubuntu
These examples are all based on Linux, but their primary difference is the software that comes packaged with each. Usually, the choice of one over another is based on preference. Some may be better suited for enterprise applications, while others create friendlier desktop environments.
The Linux operating system is built on the concept of abstractions that are organized in a sequence of layers. The term “abstraction” in this context means that the details of how one layer will work are hidden from the other layers. Layers present interfaces that other layers can communicate with to perform tasks or request services. This layered architecture provides certain benefits: it simplifies software design because developers do not have to worry about how to interact with aspects already handled by other software components. The software simply requests what it needs from the other components and it is up to that component to perform the requested task and return a result to the calling component.
Access to the inner workings of a layer is limited to what the layer’s interface provides for communication. A component cannot directly manipulate what is under the control of another, which prevents users or higher-level software from potentially corrupting lower-level operations. For example, users cannot directly access hardware functions. Instead, a user would execute a command from the command line interface to move or copy a file, for example. The commands take care of performing the requested operation through the lower-level structures that are in charge of communicating with the disk drive.
The high-level architecture of the Linux operating system consists of three primary components or layers:
- user space
- kernel space
- hardware
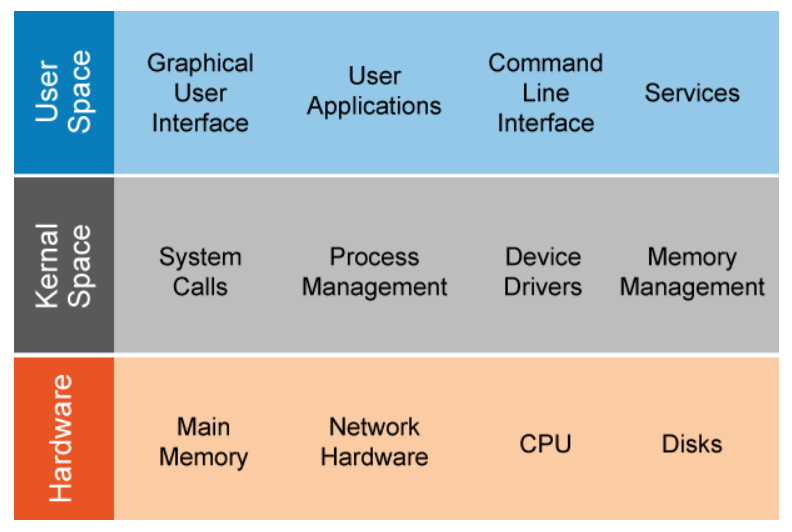
User Space
User space describes the system memory made available to run user processes. A user process can be any of the following:
- an application that is initiated by a user
- a background process that is initiated by a user application
- services
- the graphical desktop environment
- commands that run from a shell
User space processes are maintained in a separate memory space to prevent user processes from interfering with kernel processes. Interaction between the kernel and user space is performed through function calls and programming interfaces rather than allowing user processes to directly control anything in the kernel. Because of this separation, user processes that misbehave will typically not impact the rest of the system as the kernel maintains control of each process to prevent corruption of critical system functions.
Kernel Space
The kernel is the core of the Linux operating system. A section of the system’s main memory is reserved for the kernel to use. The kernel manages all the system resources.
- determines which processes can access the CPU
- manages the memory allocations for each running process
- is the interface between the user-space processes and the hardware.
Kernel/User Relationship to the Hardware
System hardware is insulated from direct manipulation by user processes because the kernel acts as the intermediary between the two. The kernel communicates with system hardware through device drivers. Maintaining this separation between user processes and hardware prevents user processes from potentially damaging the system in the event of a misbehaving process. However, users with sufficient privileges on the system can still cause damage by erasing critical files, for example.
The kernel is also responsible for managing multitasking by deciding which processes can access the CPU, a function that is called scheduling. When a user process is given time on the CPU, the kernel is responsible for mapping the virtual address space of the process to the physical address space of the main memory.
In addition, the kernel must load and unload special memory, which are called registers, within the CPU. These registers are used for extremely fast computation and storage. However, since each user process must be kept separate by the kernel, a function that is called context switching is implemented to temporarily unload the registers until the next time that process needs the CPU.
Linux File System Overview
Linux maintains a fairly standard file system structure, making navigation around different hosts easier even if they are running different Linux distributions. There are some minor differences between distributions, but navigating around the differences can be easily overcome once you familiarize yourself with the basic structure, as shown in the figure below.
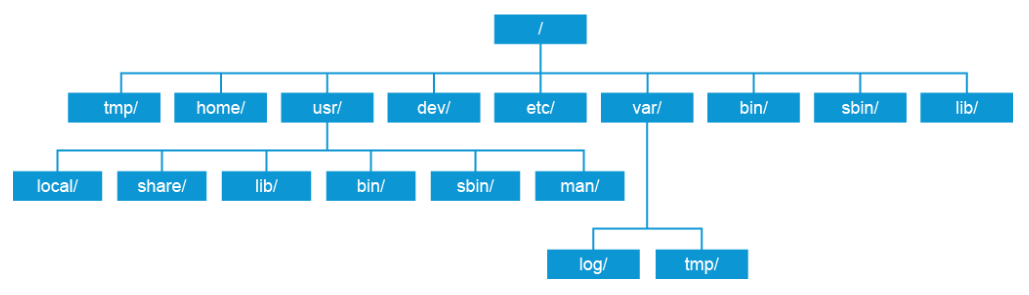
In Linux, the file system structure begins with the root directory, which is expressed with a single forward slash (/) character. Everything else in the file system, including other drives or peripheral devices, will reside somewhere below the root.
Different Linux distributions may reserve subdirectories for you to mount drives or other storage media. For example, if you mount a CD-ROM drive in an Ubuntu installation, it will be mounted in a directory that is called /media by default. Other distributions may include a directory that is called /mnt for mounting storage media. You can also mount storage media anywhere that you want as long as your user account has permission to write to the directory where you want to mount it. The location used to mount storage media is known as the “mount point.”
Different Linux distributions may have slightly different file system structures, but the core structure is common to all distributions. These directory locations are used to store specific types of data as follows:
- /tmp: Stores temporary files. It is often used as a workspace by applications. Users should not use this directory to store anything of any importance because many Linux distributions wipe this directory on boot, and in a default installation, any user is able to read and write to this directory. Attackers may use this folder to store malware, often as the first stage of an attack, because it is a consistent and permissive directory across Linux installations.
- /home: Location where the personal directories for users are stored. These directories should be secured because they often contain private and sensitive information (like configuration files with password, SSH private identity keys, and user files).
- /usr: Used to store user-space programs and data. The reason for the /usr directory is mostly historical, but in modern Linux installations it contains several subdirectories:
- /usr/local: A location set aside for administrators to install software.
- /usr/share: Originally, this directory was used to share files between hosts that could be used on different Linux/Unix platforms. It was designed as a workaround when disk space was at a premium. Today's systems have no such constraints, so it is no longer used in that capacity.
- /usr/lib: Stores library files that executable programs need to access at run time
- /usr/bin and /usr/sbin: These directories are used to store binary (compiled) executable files. These files make up the bulk of the Linux operating system. The /usr/sbin was traditionally reserved for files that can only be used by root, but that distinction no longer applies.
- /usr/man: This directory is used to store the manual pages, AKA “man pages,” that contain the documentation for important files in the operating system and installed applications. - /dev: Contains device files. Hardware and virtual devices, such as terminals, appear as files to the operating system. When Linux needs to access a device, it often does so by interacting through device files. Unlike other directories here, this folder is "special" in that the files and folders inside are representations of hardware and objects in the kernel. For example, although it appears to be a file, /dev/sda may point to your first hard disk drive, and /dev/urandom is a secure random number generator.
- /etc: Stores system configuration files for the operating system and services. For example, SSL keys for web servers, private keys for SSH servers, and user accounts and passwords are kept here. This directory must be kept secure to keep the system secure.
- /var: This directory is used by the operating system and applications to store runtime data and log files. There are several subdirectories that are located here, two of which are common to all Linux distributions:
- /var/log: Used by the operating system and applications to store log files. At a minimum, non-privileged users must be prevented from writing to this folder. Otherwise, the integrity of the log files would be compromised after an attack.
- /var/tmp: This directory is used as a workspace to store temporary runtime data for the operating system and running applications. - /bin and /sbin: These directories are used to store system binary files. Traditionally, the files stored here were files that were required to boot the operating system. All other system files were stored in the /usr/bin and /usr/sbin directories, which is no longer true as many files found in /usr/bin and /usr/sbin are required at boot time.
- /lib: Stores library files that must be available to executable files at run time.
Special File System Structures
When you navigate the file system from the command line, you are likely to encounter entries in directory listings in the form of a dot (.) or two dots (..). These structures represent important constructs in the file system. First, the single dot (.), is a reference to the current directory. The significance of this is that if, for example, you want to execute a file in the current directory, you may be surprised to find that the system will not find the file even if you are in the directory the file resides in. The reason for this is that Linux searches specific directories when you execute something.
Note:
The set of directories that Linux searches for command execution is stored in an environment variable that is called $PATH. The path is assigned to you at login. You can modify the path that is assigned to you by editing your user profile. If you wish to see the path for your environment, execute the following command: echo $PATH The output will show a colon-separated list of the directories in your path.
Therefore, to execute a file that is not in the path, you would start with the reference to the current directory, the dot (.) followed by a forward slash (/), and the file name. For example, you want to compile a tool that you downloaded to your home directory, called new-app. You created a subdirectory in your home directory to store the components that are needed to compile the application. When ready, enter the directory that was created and compile the application, which will produce an executable file that is called new-app in that directory. To execute the application, enter the following in the command prompt:

The double dot (..) refers to the parent directory of the current directory. For example, user Joe has a home directory of /home/joe. Joe creates a subdirectory to download a tool that is called newapp20. The full path to this directory is /home/joe/newapp20. While inside that directory, Joe decides to navigate back up to his home directory. To do so, he can use the double dot reference:

Joe is now working in the /home/joe directory. The command that he used is the same as the following:

One last structure that you may encounter in documentation or reference material is the tilde (~). The tilde is a shortcut that represents the current user’s home directory. Returning to the example of the user Joe, who wanted to navigate to his home directory, another alternative is to use the tilde,as follows:

This command puts him back in his home directory: /home/joe
Fully Qualified vs. Relative File References
You have two options for navigating the Linux file system. You can use a fully qualified reference to your destination or you can use a relative reference. The fully qualified reference means that you explicitly state the location beginning with the root of the file system.
Fully qualified references always start with a forward slash (/), which represents the root. For example, the fully qualified reference to Joe’s home directory is /home/joe, which is workable as long as the file system locations are not too lengthy. Consider copying a file from one location to another using fully qualified path names:

The benefit of this method is that copying this file to the specified location will work from anywhere in the file system. However, due to the length of the file location references, it is cumbersome to type, especially if a command can be repeated.
An alternative is to use relative references. A relative reference lets you specify a location relative to some starting point other than root. For example, if a file that you wish to copy is in the directory that you are currently working in, you can omit the path and specify the file name and the destination. In this scenario, Joe is in his Downloads directory and he just downloaded a .pcap file. He uses the following command to copy the file to a directory called caps, under his home directory where he stores his .pcap files:

In this example, Joe knows that his Downloads directory is in his home directory: /home/joe. The caps directory is also there. Since Joe is currently in the Downloads directory, he uses the double dots (..) to go up to the parent directory, and from there he moves down to the caps directory.
Unlike fully qualified directory references, relative references have no leading forward slash. One last note on relative references is that you can also leverage the tilde (~), which points to your home directory. In the previous example, where Joe wants to copy a .pcap file from his Downloads directory to the caps directory, he could have used the following command instead:

How Devices Are Represented as Files in the Linux File System
Devices in the Linux file system are represented as files. You will find them in the /dev directory. Usually, users don’t interact with device files directly. Device files are most often accessed by applications that require the services of a device. However, users that write scripts or code applications may need to access devices, so it is important to understand the concept of devices being represented as files.
One example of a device that is used frequently in scripting is /dev/null, which is a device that represents nothing, so sending data to it is, in effect, discarding the data. Consider the following example:

Without the reference to /dev/null, the echo command would send the string test data to the terminal window where you entered the command. However, directing the output to /dev/null discards the data, so the echo command would not display the string in the terminal window as it normally would.
Devices can be classified in one of the following categories:
- Block: Devices that process data in fixed chunks, for example, disk drives or other forms of storage devices.
- Character: Devices that work with data streams. One such device is /dev/null. Directly connected printers are another example.
- Pipe: Sometimes referred to as “named pipes.” These devices operate in a manner similar to character devices. However, the data stream is directed to another process rather than a device file or driver.
- Sockets: These devices are unique in that they are not usually found in the /dev directory. They are used for interprocess communication such as network communication.
You will be able to tell a device’s type by listing the files in the /dev directory with file details. The following command lists files in a directory with the file details:

The l parameter lists the details, and the a parameter lists all files, including filenames that start with a dot (.). Here are some examples of device file entries:
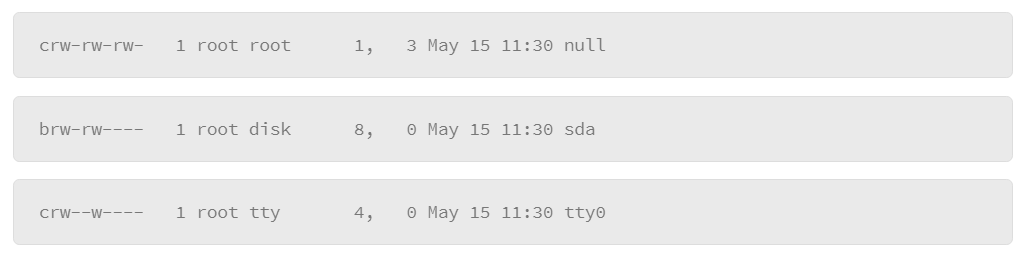
The first character of the entry specifies the type. For example, the c represents a character type of device, and the b represents a block type of device.
Some device types that you should be familiar with include disk devices. In some commands or configuration files, you will need to specify a disk drive reference. Complete by entering the file name of the device to reference.
In Linux, disks are often identified by the letters sd, followed by a third letter. For example, the first disk drive would be referred to as sda. The next would be sdb. The three-letter code refers to the entire disk drive. However, disks are often divided into discreet partitions, so a number that follows the three-letter code of the disk indicates the sequence of partitions. For example:

Here, you see an entry for a disk drive that is called “sda,” which contains two partitions: sda1 and sda2. There are many types of devices and each has its unique identification code.
Basic File System Navigation and Management Commands
File Properties and Permissions
File properties describe the characteristics of a file or directory. The command that you use to list files and display their properties is as follows:

The –l parameter instructs the command to display the listed files with their properties. The [files] parameter lets you specify which directory or file names to list. If you omit the [files] parameter, the ls command will list all the files in the current directory.
The following information is contained in the ls –l command output:
- File type: In the example, each file shows a dash (-) character to indicate regular files. For device files, you may see the letter c for character streaming devices, or b for block devices. For directories, you would see the letter d.
- Permissions: This section is represented by the next nine columns of characters. They are organized in three groups where the first group represents the user’s permissions, the next is the group permissions, and the third is the permissions that are granted to all others.
- Links: The number of hard links to the file or for directories, it represents the number of directories that it contains, including the current directory (.) and the parent directory (..).
- Owner: the username of the file or directory owner
- Group: the group that the file or directory owner belongs to
- File size: the file size in bytes, unless it is followed by a letter (k for kilobyte, m for megabyte, or g for gigabyte)
- Time stamp: By default, the three columns that follow the file size represent the last time that the file was modified. The first value is the month, the next is the date, and the last is the time in hours and minutes. If the file is very old, the time is replaced with the year.
- File name: the file or directory name
Many of the problems that users may face, relative to files and file management, can be traced to issues with file permissions and file ownership. Therefore, it is important to understand these concepts and be familiar with some of the tools that you can use to manage file permissions and ownership.
Permissions
File permissions refer to the actions that a user or members of a user group are allowed to perform on a file or directory. There are three actions that can be configured for a file:
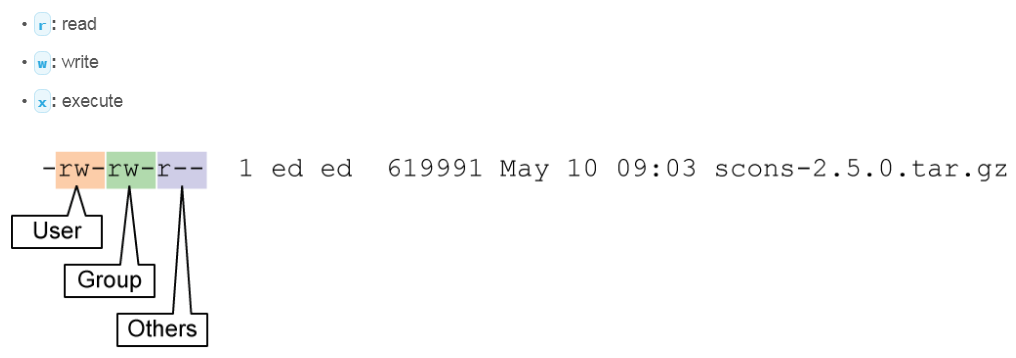
In the ls –l command output, file permissions are listed in the nine columns of characters that follow the first column. This area is divided into three sections:
- The first section describes the actions that the owner of the file is allowed to perform. In the example, you see the letters r and w, indicating that the user is allowed to read and write to the file.
- The second section identifies the actions that the users in the group assigned to the file can perform. Once again, you see the letters r and w, indicating that the users in the group who are assigned to the file can read and write to the file.
- The third section indicates the actions that all other users are allowed to perform on the file. In the example, only the letter r is displayed, indicating that everyone else can only read the file.
- Note that Linux treats file permissions as a hierarchy. For example, without permissions to read the directory, you would not be able to see a list of the files that are inside, and without execute permissions on the directory, you would not be able to open the files that are inside.
The file owner and user root can modify the permission properties of the file.
Ownership
The concept of file ownership in Linux is a key security measure that is built into the operating system, which gives administrators very granular control over what people can access on the system. For example, the user root has access to virtually everything in the operating system. You don’t want users with lesser privileges to have that degree of access. File ownership can also be used as a mechanism for preventing one user from accessing sensitive items that belong to another user.
The output from the ls –l command displays the file ownership properties as follows:

The user that is identified in the user field is considered the owner of the file. And the group that is indicated in the group field identifies the user group that is assigned to the file. Access to the file can be granted to members of the assigned group. The file owner and the root user can modify the ownership properties of the file.
Editing File Properties
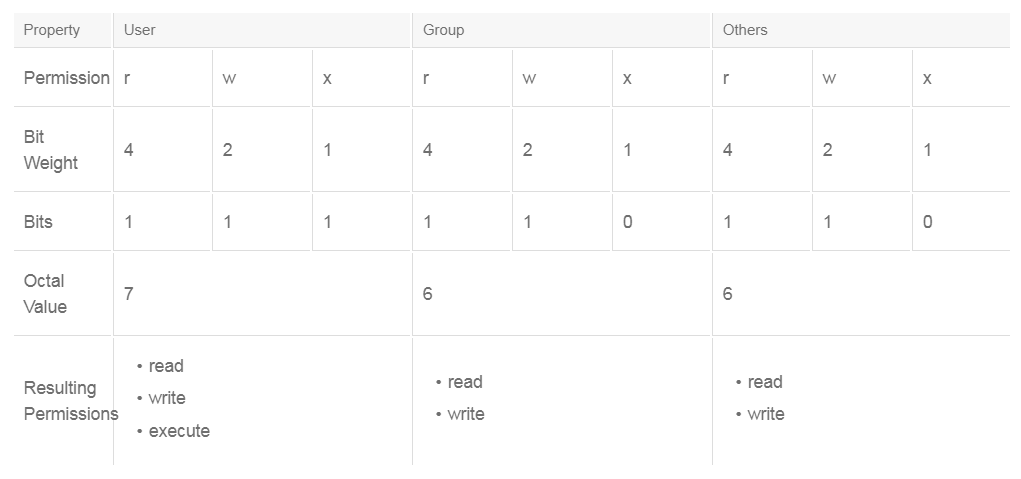
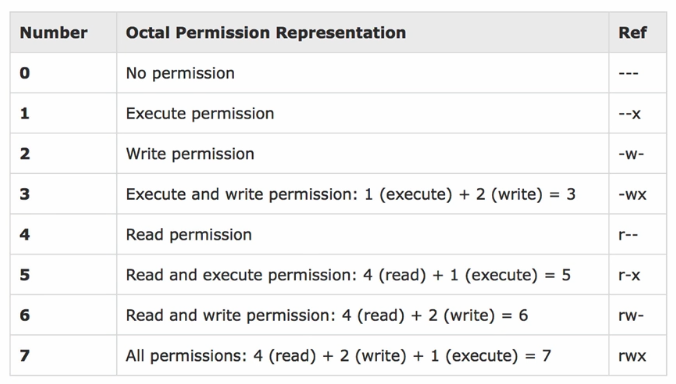
Linux provides several commands that you can use to manage file permissions and ownership. The chmod command has many options to modify file permissions. One method is to use an octal numbering scheme that works because the permission settings use three values for each of the access classes: user, group, and others. Therefore, the three values can be represented as bits in an octal number. An example of how this method works is as follows:

The first number sets the permission bits for the user, the next sets the bits for the group, and the last sets the bits for others. In this example, the permissions would be set as follows:
Rather than using the numeric or absolute form, you can use the symbolic form. The table outlines the various symbols that can be used and their meanings:
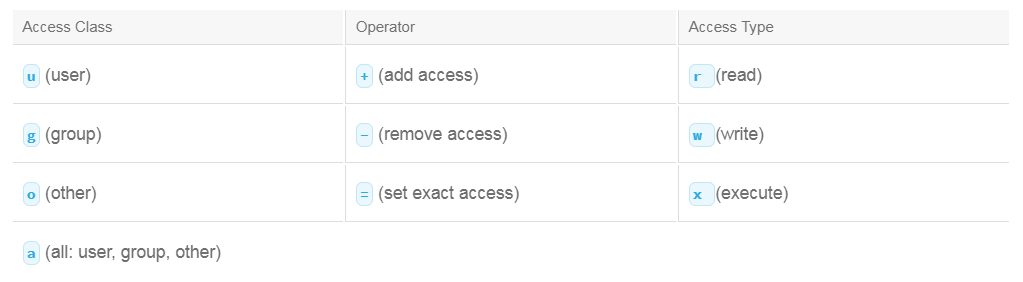
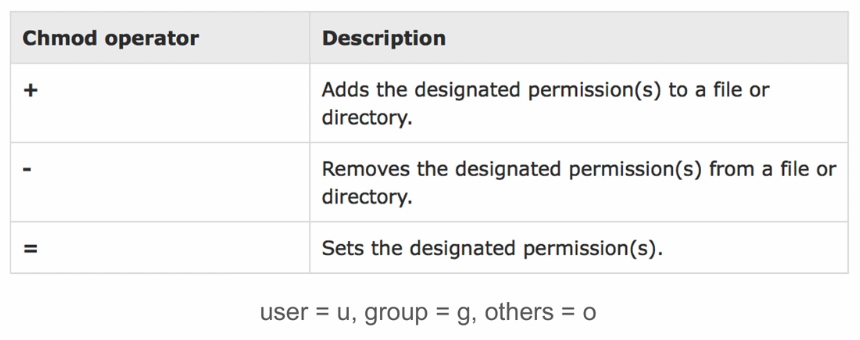
With the symbolic method, you can use a symbol to represent the access class and the access type you want to modify. You specify the operator to set the state of the access type by placing it in front of the access type symbol. When the access type and access class are chosen, the selections are affected by the command. The exception to this rule is when you use the = operator. If you omit an access class, the a or all access class is implied.
The example that follows sets the user access class to the file called MyFile.txt to read only:

This example sets the access type to read and write for both the user and the group:

The next example sets the access type to read and removes write access to the group and others:

The last example sets all users access type to read only:

The difference between the last example and the others is that this syntax resets any access type bits that were set. In the other examples, the command only affects the access types that are called out in the command. If, in the first example, the write bit for the user was already set, it would remain set.
Root and Sudo
In a Linux installation, the root user, also known as the super-user, has authority over all. It is a powerful account, and if used improperly, could cause a lot of damage. Or, if compromised, an attacker can do anything on the compromised host. Regular non-root users cannot do quite as much damage because of the permission and ownership structure of the Linux file system.
Because of the great power of the root user, many modern Linux distributions limit the use of the root account. In fact, some distributions make it extremely difficult to even enable the root account, which makes good sense as a security measure, but there are many system functions that only the root user can do, making the system impossible to use if root access is eliminated completely.
Modern Linux distributions provide a mechanism for controlling root-level access that is called sudo. It provides a system for delegating authority on a very granular basis. For example, you can allow users to run commands as root or limit them to certain commands. It also is capable of very granular logging if you enable this capability in its configuration file. This feature of sudo leaves a very detailed audit trail so that you can tell who executed commands as root and when.
Using sudo is really rather simple; you enter the string sudo at the command prompt, followed by the command that you wish to execute. For example:

vi is a text-editing application. Normally, the file /etc/hosts is only writable by root. If you attempt to write to this file without including the sudo command, you would see a system message that permission to write to the file is denied.
When you execute the sudo command, you will be prompted for your password, which starts a five-minute session during which you are allowed to enter commands with root authority. If the terminal where you issued the sudo command is left unattended for more than five minutes, you will be asked to authenticate again in order to invoke another sudo command.
As the administrator of a Linux installation, you should get used to using sudo, because many of the administrative tasks you would need to do require root access.
Disks and File Systems
From the file system perspective, everything in Linux appears as a single structure with its foundation being root, even if the system contains multiple disk drives or other types of storage media, such as optical drives. They are mounted to the file system at mount points that begin in some subdirectory off root. In reality, physical disks and optical drives are unique entities that store or allow you to read data.
Disk drives are one of the most important hardware devices in the system, because they store the file system itself. Understanding their structure is important because you may need to delve beyond the file system to perform certain administrative tasks or analyze a host.
Disk Partitions
Disk drives must be structured in a logical manner in order for the operating system to be able to find things on the drive. One of the structures that are used for organizing data on a disk is known as a partition. Partitions are areas of the physical disk that are reserved for storing data. You can see this structure in the device directory, /dev, when you list the disk devices. For example, the physical disk will typically have a three-letter code that is assigned to it, starting with the letters “sd.” The third letter represents the sequence of disks where the first disk would be called sda, the second sdb, and so on.
Disk partitions are identified by a number following the three-letter code. For example:
- /dev/sda: The first physical disk
- /dev/sda1: The first partition of the first physical disk
- /dev/sda2: The second partition of the first physical disk
A structure on the disk that is known as the “partition table” is where partitions are managed. Partition tables contain the code that is required to boot a host and they outline where disk partitions start and end. Several Linux utilities are available to manage the partition table, such as parted, gparted, fdisk, and gdisk, to name a few. Some are designed to work with a specific type of partition table (fdisk only supports the MBR type) and others can work with both the commonly used partition table types: MBR and GPT. Also, gparted is a graphical version of parted.
The MBR partition table type is the older, more traditional type. It is the most widely compatible, but it has some limitations regarding the size of disk drives that it supports and the number of partitions that you can host on a disk. The limit is four partitions, but there are ways to get around that limit by using different types of partitions. Also, a disk may only have one MBR. If the MBR were to get corrupted, it could render the entire disk unreadable.
The other type of partition is known as GPT, and it is the newer of the two types. GPT removes the restrictions on disk size and number of partitions. It also replicates itself on the disk several times, so that if the primary GPT were to become corrupted, the disk can revert to one of the copies and continue operating.
The following example uses the parted command with the –l parameter to list partition table information.
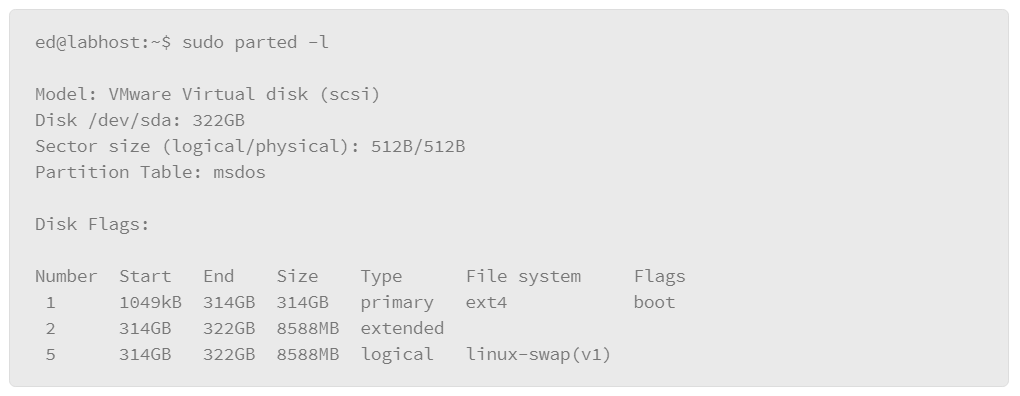
In this example, the host has a single disk that is mounted, and its device name is /dev/sda. The partition table type is identified as msdos, which means that it is using the MBR partition table format. Then it lists the partitions on the drive. In this case, it has three partitions numbered 1, 2, and 5.
The parted tool and the other tools allow you to not only view partition information, but also to manage partitions. For example, you can create partitions on new disks or change the size of existing partitions. Managing partitions can have severe consequences if not done with care and planning because it can wipe the contents of an entire disk. Approach with due care and make sure that you back up important data before managing partitions.
File System Types
File systems themselves come in several varieties. The native Linux file system is known as extended file system or ext. This file system type has been updated over the years; the most current version is ext4. Linux continues to support the two previous versions: ext2 and ext3. There are several file system types that you are likely to encounter in Linux environments:
- ext2, ext3 and ext4: Considered native Linux file systems, ext4 is the most current. Linux maintains backward compatibility with the previous versions as well.
- NTFS: Used by modern Microsoft Windows environments, this complex file system supports versatile permissions, large disks, and other advanced features.
- FAT16, FAT32, exFAT: FAT was the native file system in older Microsoft environments. It has mostly been replaced by NTFS but remains as a fairly common file system type since many USB storage devices come formatted with the FAT file system. FAT file systems are Linux compatible, but lack features such as permissions and support for large disks.
- ISO 9660 and JOLIET: File system standards that are used on optical media, like DVDs and CDs.
- HFS+: The file system that is used by Apple systems running OS X. Linux ships with drivers that can read and write to this file system, so there is compatibility between Linux and HFS+.
- Swap: A special type of file system that is used in Linux swap partitions. The swap partition is disk space that is reserved for the system to use when it needs to free memory resources. The system’s main memory (RAM) is very fast compared to disk drives, so, ideally, you will want to run everything in main memory. However, if the system starts to run low on main memory, it can free up memory resources by moving data in memory to the swap partition. So, the swap space is not really a file system at all. It is directly addressable space on a disk drive to temporarily dump content from main memory. When a system’s main memory resources are oversubscribed, you will find that the system’s performance will degrade substantially because it is moving data much more frequently between main memory and the swap disk.
Mounting Devices
Another aspect of managing disks is understanding how they connect to the file system and how you can determine what is mounted to the file system. Linux will try to mount the disks it sees when it boots. You can see details devices that have been previously mounted in the /etc/fstab file. If you attempt to mount a device, it will reference this file to get the mount configuration for the device. Or you can add the –o option to override the configuration parameters in /etc/fstab and supply your own.
One thing to note is that newer implementations of the /etc/fstab file will list devices by their UUID numbers instead of the device name. A more precise way of identifying devices because device names may change. The example that follows shows an entry in /etc/fstab.

Note that there are two lines that are related to the same device. The first line is a comment and has no effect on how the system operates. It is there to help users understand what the line that follows indicates. The second line contains a series of fields that are separated by spaces or tabs. These fields contain the device’s parameters at mount time, as follows:
- UUID of the device: The comment above it indicates the device file that it refers to. In the example that device is /dev/sda1. When the filesystem is created, the UUID is generated and stored in the metadata on the device itself. While names like /dev/sda may change if the device is plugged in differently, the UUID will allow Linux to better track the device.
- Mount point: In the example the mount point is root (/), which indicates where the root of the file system is located.
- File system type: The example lists this device as having the ext4 file system type.
- Options: The options indicate operating parameters of the device. In the example, the option that is shown specifies what to do if the device encounters an error condition. In this case, if the device begins encountering errors, Linux will remount the device in read-only mode, so the system can continue to operate.
- Dump frequency: The second-to-last column (shown as a zero) is a deprecated field that no longer has relevance in modern Linux environments.
- Pass number: The final column (shown as a one) configures the order that devices should be mounted. The root file system is the first partition to be loaded, so it is marked with a one. Other file systems would be configured with a two, which indicates they can be mounted anytime after the root filesystem.
To manually mount a device, use the mount command. The basic syntax is as follows:

The –t option lets you indicate the file system type of the device. It is not required, since Linux can generally figure out the type on its own. The next option is to specify the device name, for example, /dev/sdb. The last option is to specify the mount point. Many Linux distributions set aside a directory that is called /media as an organized place to mount devices, but you can mount a device anywhere on the system that your user account is permitted to access.
System Initialization
The general sequence of events in the Linux boot process is as follows:
- hardware checks
- device bus discovery
- device discovery
- kernel sub-system initializes
- root file system mounts
- start user processes
The key component that starts the boot process is the boot loader. There are many boot loaders available to choose from, but the two most common are GRUB and LILO. Because no drivers to access disk drives are available at start time, the boot loader must interact with the system’s BIOS or its more modern counterpart UEFI, to access the disk hardware. The BIOS/UEFI resides in the system’s firmware. It contains enough code to perform some basic system checks and initialization of system peripherals at boot time. One of the checks that it performs is to find the system start disk and read its partition table, which contains a small bootstrap program. The boot loader’s primary job is to find the kernel on the startup disk and load the kernel into memory so that it can begin booting the system.
Boot parameters that are processed by the boot loader are called /proc/cmdline. An example of its contents follows:
BOOT_IMAGE=/boot/vmlinuz-4.4.0-22-generic root=UUID=339228c9-cbc3-4503-950f-40415e03779f ro quiet splash
The BOOT_IMAGE parameter contains a reference to the Linux kernel and the root parameter that follows it identifies the disk drive where the boot image can be found. Note that the disk is referenced with its UUID. It can also be referenced using its device name, /dev/sda1, for example, but most modern Linux implementations will use the UUID.
How Linux Controls the Boot Process
After the kernel boots, the system will begin to initialize the user-space processes. User-space processes include starting services and daemon processes which are processes that detach themselves from the script that starts them and continue to run in the background. The way these processes get started can vary from system to system depending on how old the version of Linux is or what the Linux distribution you are using. There are two primary initialization processes:
- System V init: The traditional init process, which is called init, reads and executes a series of scripts that are located in a startup directory. Each script starts a process or service one at a time until all the scripts in the directory have been executed.
- Systemd: The newer initialization system which uses systemd-based systems initialize services and processes in parallel and can support on-demand services.
Run Levels
Run levels describe the operating mode of a Linux installation. They are mostly associated with the System V init process though the concept of run levels still exist in systemd-based implementations. At startup, the init process references its configuration file to see which run level it should use. There are seven run levels numbered from 0 to 6. Each is a directory that contains a series of scripts to start or stop processes. Generally, when a Linux system is initialized into a run level, it stays there. If you put the system into run level 0, the system halts. And run level 6 is used to re-boot the system. Typically, the lower run levels (1–2) are reserved for emergency repairs or system maintenance. The middle range of run levels are the default run levels. Run level 3 is often used to start the system with no graphical interface, and run level 5 starts the system with the graphical interface.
Each run level is a directory that contains start and stop scripts. The name of the directory includes the run level number and, in most Linux installations, you will find them in the /etc/rc directory. For example, rc.0 would be the directory name for run level 0, rc.1 would be the directory for run level 1, and so on. In each of these directories, you will see the scripts that are used to stop and start services. Scripts that begin with the letter S are startup scripts, and scripts that begin with the letter K are used to stop processes. The script names may also contain a number that determines the sequence in which to start the script relative to the other scripts in the directory.
Common Boot Management Processes
There are two boot management systems that are commonly used in Linux: System V init and systemd. To know which method the Linux host is using, do the following:
- If the system contains the directory /etc/systemd, then it is using systemd.
- If the system contains the file /etc/inittab, then it is using the System V init method
Traditional System V (init) Bootup, CentOS 6.x
System V boot or SysVinit is the traditional method for initializing user-space processes and services. Systems that use this method initialize user-space by starting a process that is called init, which controls starting the remaining user processes. It continues to run until the system is either re-booted or shut down. The init process can be called upon to change run levels if a user so desires. When init starts, it consults with a file that is called /etc/inittab to get its instructions for how to start up. One of the parameters it receives from this file is the run level that it should start in. Once the run level is determined, it executes all the start and stop scripts in that run level’s directory.
The systemd Command, CentOS 7.x
The systemd start method is a more modern mechanism for initializing user space processes and services. It is being implemented in more Linux distributions, and will soon become the standard for most Linux distributions moving forward. One of the primary benefits of systemd is that it can control other initialization behaviors such as mounting file systems. It also processes what it needs to start at initialization time in parallel, so systemd-controlled systems tend to boot faster.
Emergency/Alternate Startup Options
If a system that is running Linux is experiencing problems or has been compromised in some way, you may want to start the system in a safe configuration, or boot the system using an external device to ensure that the system is in a clean environment.
Single User
Starting a system in single user mode is a method that is used to enter a system that may not be behaving properly. It initializes the system into run level 1, which starts only essential services and processes to allow you to enter the system to troubleshoot or test for stability. Single user mode does not start up a graphical desktop environment nor does it enable networking services. It boots into a command line console from which login and troubleshooting can be completed.
If you are concerned that an attacker may have gained control of the system, or you wish to preserve the system for forensic analysis, you should never boot into single user mode. Single user mode uses the files on disk to boot the OS and run commands. The act of booting into single user mode makes changes to critical data, like timestamps and logs, that would hinder forensic analysis.
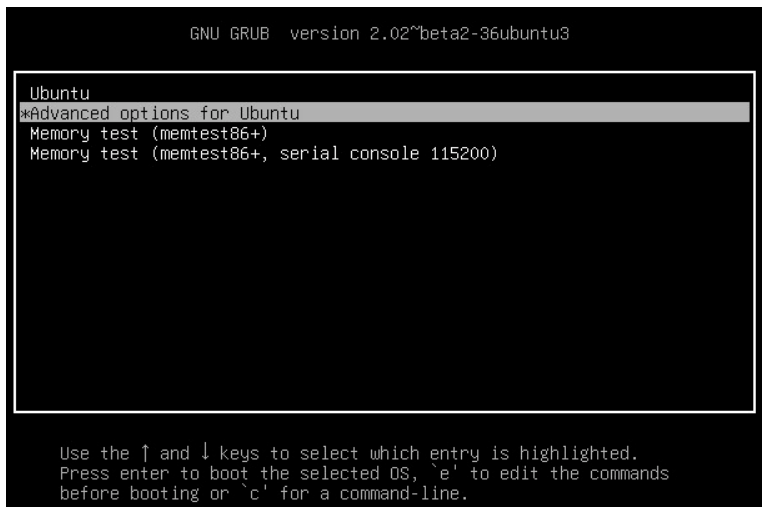
Entering single user mode may differ slightly depending upon which boot loader your system is using. Most systems use GRUB so the examples here are based on GRUB.
The steps for entering single user mode are as follows:
- First, as you boot your system, you will typically see the BIOS screen as the BIOS performs its power-on self-test and identifies the peripheral devices that are attached to the host at boot time.
- When the BIOS splash screen turns off, press the left shift key which will force the system to display the GRUB menu.
- In the GRUB menu, use the up/down arrow keys to highlight Advanced Options and press Enter.
- A list of the kernels that are available to boot will be displayed. Normally, the newest kernel which will be located at the top of the list. Use the arrow keys to highlight the kernel to boot with the string (recovery mode) after it.
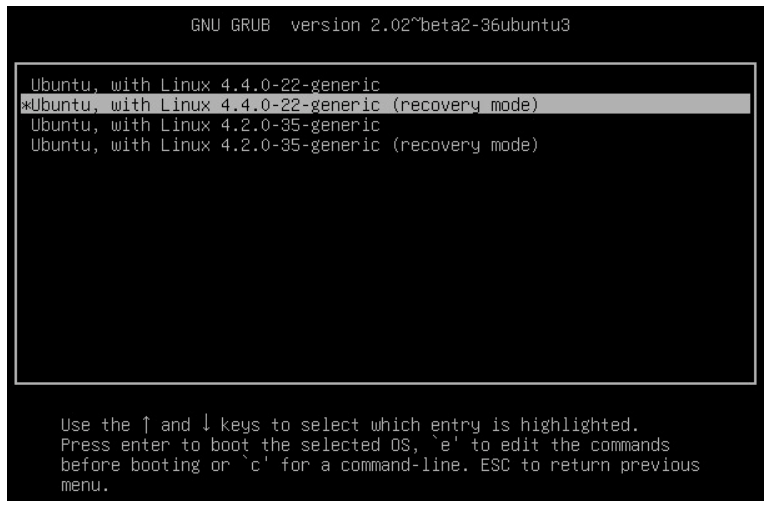
- With the selection highlighted, press the Enter key to get to the recovery mode menu.
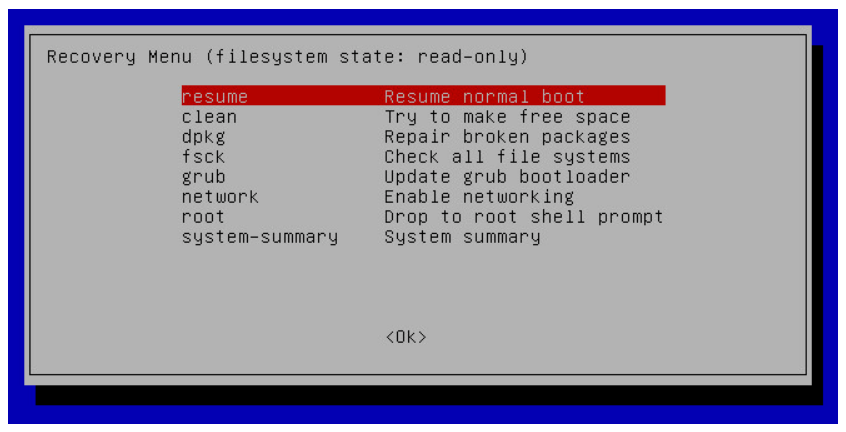
- The recovery mode screen gives you access to several tools you might find useful in an emergency situation. Of them, root brings you to a single user mode command prompt.
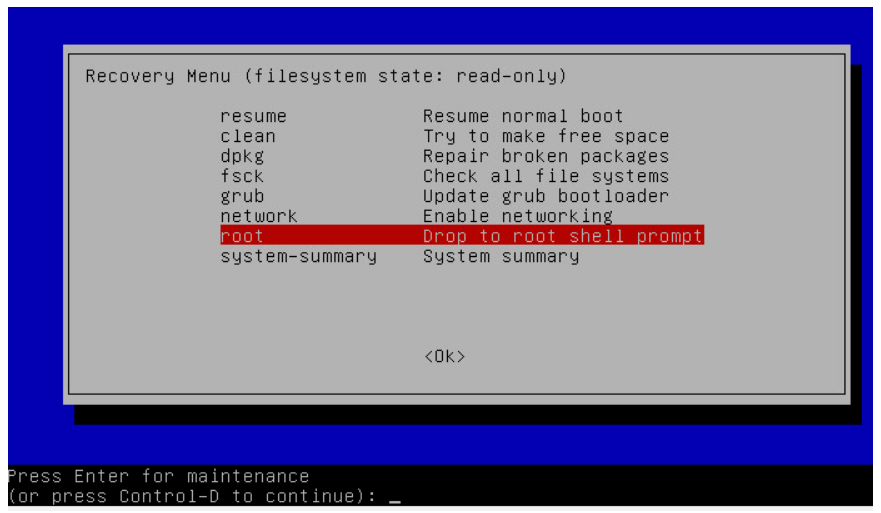
- From here, press Enter as prompted to execute commands for navigating the file system, or to investigate files on the host without disturbing it. The file system is mounted as read-only so you can’t alter much of it in this state. However, you can remount the file system in read-write mode if you need to make edits. Once you complete your single user mode session, you can type reboot at the prompt to restart the system. The system should restart normally at this point.
Live CD
Another option for interacting with a system that you need to analyze or troubleshoot is to boot from external media. You can obtain bootable disk images of virtually any Linux distribution. There are also many sources that provide purpose-built bootable images that come stocked with troubleshooting or security tools. These bootable distributions are known as live CDs.
Booting from a live CD is preferable in situations where the system is believed to have been compromised, or when a forensic analysis is potentially desired. Some live CDs are intended to be used in these situations, as they will not mount file systems, use files on local hard disks, or generate network traffic.
After you obtain the image file of the distribution that you wish to use, it is easy to either burn the file to optical media, such as CD or DVD, or copy the image to other storage media, such as a USB flash drive. Then, configure the host to boot from the optical disk or storage device and simply allow the system to boot. The benefit of using optical media is that the live CD can be trusted more than a USB flash drive. If you would like to be able to make changes to the live environment easily, the USB flash drive would be a better choice.
Shutting Down the System
It is important to properly shut down a Linux-based system when you need to bring the system down for maintenance or troubleshooting. Files that are not properly closed as a result of an abrupt shutdown or power loss could become corrupted causing the system to potentially malfunction. The graphical desktop environment provides tools for shutting down or restarting the system in the form of buttons in a tool bar or options in a menu.
You can also initiate a shutdown or reboot from the command line, usually done with the shutdown command. The basic syntax of the command is as follows:

There are several options that you can exercise. The two most common are –h to halt the system, and –r to reboot the system. The time argument is optional—if no time is specified, the shutdown will execute one minute after the command was issued. Time can be specified on one of two formats:
- hh:mm: The hour in 24-hour format followed by the number of minutes.
- +m: The number of minutes from the time the command was issued.
- now: The time parameter will also accept the keyword “now” to indicate that the command will execute immediately.
The message is also optional. It will be broadcast to all users logged in to the system, repeatedly over the course of the final minutes, to let them know the system is going down. If you include a message, you must also include a time. Five minutes before shutdown, new logins will be denied. For example, to shut down the system in 30 minutes, with a message to users:

An example of how the shutdown command can be used to halt the system is as follows:

In addition, the reboot command is a quick way to immediately reboot the system. Users will receive a broadcast message upon issuing the command:

Although the shutdown command works across every Linux distribution, systems that use systemd to manage user processes can use the systemctl command as follows:
- systemctl poweroff
- systemctl reboot
System Processes
When commands are executed, they become processes that are managed by the system to ensure that they get the memory, I/O, and CPU resources necessary for them to continue processing until execution completes or gets terminated by other means. This section describes processes, and introduces tools for monitoring them, in addition to monitoring the resources they are consuming.
Identifying the Processes
Everything that executes in the system produces a unique process that requires system resources to continue running. Processes themselves are identified by a PID to distinguish one from another. The kernel takes care of managing all the running processes to ensure they get the resources they need.
A process thread is a component of a process. It is a unit that is capable of sharing the resources that are allocated to a process. A process can consist of one or more threads. A process that is composed of one thread is called a “single-threaded process,” and a process that contains more than one thread is called a “multi-threaded process.”
Multi-threaded processes have the advantage of being able to run in parallel, which can increase the speed at which a process runs. Multi-threaded processes always start as a single thread, which is known as the main thread, which will spawn additional threads as needed. Threads have their own unique identifiers, called TIDs, which allows the kernel to track them, much like the kernel would track processes by PID.
Linux Process Creation
New processes are created in Linux with a fork-and-exec mechanism. When a process makes a fork call, a new process with a new PID is created. The process that made the fork call is the parent process and the new process is the child process. The child process starts as a duplicate of the parent process, with some significant status changes. Both processes receive a value from the fork call. The parent process receives the PID of the child process while the child process receives the value 0. The two processes can determine which is which by the return value of the fork call.
Most commonly, the child process will then make an exec call. The exec call facilitates replacing a process with an entirely new program. As an example, the Linux CLI is made available to the user by a shell process. The shell process monitors standard input. When the user enters a command via standard input, the shell parses the command. If the user input matches an available executable file, the shell process will make a fork system call. This creates a new shell process as a child to the parent shell process. The child shell process then immediately makes an exec call, replacing itself with the program defined in the user specified executable file.
The fork call is not always followed by an exec call. A program may contain the code for both the parent and the child process. For example, a daemon that listens on a TCP port may fork a child copy of itself when a new connection is initiated. The child process handles the all aspects of that TCP connection. The parent process can fork multiple copies of itself to handle concurrent TCP connections.
Monitoring Running Processes
The ability to monitor processes and determine the resources that they are using is critical if you do any level of investigation on a host. This topic describes several tools that allow you to view running processes and process threads. It will also present tools built into Linux to show you the resources being consumed by the processes running on the system you are investigating.
Displaying Processes and Process Threads
One tool that you can use to view running processes is called top. This tool remains open giving you a real-time view of system information including system up time, process information, and resource utilization. Exit top by pressing the letter q or <Ctrl+C>
The top application screen is divided into two sections. The upper portion lists general information regarding system resource utilization as follows:
- The first row lists system up time and system load average. The load average is represented as three decimal numbers which, from left to right, show the load on the CPU over the last 1, 5, and 15 minutes.
- The second row gives you general information about the processes running on the host.
- The third row lists various aspects of how the CPU is being utilized. Some of the statistics you may find useful at a glance include the following:
- us: user space processes
- sy: system/kernel processes
- id: system idle time
- The remaining rows provide information on how memory and swap space is being utilized. The first of the two rows shows system memory utilization and the second is for swap utilization.
The lower section shows details of the top running processes. The larger your terminal window, the more processes top can display. Each row in the lower section represents a process. The top application’s screen refreshes approximately once a second. So the values displayed and the position a process occupies will shift with each refresh as it represents the state of the system at the time of the refresh.
The columns of information that is displayed by top are as follows:
- PID: Process ID number. When a process is started, it is given a unique PID that identifies that process to the system. If you ever need to kill a process, you can refer to the process by its PID.
- User: The user name of the process’s owner
- PR: The scheduling priority of the process
- NI: The process’s nice value.

- VIRT: Virtual memory
- RES: Resident, non-swapped physical memory
- SHR: Shared memory
- S: Process status
- D: Uninterruptible sleep (stuck waiting for input or output)
- R: Running (executing normally)
- S: Sleeping (waiting internally)
- T: Stopped by job control (stopped with a signal from the kernel)
- t: Stopped by debugger (another process has full control)
- Z: Zombie (completed processes that are not yet removed from the kernel's process table) - %CPU: The estimated percentage of CPU resources being consumed by the process
- %MEM: The percentage of physical memory being consumed by the process
- TIME+/–: The total CPU time the process has consumed since it started
- COMMAND: The name of the process
Be advised that there are many more features available in top. These features are seen by default. However, there is a lot of information it provides and it is in real time as long as top continues to run.
The ps Command
To extract more specific information about processes, you can use the ps command. This command has an extensive list of options that you can use to get information about processes. This section will cover some examples of what you can do with the ps command.
There are several ways to express options to the ps command, as follows:
- UNIX: Options can be grouped and must be preceded by a dash.
- BSD: Options can be grouped and must not be preceded by a dash.
- GNU: Long form where options are preceded by double dashes.
Because of this flexibility, it is possible to achieve the same result with the ps command several different ways. The methods can be mixed, but may conflict. If your output is not what you expect, it may be the result of a conflict.
By default, the ps command only lists processes that are associated with the user running the command. You can override this behavior with options to specify processes that are owned by specific users or all users.
An example of using the ps command in its simplest form is as follows:
 </li>
</li>
The example output above shows the processes that are owned by the user who executed the command. For each process, it shows the PID, the terminal that the process is running in, the CPU time that is being consumed by the process, and the name of the command.
To add more information about the processes that are returned by the command, add the –f option, which gives you full output.

Using the -f option added the following columns:
- UID: User ID of the owner of the process
- PPID: Parent Process ID. In addition to a unique process ID, each process is assigned a parent process ID (PPID) that tells which process started it. The PPID is the PID of the process’s parent. The init process (PID 1) is the parent of all processes without a parent process.
- C: CPU utilization percentage
- STIME: Process start time
To see the processes for all users, you can add the –e option. If you combine the –e and –f options, you get both the full set of columns and processes for all users. You can shorten the options by grouping them after the dash (-ef). An example in the command line is:

This example is using the UNIX style syntax for expressing options. The equivalent command using the BSD style would appear as follows:

Notice the absence of the dash. Also, this style includes a few more columns to correspond with BSD style output.
The output that either of these examples produces is rather lengthy, because essentially it lists all the processes for all users. However, you can filter the listing several ways. The first method is to include the –C option (upper case), followed by the name of the process you are interested in. For example, to list the processes that are associated with the SSH server, do the following:
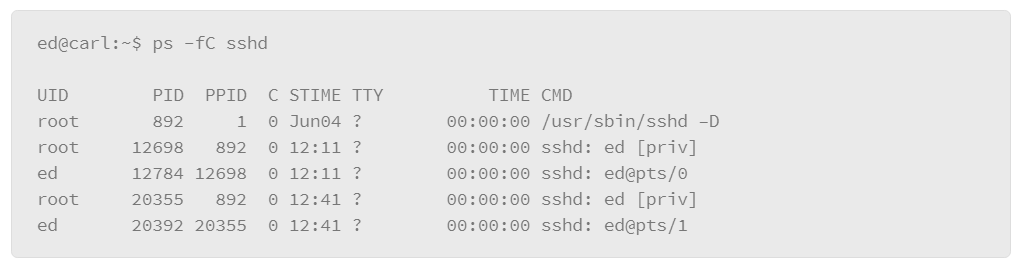
In the example, the –C option is grouped with the –f option, which produces the full output style, and filters the output to the processes that relate to the SSH service called “sshd.”
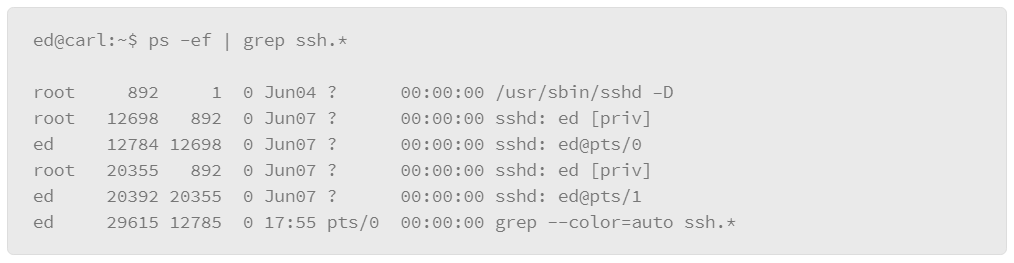
The disadvantage of this method is that it assumes that you know the precise name of the process that you are interested in. For more flexibility, you can pipe the output of the ps command to a grep filter. “grep” is a Linux command that you can use for filtering with wild card characters or regular expressions. The basic format of this usage is to pipe the output of the ps command to the grep command, where you can express the filter that you wish to apply, as in the following example:

In the example, -e lists every process and -f displays the output in the full format. Next is the vertical bar or pipe character, which passes the output of the ps command to the grep command, which contains the filter that you wish to apply. In the example, the filter is ssh.* which is expressed using a regular expression-style wildcard. The .* option means “any,” so it will match on any line of output from the ps command that contains the string ssh followed by any characters.
Displaying Open Files
Another tool that is useful when analyzing or troubleshooting a Linux-based system is to list the files that are currently open in the system, which includes files that a user may have open or files that a process may have open. Since Linux tends to treat everything as if it is a file, including devices, you will also be able to list things such as device file references, directories, and even network connections.
The primary tool for this purpose is the lsof command. This command contains an extensive list of options and it is common to most of the Unix and Unix-like operating systems. Therefore, some of the options may only work in certain environments. Also, the amount of information output from the lsof command can be extensive, so learning how to filter its output makes using it more useful.
In its most basic usage, the lsof command lists every open file. The amount of output could be overwhelming unless you are more specific about what to look for by applying options that target specific types of files or by file ownership.
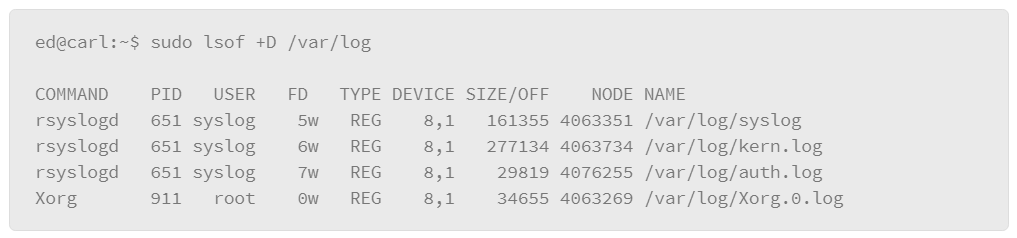
This example of lsof usage can be used to list the processes accessing a specific file. For example, if you want to know which processes are using the syslog file, you can apply the following command:

Some of the key features of this output include the following:
- Command: The name of the process using the file.
- PID: The process ID of the command using the file.
- User: The user running the process.
- FD: File descriptor: a reference number that is used by the kernel to identify an open file. File descriptors may be followed by a code letter to further describe the state of the file. In the example, the letter “w” indicates that the process has a write block on a portion of the file.
- Type: Identifies the type of file. For example, DIR represents a directory, inet is a network connection or BLK to represent a block device such as a disk drive. The example lists the type as REG which represents a regular file.
- Device: Device number that represents the device being called to perform the I/O.
- Size/Off: The file size or memory offset. The lsof command will display whichever one is appropriate for the file being listed.
- Node: The file’s INODE number, which is used to uniquely identify the file on the file system.
- Name: The path and file name
To list the processes that are accessing log files in a directory, you can use the +D option:
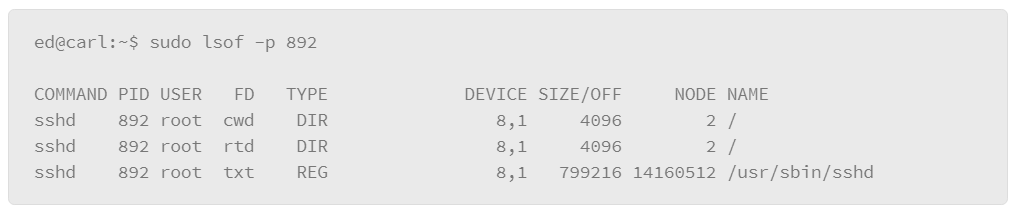
To find the files that a particular process has opened, you can use the –p option with the lsof command, which lets you specify a PID number as follows:
The lsof command can also be useful for tracking the state of network connections. For example, you can view the services that are listening for connections with the following command:
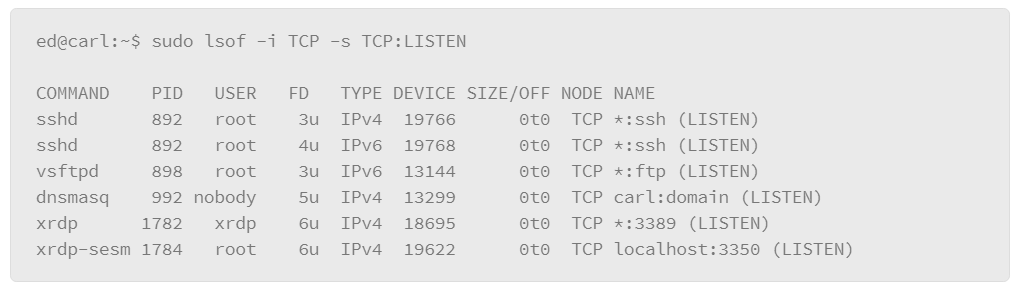
In this example, the output lists the commands for all the TCP services that are listening for connections, which is useful for determining if strange or unauthorized services are running on the host. The –i option is used to specify the network characteristics to output. Here, TCP filtered the output on only TCP-based services. The –s option lets you specify a protocol and the the protocol state that you want to output, where the protocol and state are separated by a colon (:). In the output, you can see the command and, at the end of each line, the host:service followed by the state: LISTEN.
A variation of this command allows you to show services with established connections as follows:
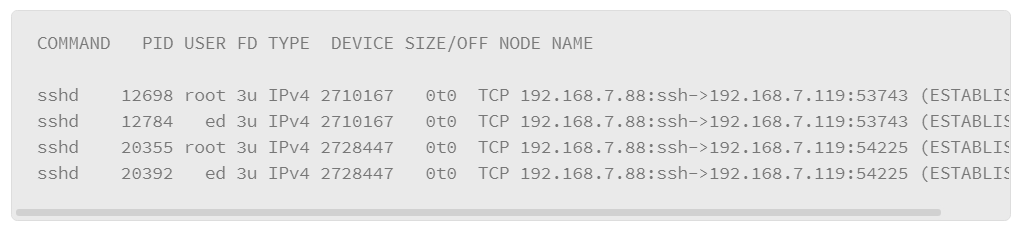
One of the key pieces of information that is produced by this implementation of the lsof command is that it shows the IP addresses and port numbers that are used by the hosts that have established connections.
Monitoring CPU and Memory Utilization
Monitoring system resource consumption can be a critical part of investigating a host. Excess resource consumption can be the result of many things and often it is symptomatic of an attack. For example, the compromised host may be sending out spam emails, or it may be the victim of a DoS attack.
The top command provides a lot of information regarding resource utilization in real time. The top command also lets you select specific processes to monitor, so you can gauge the resources that are consumed by that process. For example, you can add the –p parameter to specify the PID that you wish to monitor as follows:
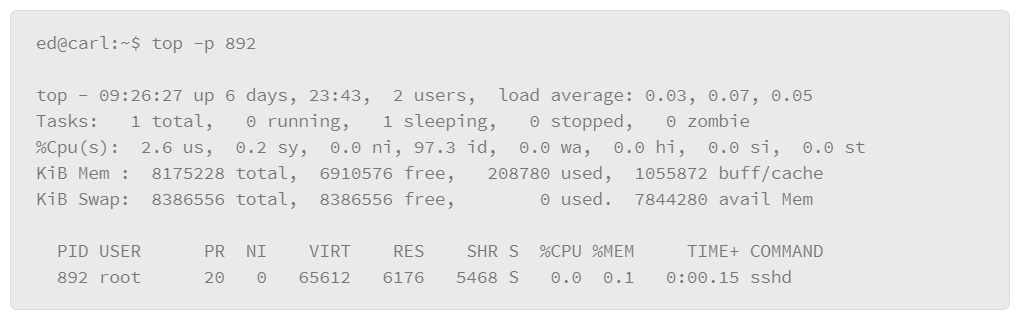
As you can see in the example, it produces the same output as the top command, except the process detail portion of the output is filtered down to the process that you specified in the command.
If you are not sure which PID you are interested in, you can find it with the pidof command, as follows:

In this example, the PID of the SSH service, sshd, returned five PIDs, which indicates that there are five instances of this process running on the host.
There are other tools to monitor resource utilization. Memory is an important resource so you may want to track how it is being utilized. One concern regarding memory is the impact that it has on the system when memory resources run low. Linux uses disk space as an extension of real memory by reaching out to the swap partition of the file system. The more the system has to reach out to the swap partition, the greater the impact on the system’s performance. Therefore, you may wish to monitor the processes that are reaching out to the swap space.
The ps command provides options that allow you to do just that. The –o option to the ps command lets you specify information that you want about a process, rather than outputting the standard set of information that it normally produces. In this example, request the number of major page faults with the maj_flt parameter in the –o option, as follows:

A major page fault happens when a process requests memory resources from the system and those resources are not available at the time of the request, which causes the system to reach out to the swap space so that it can get the resources that it needs. Page faults are not particularly unusual, but large numbers of them can be an indication of an under-resourced system, or a process behaving strangely. In the example, the process returned 11 major page faults, which may not be unusual for a long-running process.
For a broader view of memory utilization relative to swap activity, you can use the vmstat command. This command is similar to top, if a time parameter is added, it continues to run and produces output on the interval of time that is specified in seconds. In this example, run vmstat with a time parameter of 2 to indicate retrieval of current memory statistics every two seconds.
To exit the command, press <Ctrl+C>. This command produces a lot of output, the most relevant pieces should be the focus. The top row organizes the output into categories of information, and the second row outlines what each column represents regarding the category that it falls under. The categories are as follows:
- procs: Lists the number of processes in either a runnable state (r) or in uninterruptible sleep (b).
- memory
- swpd: Virtual memory used
- free: Available memory
- buff: The amount of memory that the kernel is using for buffering
- cache: The amount of memory that is reserved as cache - swap
- si: Swapped in
- so: Swapped out - io
- bi: Blocks that are received from block device
- bo: Blocks that are sent to block device - system
- in: Number of interrupts
- cs: Number of context switches - cpu
- us: CPU time spent processing non-kernel (user) processes
- sy: CPU time spent processing kernel processes
- id: CPU idle time
- wa: Time spent waiting for I/O
- st: Time that is stolen from virtual machine
Regarding swap usage in the example, the system has not used any, and there is a lot of available memory. Given the values in the remaining segments of the output, you can see that this system was not very busy at the time that the command was run.
Monitoring I/O
Another aspect of the system that you may wish to monitor is general I/O. A good tool to give you an idea of the amount of I/O taking place on a system is the iostat command. The iostat command is similar to vmstat in that you can pass it a time delay parameter in seconds or you can use it without the time delay to get a snapshot of current I/O activity. The following is an example of this command:
The upper portion of the output shows general CPU utilization statistics. The lower portion of the output lists the devices that are producing I/O and statistics that are related to the amount of I/O the device is producing. The tps column represents transfers per second. The remaining information simply displays reads and writes per second, and the amount of data that are read and written to the device.
Interacting with Linux
Linux Command Shell Concepts
The command shell in Linux provides a powerful environment for interacting with the operating system.
Environment Variables and Shell Variables
Linux provides mechanisms for creating variables that represent text strings you can access with the variable name rather than the string itself. A common use case for this functionality is to store file system locations that you can reference with the variable. In fact, one of the more important variables that you will encounter frequently as you interact with the shell is a variable that is called $PATH. This variable stores a list of the directories that the system searches when you execute a command.
To see the value that is associated with the $PATH variable, issue the following command:

The echo command prints some value to the screen. In this example, the value is the $PATH variable. The output that it produces is a colon (:) separated list of directories that are the locations searched for commands you wish to execute. If a command that you intend to execute is not in one of these directories, you must provide the path to the command when you execute it.
$PATH is an environment variable. Environment variables are available system wide. You can view all of the environment variables using the env command. Shell variables are only available in the current shell. You can create shell variables at any time as follows:

In the example, a shell variable named MYVAR is created and assigned the value abc123. Then, the echo command displays the value of the variable. You can see that it produced the text abc123, which corresponds to the value assigned to the variable. Note that when the variable is created, the name is specified to assign to the variable. When the variable is used, prepend the dollar sign symbol ($) to it as follows: $MYVAR.
$MYVAR is not available to other shells running on the same Linux system. It is only available to the shell under which it was defined. Shell variables can be made available to other shells, as environment variables, using the export command.
Creating variables is most often used in creating shell scripts, which are essentially sequences of commands that you can package into a text file and execute as if it were a command. As it pertains to normal interaction with the shell, it is important to know of the existence of variables. In particular, the $PATH variable is important to know because that will often determine how the shell goes about finding a command that you wish to execute.
General Command Structure
In general, when you execute system commands, you simply provide the name of the command at the shell prompt followed by any options that you wish to include with the command. System commands will normally reside in one of the directories that are specified in $PATH, so the shell should have no problems finding the command, unless you misspelled it.
Sometimes, you may want to build applications from its source code, or you may have downloaded an application that is already compiled. Then, when you attempt to execute the application from the command line, you may find that the system does not recognize the command, which can be particularly puzzling if you are in the directory the application resides in.
The reason may relate to the $PATH variable. If the command to start the application is not in $PATH, the system won’t find it, even if you are in the same directory as the command. To execute a command that is not in $PATH, you must provide the fully qualified path to the command when you execute it.
In situations where the location is the same directory as the command to execute, provide the self-referential directory path instead. The Linux file system contains two special directory references:
- . (single dot): Represents the current directory which is also known as a self-referential directory.
- .. (double dot): Represents the parent directory or the directory that is one level up from the current directory.
Therefore, if you downloaded the source code for an application into your home directory, and, after compiling it, you wish to execute it, you must include the self-referential directory in the command or the system will not find it, even though you are in the same directory, which is true because home directories are not in $PATH.
Consider the following example:

In the first attempt to run the command, the system reported that it could not find the command. In the second attempt, the self-referential directory followed by the slash to specify a path of the current directory. In this instance, the command executed successfully.
STDIN, STDOUT, and STDERR
An important concept behind the Linux shell is that Linux treats input to commands and output from commands as streams of data which also holds true for output that is produced by errors. The following structures define these streams:
- STDIN (0): Standard input which normally comes from your keyboard but can also come from a file
- STDOUT (1): Standard output which is normally directed to the display, but it can be directed to files, processes or directly to other devices
- STDERR (2): Standard error is usually reserved for output that is produced by error messages. Like STDOUT, it normally goes to the display but can be directed to other destinations such as files or devices. STDERR is typically used for debugging or troubleshooting.
To test STDIN, you can use the cat command. The cat command is used to display the contents of the file you specify as a parameter to the command. It dumps the contents of the file to STDOUT, which is the screen if you don’t direct the output elsewhere. If you don’t specify a file as the input source, the cat command takes its input from the default input device which is the keyboard. In this example, STDIN represents what you type at the keyboard:

In the example, the cat command is executed with no options. Then, the string test, and when the Enter key was pressed, the cat command sent the string that was entered into STDIN, to STDOUT. The process was repeated with the string 123.
Most commands like cat take a file as input. For example, to display the contents of a file that is called testfile.txt, issue the following command:

However, direct the contents of the file to the “cat” command using the STDIN directional operator, the less-than symbol, as follows:

Note that the command produces the same output. The only difference is that, instead of specifying the file as an option, the directional operator to direct the contents of the file to the command as its input source to demonstrate how to direct input to a command.
A command’s output can be directed. Use the echo command to demonstrate this functionality. The echo command normally echoes, or copies, the value specified as the command option to the screen. For example, echo the value of the $PATH environment variable to the screen, as follows:

However, rather than directing this output to the screen the way the echo command would normally work, you can direct the STDOUT to a file instead, using the greater-than symbol as follows:

Note that the command does not produce output to the screen. However, it did create a file that is called path.txt, in which the output that would normally be directed to the screen is placed, which is an example of changing or directing STDOUT to a file. To test, use the cat command to view the contents of the path.txt file, as follows:

The path.txt file contains the output from the echo $PATH command. One thing to note is that it is easy to overwrite this file. For example, issue the following command:

It writes over the path.txt file with the data that you specified in the echo command, as follows:

The previous data in path.txt was completely written over with no warning. This process is known as clobbering the file. However, you can use a variation of directing data through STDOUT to append, rather than overwrite, using the following syntax:

The example shows two consecutive greater-than symbols to append data to a file rather than overwriting the file which used the echo command to send another string of text to the file, and the operator appends the data. Then the result was tested with the cat command. The path.txt file now contains two lines: the original line of text (Test data) and the appended line (More test data).
The last example demonstrates how to work with STDERR. STDERR also streams output by default to the display, but it does so over a different channel than STDOUT. It is possible to direct output to SDTOUT, but still get a message in the display from STDERR. For example:

In the example, use the ls command to display the details of the abc123.txt file and direct the output of the command to the output.txt file. The problem is that the abc123.txt file does not exist in the directory in which the command was executed, so it creates an empty output.txt file.
Even though the output of the command was directed to the output.txt file, a message was sent to the display. This message did not come from STDOUT—it actually came from STDERR because it was not specified where to send the STDERR message, it went to its default destination, which is the display.
There are a couple of ways that you can manage this problem. One way is to simply discard the message if it is not important to you, as follows:

In this example, a second directional operator was added with the number 2 in front of it. The number 2 references the STDERR stream. After the directional operator, the output was discarded to a device called /dev/null which is an empty device that is not capable of holding any data, and effectively discards anything that is put into it. As you can see from the example, the error message is no longer output to the display, because it was discarded it to /dev/null.
However, messages that are produced by STDERR could be used to troubleshoot a problem. So, rather than discarding the data, you could direct STDERR messages to some other file that you can reference later to see if something did not work properly. The following is an example of how you can configure such an outcome:

In this example, the STDERR was output to a file called errors.txt. Then, the result was tested with the cat command and the STDERR output was successfully directed to the file. The only problem with doing it this way is that the next time, the STDERR message will overwrite the file with the latest output. To prevent that, you can use the double greater-than symbol to append error messages to the file, rather than overwriting it every time, as follows:

In the example, note the use of the double greater-than symbol (»). Also, when the cat command was used to display the contents of the errors.txt file, it contains two lines of STDERR data to show that data was appended to the file, rather than overwriting the file.
Piping Command Output
In addition to directing output, input, and error streams to and from commands, you can send the output of one command to another command which is a process that is known as piping. An example follows:
In the example, the output was piped out of the ps command to the grep command, which is a technique that is frequently used to filter lengthy output from a command through a grep filter. The vertical bar (|) between the ps command and the grep command is known as the “pipe” character. The pipe character instructs the ps command to send its output to the grep command, rather than showing the output in STDOUT. Then, the grep command processes each line of output from the ps command, and sends any line of output that matches the grep filter to STDOUT. In this example, the grep filter is the ssh string, so that any line that contains that string gets sent to STDOUT.
You can pipe any number of commands together in this manner. In the example below, a second pipe is added to the sort command which will sort the output alphabetically.
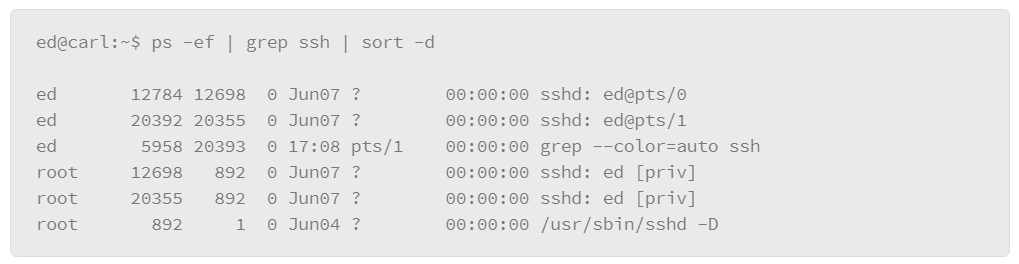
Running Multiple Commands
Another feature of the Linux shell is the ability to run multiple commands in a single command line. This feature differs from piping in that piping moves the output of the first command to be processed by the next and so on.
An example of how you might use this capability would be when you compile applications in Linux. Applications in Linux are often delivered as source code, which means that before you can use them, they must be compiled. There are three commands that are frequently used in this process. You can execute each one individually or, you can use the following format to execute them sequentially from a single command line:

The double ampersand symbols (&&) between each command signals the shell to execute the next command when the previous one finishes processing. As long as you don’t encounter an error, the shell will simply process each command in the sequence that is listed in the command line.
Other Useful Command Line Tools
Beyond the set of regular system commands, Linux makes many tools available for you to manipulate data making the Linux shell a powerful environment to operate in.
The history command
When you use the shell in Linux, it keeps track of all the commands that you issue during your session with the shell, which is known as the history, and can be particularly useful in that you cannot only view a list of previously executed commands, you can also execute them again by referencing their position in the list rather than re-entering the entire command. Note that if you open multiple command line shells, each one tracks history separately. So, you will not be able to reference the commands that are executed from a different session unless you re-enter the session.
To view the command history, enter the history command at the command prompt, as follows:
As you can see from the numbered lines in the output, the history is rather lengthy. If you wish to work with all the entries in the list, you can pipe the output to a text-viewing application such as less. The less command opens a file and allows you to scroll through it or run searches for content from within the application. But it does not allow you to alter the file—you can only view it.
When you execute the command in this example, the full text of the history gets piped to less, which allows you to scroll up or down through the output by using the arrow keys, move forward one page by pressing the f key, or move backwards one page by pressing the b key. You can also search for text by pressing the forward slash (/) key and entering the search term. To exit, press the letter q, which is the command to quit the less application.
With the history capability of the shell, you can easily execute a command that you executed previously by entering an exclamation point (!) at the command prompt, followed by the number of the command in the history list.
Consider the following output from the history command:
If you wish to run the tcpdump command that is found in line 735, without re-entering the entire command, enter the following at the command prompt and it will execute as if you had entered the entire command:
The output indicates that the shell correctly copied the command at position 735 in the history, and printed it in the line that follows the command. Since the command starts with sudo, you are prompted for a password. After entering the password, the command executes as if you had typed it in its entirety. The entry at the end that contains ^C (Ctrl + c) is used to break out of the tcpdump command, which could save time, especially if you are working with lengthy commands.
You may need to repeat a command as you operate the command shell. Another capability of history is the ability to repeat the previous command by entering two exclamation points (!!). For example, if you want to repeat the tcpdump command from the previous example, rather than referencing it by the number it occupies in the history list (!735), simply enter the double exclamation points since it was the last command that you ran, as follows:
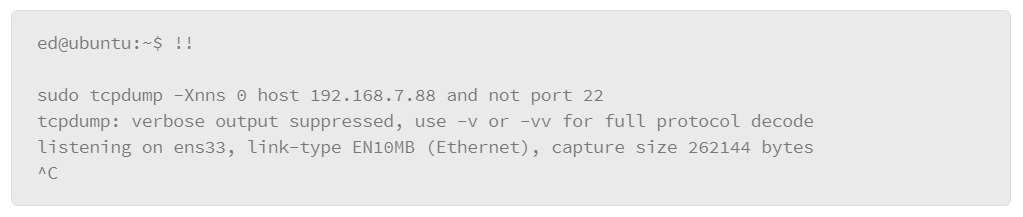
After entering the double exclamation points, the correct command is repeated in the line that follows. ^C is entered by the user to break out of the tcpdump command.
You can further extend the functionality of the double exclamation point to add text in front of a command, which can be particularly useful in situation where you forgot to precede a command with sudo. Simply enter the string followed by the double exclamation points, which has the effect of auto-filling the rest of the command after the string.
To illustrate, attempt to read a file where only root has write access as a regular user as follows:

In the example, the user tried to display the contents of the host’s SSH RSA key file. However, the user did not have permission to view the file and was denied access. To overcome, do the following:
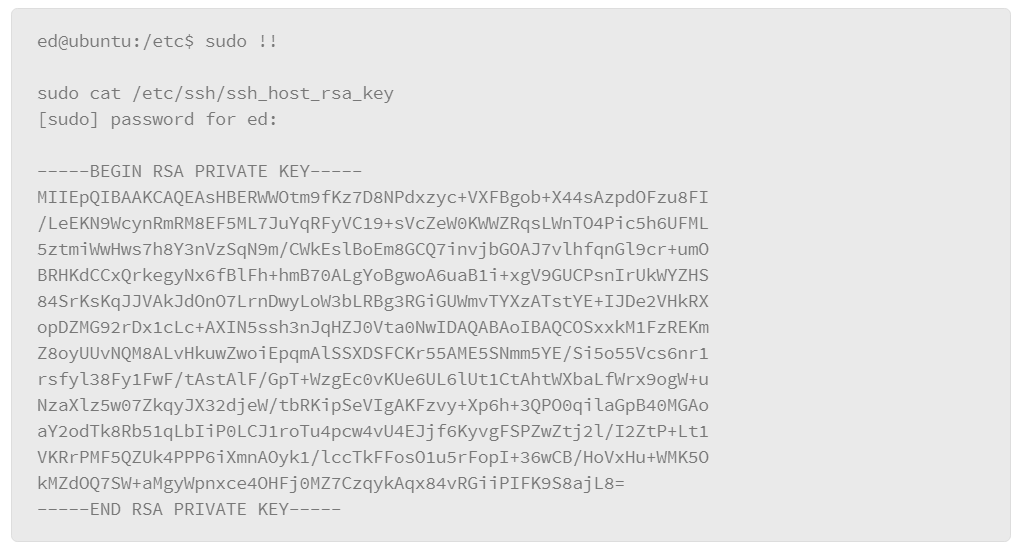
Insert the sudo command at the command prompt, followed by the double exclamation points, which has the effect of adding the previous command after the sudo command without having to manually type the whole thing. When the command is executed, a prompt for the user’s password is seen, the same way that is seen when using sudo. Then, the command was allowed to execute with the elevated privileges.
The history command provides many other features that may be found useful to make the shell environment easier to use. Review other features of the history command to fully benefit from its other options.
The awk command
awk is a powerful text processing tool that ships with the Linux operating system. It is actually a text processing language unto itself. It can be utilized in several ways, such as awk can take its input from files, STDIN, or even devices. The basic workflow is as follows:
- Read a line of input. Lines are typically terminated with newline characters. When awk encounters a newline character, that signals the end of the line.
- Execute commands on the line.
- Move on to the next line if it has not reached the end of the file.
awk is mostly used as a data extraction tool or a reporting tool. Ideally, the data that is fed into awk should be consistently formatted, such as a tabular data file or a comma- separated file, where each column represents a standard field. When awk reads a line of data, it will attempt to parse the line into fields. By default, spaces are used as field separators, but, you can specify other characters to act as separators, such as commas.
The sed command
The sed command, like awk, is a very powerful tool that is implemented in Linux. It is a language unto itself, but can also be used from the command line.
The sed command is a stream editing tool that performs the action you configure on lines of text that are read in from files or STDIN. Lines are determined when sed encounters a newline character. One of the most common uses of sed is to perform string substitutions. The general syntax of the sed command is as follows:

This example represents a very basic syntax structure for performing substitutions. It starts with the sed command followed by the –e option, which instructs sed to execute the command string that follows. The command string is enclosed in single quotes and begins with the letter s, which is the command to perform a substitution. Next, specify the string that you want to look for (it could be expressed as a text string or regular expression), followed by what you want to change it to. The last section represents options that you can apply to the command. An example of an option would be to include the letter g, which means replace all instances of the input pattern that occur in the line of input. If you do not specify an option, only the first instance of the input pattern is replaced.
The following example illustrates how to implement sed for simple text substitution:

The echo command produced the word left. But rather than sending the output of echo to STDOUT, it was piped to the sed command, which is configured to look for the string left and replace it with the string right. In the line that follows the command, the resulting string is right.
In this next example, use sed to normalize a file. The file names.txt contains the following:

The goal list is to normalize the instances of mr., so that they all appear with an upper case M. Use sed in the following manner:

In this example, use sed to read in the names.txt file. The input pattern uses a regular expression to look for the letter m, in either upper or lower case, followed by the letter r. Once found, it replaces the string with Mr. When the command executes, each line now begins with Mr., rather than in mixed case as it was before running the file through sed, which will only output the changes to STDOUT. To actually modify the original file, you could redirect the output to a file, as follows:
Another way to use sed is to delete lines from an input source that match criteria that you specify. For example, you can explicitly state which lines to remove, as follows:

Or, you can delete a range of lines as follows:

Another alternative is to use a search pattern to delete lines as follows:

This example looks for lines that contain the string mr in lower case and deletes them. You can see from the output, the only line that remains is the one that starts with “Mr.”
The caret (^) is a meta character that represents the beginning of the line, and the dollar sign symbol ($) is a meta character that represents the end of the line. Since there is nothing between the two, it is effectively looking for a blank line.
sed is a very powerful tool with many more features. It would be worthwhile to do further research into sed to fully benefit from the capabilities of this tool.
The vi command
One task that you may find yourself doing frequently in the command shell is editing text files. Linux ships with several options for text editing applications, but options differ from one Linux distribution to another. Also, many distributions that are built to be used as server platforms may not even ship with a graphical user interface. Therefore, everything you do to manage these installations must be done from the command line. One is common to virtually every Linux and Unix installation, and it is known as vi.
The vi application was devised as a full screen visual interface to line-oriented text editors that were commonly used in the early days of Unix. A primary reason for its early adoption was that it shipped for free, where other text-editing applications of the day were commercial.
Despite its long history and wide adoption, vi has a reputation for being somewhat cumbersome to use. However, every Linux administrator should be familiar with how it works, because there may be instances when you need to perform remote administration tasks from a shell without benefit of modern graphical text editing tools. The ubiquitous vi is present in virtually every Unix and Linux-based system.
The screen layout is very simple, consisting of the main panel for text entry and viewing text, and a status area along the bottom. vi can operate in two modes. The first mode is the command mode, and it is the mode that you are in when you first enter the application. In command mode, keystrokes represent commands to do various things within the application. The other mode of operation is the insert mode, where you can enter and edit text. To access insert mode, you must first be in command mode. From command mode, simply press the letter i to enter insert mode. While you are in insert mode, you will see the term Insert displayed in the status area at the bottom of the screen.
When you are in insert mode, you can begin entering text. When you finish making edits, press Esc to exit insert mode and return to command mode. From command mode, you can save or write your edits to the file, or you can quit.
To write your edits, press the colon (:) key which will display a colon in the far left portion of the status area. Then, you can enter the letter w, which is the write command, followed by the Enter key.
To quit the application, you must be in command mode and press the colon (:) key. At the colon character that is displayed along the left-most portion of the status bar, enter the letter q which represents the quit command. If you made changes to the file and attempt to quit, vi will warn you and give you an opportunity to save your edits. However, if you want to discard any changes that you made to the file and exit out of the application, press the colon (:) key, followed by the letter q to quit, and an exclamation point (!) to override the warning message.
To save your edits, issue the write and quit commands in the same sequence by entering : + w + q. The list below outlines the commands that are described. Keep in mind that these commands must all be issued from command mode:
- i: Enter Insert mode. Press Esc to exit Insert mode and return to command mode.
- :w: Write your changes to the file.
- :q: Quit vi. If edits are pending, you will get a warning to let you know.
- :q!: Quit without saving which exits the application immediately and any pending edits are lost.
- :wq: Write edits to the file and quit the application.
Some common text editing tasks that you may need to perform in vi include the following:
- Deleting characters: In command mode, you can move the cursor on the character that you wish to delete and press the x key. Note that your keyboard settings may allow you to delete text in insert mode with the Delete key as well. Other variations of the delete command are as follows:
- dd: Delete the entire line
- dw: Delete everything starting from the location of the cursor to the end of the word
- ndw: Delete the number of words that are specified by n - Copy/paste: In vi, these commands are known as Yank (copy) and Put (paste). Deleting text is the same as Cut. The text is retained in a buffer so that you can use the paste command to place it somewhere else in the file.
- yw: Yank a word.
- nyw: Yank n number of words.
- yy: Yank a line.
- p: Put yanked or deleted text starting from the current location of the cursor. Yanked lines are placed in the line after the current location of the cursor. - Navigation: There are various commands that you can issue in command mode to get around a document. Depending on your keyboard settings, you may be able to use the arrow keys and other keys in insert mode that are typically supported in many applications. However, the commands described here work universally.
- h: One character to the left.
- j: Down one line.
- k: Up one line.
- l: One character to the right.
- w: Forward one word.
- b: Backward one word.
- $: Move to the end of the line.
- ^: Move to the beginning of the line.
- gg: Move to the beginning of the file.
- G: Move to the end of the file.
- nG: Move to the line number specified by n. - Entering insert mode: In insert mode, you can enter or edit text in vi. You can exit insert mode to return to command mode by pressing Esc. The following list outlines several methods for entering insert mode.
- i: Insert text where the cursor is currently located.
- a: Insert text immediately after the cursor location. This option is useful in situations where you want to append text to the end of a line.
- o: Insert line after the current line.
- O: insert line before the current line. - /search pattern: In command mode, enter the forward slash character followed by the search pattern. When vi finds the string, it stops at that location and highlights the string.
- n or N: Lower case n moves to the next occurrence of the search string. Upper case N moves to the previous occurrence of the search string.
- :s/search pattern/replacement text/g: This command performs a search and replace operation. It begins with :s followed by the forward slash and the search pattern. The next portion of the command begins with another forward slash followed by the replacement string. The last part of the command is optional. In the example, you see forward slash and the letter g which instructs the command to replace every instance of the search pattern in the file.
There are many more features of the vi tool, but the set that is described here is the most commonly used set to edit files.
Overview of Secure Shell Protocol
One skill that beginning Linux administrators must master is the ability to remotely access other hosts over the network, so that you can remotely investigate, troubleshoot, or administer hosts that are not physically in your presence. In the past, the tool that is most frequently used was known as Telnet. However, in most modern implementations of Linux, telnet services are either not installed or not enabled, largely because telnet is natively a clear-text protocol that poses some significant security risks. Today, the preferred tool is SSH, which allows you to access a shell on a remote host over an encrypted channel, mitigating the risk of third-parties eavesdropping on communications to remote hosts.
SSH is a tool that allows access a shell on a remote host, using current credentials to the remote host. SSH communications take place over securely encrypted channels so that a third party that is monitoring an SSH session cannot see the data that is transacted over the life of the session.
To use SSH, you must use an SSH client to communicate with an SSH server. The remote host, the server, authenticates itself to the client with public key cryptography. Once authenticated, the user on the client side can log in to the remote host with login credentials recognized by the remote host. Alternatively, users can generate their own public/private key pairs and distribute their public keys to the hosts that they wish to access which serves as a user authenticating mechanism. Thus the user can access the host without having to log in.
SSH can be used for other purposes as well. For example, it can be used to tunnel non-encrypted protocols over SSH. Protocols that normally operate in clear-text can be protected by the SSH-encrypted tunnel, protecting the clear-text protocol.
This topic describes the most basic use case for SSH, which is to remotely access hosts over a network. The basic syntax for using the SSH client is as follows:

Some SSH clients assume that you are logging in with the same user account as the one you are running the client from. If so, you can omit the username portion and enter the remote host name or IP address. However, if you are using a different set of login credentials on the remote host, you must specify the username.
Upon issuing the SSH command, you are prompted for the password of the user account on the remote system. If the credentials are valid, you are presented with any system messages, followed by the command shell prompt of the remote host. From here, execute commands as if operating the remote host from a local console.
To exit the session, you can issue the exit command, which closes the SSH session and returns you to the command shell on the local host.
Note that the first login to a host will present a message that is essentially asking to accept the public key of the remote host.

If you trust the remote host, enter yes (must be the full word) at the Are you sure… prompt. After you enter yes, you will see a warning informing you that the host was permanently added to the list of known hosts. From this point forward, no other host can masquerade as the remote host because the public key will not match. Therefore, you are protected from a rogue host that is trying to impersonate a trusted host.
This protection against an attacker intercepting your connection comes at a cost. On the first connection to a new host, you must independently verify that the host key fingerprint in the prompt above is valid. Ideally, you would have physical access to the remote system, or contact with an administrator who does, to verify this key. Alternatively, you could connect to the host using an already-trusted connection. If you skip this crucial step, an attacker who is able to intercept your first connection could continue to do so indefinitely.
For example, you or a trusted remote administrator, could run the following command on the remote system to view the SSH host key fingerprint:

Once you confirm the host key in the prompt above, it is saved in your home folder at ~.ssh/known_hosts. This file is read by SSH before asking for your user name or password.
Assume that you had previously used SSH to connect the host at the IP address 192.168.7.141, but the host has since been replaced by a different host under the same IP address. The keys of the new host would be different than the original host. So when you attempt to communicate with the new host, you will get a warning because the keys don’t match and it could indicate that someone is trying to impersonate the original host:
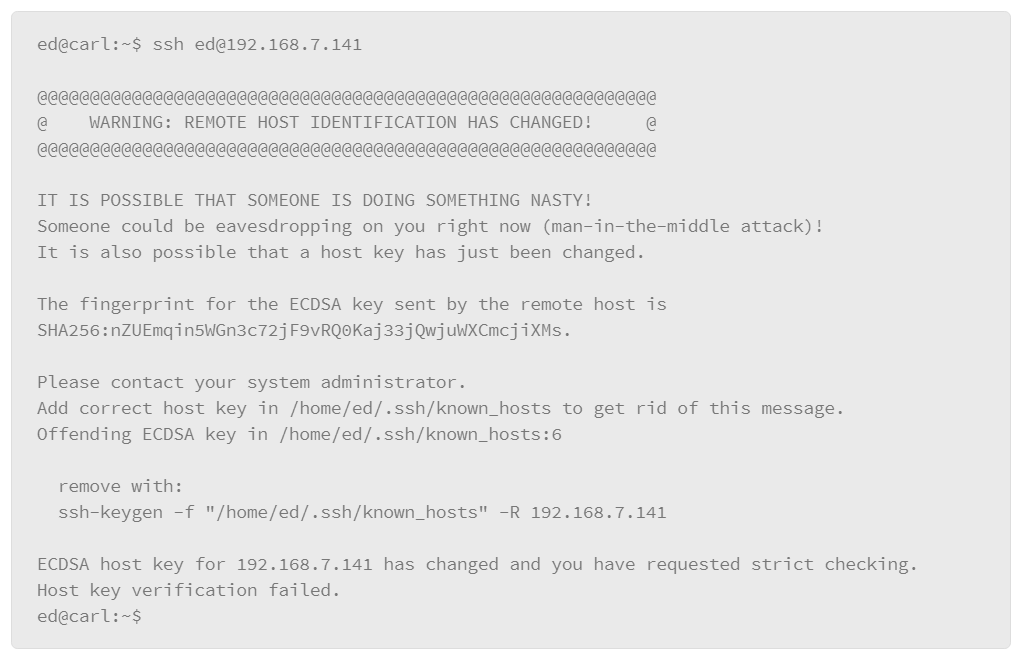
The message clearly indicates the potential for a malicious situation. However, if you are aware of the change and trust the new host, the message also provides an example of how to remove the entry in your ~/.ssh/known_hosts file using the ssh-keygen command. The next time that you make the connection, SSH will ask you to verify the new host key fingerprint, as if it had never connected.
Securely Copying Files Between Hosts
There are many options for copying files between hosts, but many available options use clear-text protocols, which could potentially expose your activity to eavesdropping. The best option is to leverage the SCP to securely copy files between systems.
SCP uses the SSH protocol to encrypt the session, protecting the transfer of user credentials and file data. SCP is a good, secure option for copying files between hosts. SCP can be used to copy files both to and from remote hosts. To copy a file from the local system to a remote system:

Similarly, to copy a file from a remote system to the local system, we swap the parameters:

Use relative path references and wild card characters if you wish. You can change the file’s name by providing a different one in the destination path. If you don’t specify a destination file name, the file retains the original name. Lastly, you must know the login credentials on the remote host because you will be prompted for the password before you are allowed to copy files to the remote host.
Like SSH, the first-time communication with the remote host prompts for acceptance of its public key. To proceed, respond yes at the prompt, and if you provide the correct login credentials, the system will proceed with the copy. When the copy is complete, it will report 100% in the progress column along with other statistics of the copy performance, such as the size of the file and the bytes/second. Note the format of the destination. When the user is authenticated, it uses the user’s home directory as the starting point for where to place the file. In the example, the dot is used, which is the self-referential directory. In other words, place the file in the current directory, which is the home directory for the user. You can use relative directory references knowing that the starting point is the remote user’s home directory, or you can use fully qualified directory references, provided the user has permission to write to the directory.
Networking
Linux provides a very robust networking environment. It was built from the ground up with connectivity and networking in mind. It provides a rich set of tools and features for managing virtually every aspect of networking and connectivity configuration.
Viewing Basic Network Properties
One of the most important commands relative to checking your network properties is the ifconfig command. This tool gives you a lot of information about the state of your network interfaces and their configurations. The ifconfig command accepts many options, but with the syntax shown in the following example, a lot of information is retrieved about the interfaces in the installation:
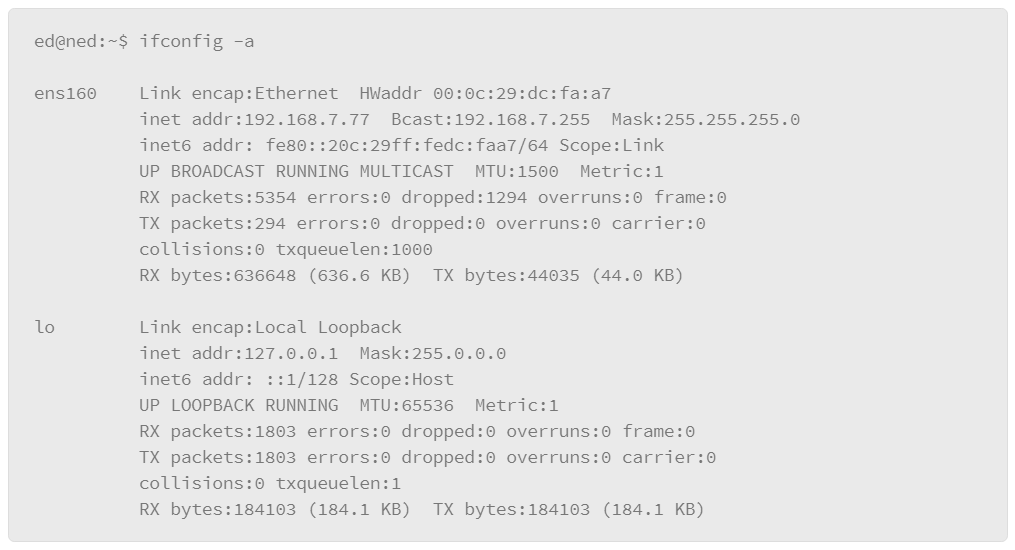
The –a option instructs the system to output information on all the interfaces even if they are down. Each entry begins with the name of the interface. In the example, the first interface is called ens160, and the second interface is called lo, also known as the loopback interface. The first line in the details portion of the entry shows the hardware address (for example, the MAC address) of the interface. The next lines show the IP address information that is associated with the interface which includes the following:
- IPv4 IP address
- Broadcast address
- Subnet mask
- IPv6 IP address
After the IP address information, it displays information regarding the state of the interface. If you see the word UP at the beginning of this section, the interface is able to send and receive IP traffic. The remainder of the feedback gives you statistics about packets that are received and transmitted.
The ifconfig command tells you a lot about the state of your network interfaces and their configurations. You can get information on a specific interface by specifying the interface name in the command.
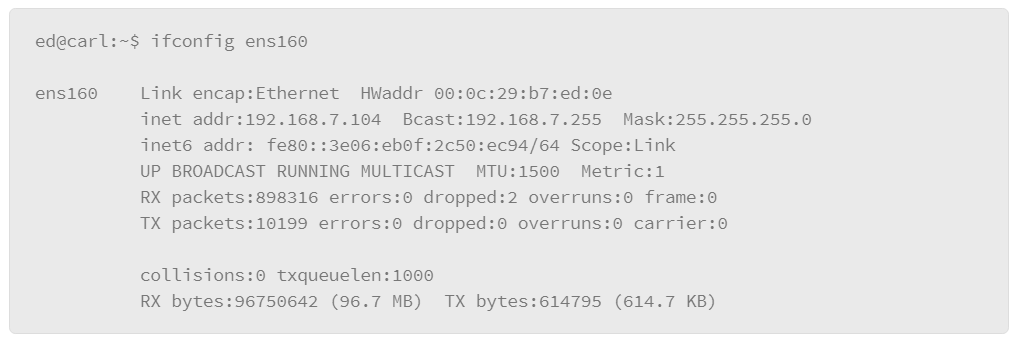
Configuring Network Properties
Some server-based installations may not have a GUI installed, so you will have to perform network configuration from the command line, or you may be remotely connected to a host to perform administrative tasks on the host. In these scenarios, it is important to read the documentation that is associated with that Linux distribution to learn about specific commands, processes, and files that are used for network configuration.
Configuring Basic Properties (IP, Subnet Mask, Gateway)
One task that may need to be performed is to set the IP address of a network interface. Use the ifconfig command, as follows:
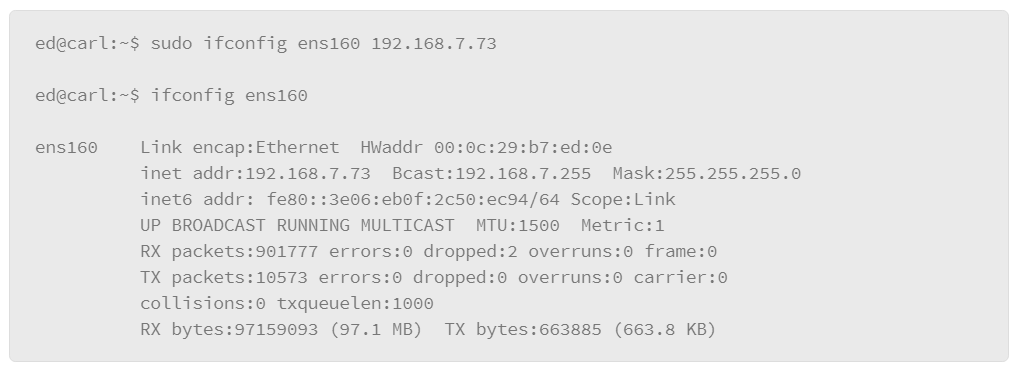
In the example, the ifconfig command was used to set the IP address for the ens160 interface. The configuration was tested with ifconfig to report on its settings. As the feedback from the command illustrates, the interface now has the IP address that was assigned.
You could also include options to set the netmask and broadcast address as well. The example below shows the command with all the options to set IP address properties to the interface:

Viewing and Configuring Routes
Another important networking property to consider is the routing configuration, which includes setting the default route, also known as the default gateway, and static routes if they are needed. Use the netstat command. To view the routing table with netstat, you would configure it as follows:
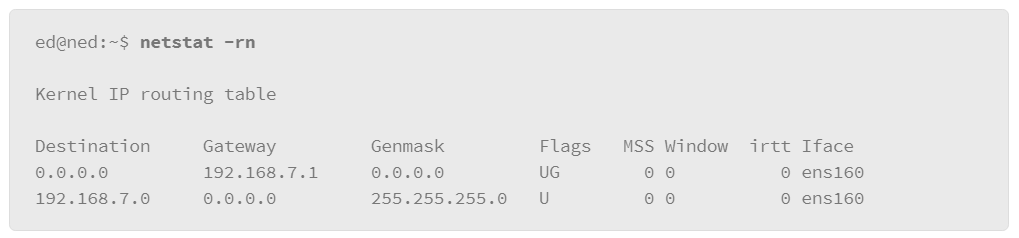
The netstat command with the –rn options as shown displays the routing table with numeric IP addresses. If you prefer to see host names, you can remove the n option.
Of the routes that are listed, the first one represents the default route. The IP address 0.0.0.0 with a netmask of 0.0.0.0 represents any IP address. The gateway value represents where to send traffic with destinations that are not known to the device.
The second route represents a static route for the local network. So, any traffic with a destination of 192.168.7.0/24 is not sent to a gateway. Rather, it is transmitted to hosts in the local network segment.
In a new installation, you may need to set the default gateway. The syntax for doing so is as follows:

The term “default” in the example represents the 0.0.0.0 IP address, and the gw option followed by an IP address is the gateway.
If you need to statically set a route to a network, you can set up the route command as follows:
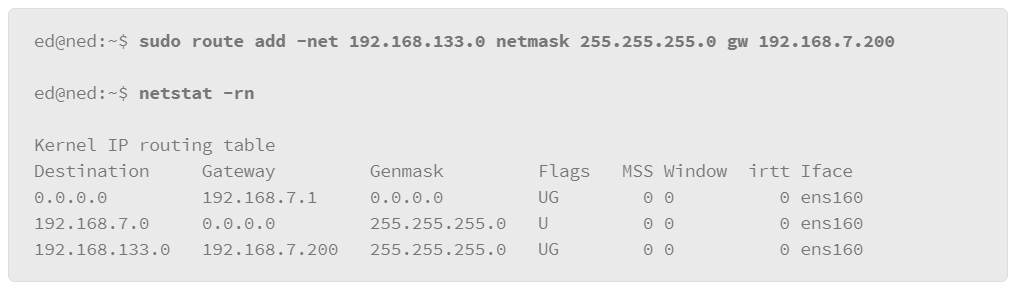
The structure of the route command for entering the static route is as follows:
- route: The route command
- add: The option to indicate that you wish to add a route
- -net: The option to indicate that the destination of the route is a network
- 192.168.133.0: The IP address of the destination network
- netmask 255.255.255.0: The netmask value for the destination network
- gw 192.168.7.200: The gateway IP address of where to send traffic that is destined for the 192.168.133.0 network
After issuing the command, the netstat command was used to list the routes and confirm that the new route was added. As the command feedback indicates, the addition of the new route was successful.
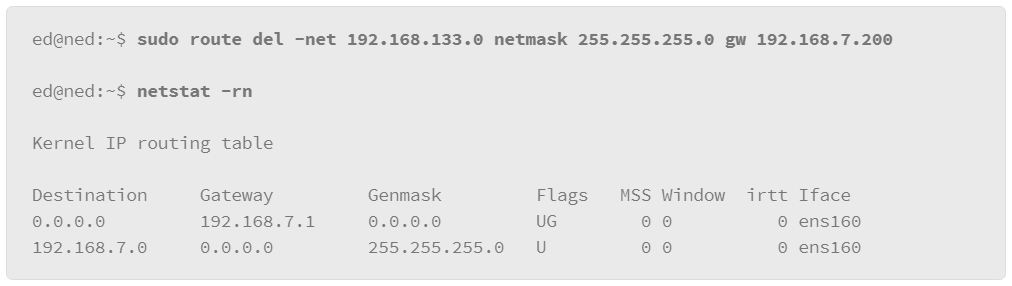
In the example, the route created previously was deleted. It is essentially the same syntax as adding a route, the keyword del was used instead of add. After issuing the command, the netstat command was used to confirm that the route no longer exists.
Managing Services in SysV Environments
Often, when you make a change to service configurations, you will need to stop and start the service so the updated configurations can be read and implemented by the operating system. This process is known as “bouncing” the service.
Most modern implementations of Linux use systemd to manage services. Bouncing a service in systemd-based installations only requires you to know the name of the service. Use the service command, followed by the name of the service that you want to manage and the command that you wish to perform on the service. For example:
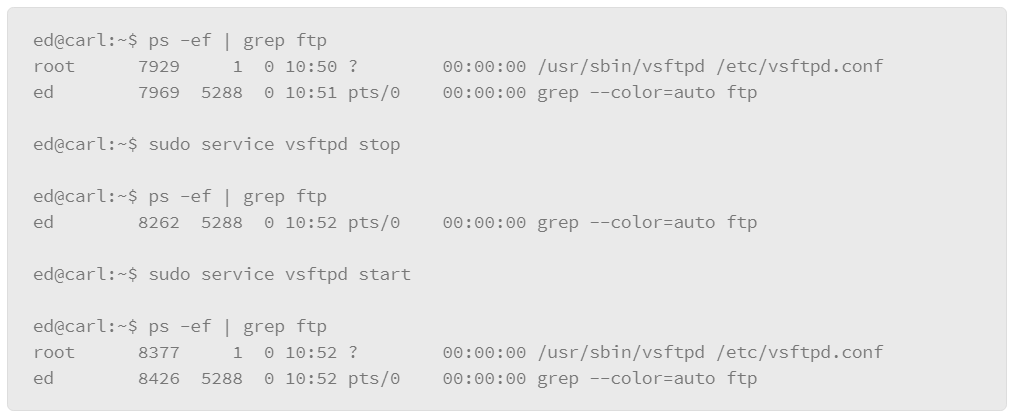
In the example, use the ps command to confirm that the FTP service is running. It also shows that the name of the service is vsftpd. Next, use the service command to stop the service. Stopping and starting services requires super user privileges, use the sudo command to perform this action. Then, use ps again to confirm that the service is no longer running. Lastly, start the vsftpd service and follow that up with another ps command to confirm that it is running again.
The syntax for the service command is as follows:

Basically, after you provide the service name, you can choose to start, stop, or restart the service.
Linux installations that do not use systemd will use traditional startup scripts. The exact location of these scripts may vary from one Linux distribution to another, but they will always be found somewhere under the /etc directory. For example, in debian-based Linux installations, startup scripts are in /etc/init.d. Listing the files in this directory shows you the startup scripts for the services that are installed on your system.
Note that systems that use systemd to manage services still include this directory for backward compatibility. To bounce a service the traditional way, you can either point to the service startup script with its fully qualified path or use the ./ notation from within the directory as follows:

This method also requires super user permissions. Thus the inclusion of sudo in the restart command.
Systemd Service Manager
Systemd is rapidly becoming the standard for system initialization and system management. You can use systemd commands to perform various system administration actions that are traditionally managed by specific Linux commands and tools. The systemctl command allows you to manage many systems functions including stopping and starting services.
Systemd manages elements that are known as “units.” There are various unit types that are recognized by systemd. Services are a type of unit that systemd can manage. Units are defined by files that contain the properties that are required by systemd to manage the unit. The file name contains the name of the unit, followed by an extension that represents the unit type. For example, the vsftpd service would appear as follows:

Unit file locations can vary from one Linux distribution to another, but a common location for systemd unit files is as follows:

You can use the systemctl command to manage units. The location of the unit files is defined in the systemd configuration, so that referencing its path when managing a unit is not required. When you use the systemctl command to manage a service unit, the .service extension is not required either. So, the basic syntax for managing a service is as follows:

The following examples are some systemctl commands that you can use to manage services. Note that service management requires root-level privilege, so each example begins with the sudo command:
- sudo systemctl start vsftpd: Starts the VS FTP daemon
- sudo systemctl stop vsftpd: Stops the VS FTP daemon
- sudo systemctl restart vsftpd: Restarts the VS FTP daemon
Another benefit of systemd for system management is the ability to use the systemctl command to reload service configurations without having to stop the service. See the examples that follow:
- sudo systemctl reload vsftpd: Reloads the VS FTP daemon configuration files without stopping the service
- sudo systemctl daemon-reload: Reloads the systemd configuration and dependencies without stopping the services that systemd is managing

Viewing Running Network Services
To track the services running in your Linux installation, you should familiarize yourself with several tools. The primary command for listing running network services is the netstat command, which prints information about connections that are made to network services. A network service is a daemon or background process that listens on a port for network connections from other hosts. The basic syntax of the netstat command is as follows:

There are many parameters that you can use with the netstat command. The following list shows some of the most common options. Also note that to get the maximum amount of information back from the netstat command, you should run it with root privileges, so these examples will include the sudo command.
- netstat –a46: Shows information about connections to services in any (-a) connection state over IPv4 (-4) and IPv6 (-6).
- netstat –lt: Shows information about TCP (-t) connections in the listen (-l) state. In other words, no connection; the port is simply listening for connections. If a service is listening for a TCP connection, this command will show it.
- netstat –lun: Shows information about UDP (-u) connections in the listen (-l) state. In other words, no connection; the port is simply listening for connections. The –n parameter is used to display host and port information in a numeric format rather than symbolic format in which hosts are shown as host names and ports with protocol names for known ports.
- sudo netstat –atnp: Shows information about TCP (-t) connections in any (-a) state. The –n parameter is used to display host and port information in a numeric format rather than symbolic format in which hosts are shown as host names and ports with protocol names for known ports. Lastly, the –p parameter shows the program name and PID of the process listening on the port.
The following is an example of the output that is produced by the netstat command:
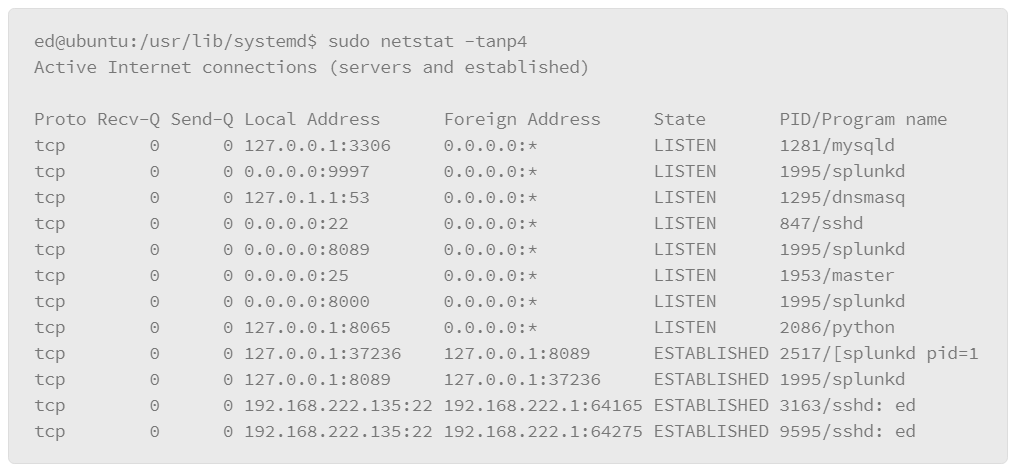
The command output displays the following columns of information:
- Proto: Displays the protocol. In the example, note that they all show TCP as the protocol since the –t parameter was used in the command.
- Recv-Q / Send-Q: Number of bytes sent or received not yet processed. These columns normally read 0. Bytes held in the queue mean that one side of the connection has not processed all the data that are sent which could indicate a problem if it persists.
- Local address: The IP address and port of a service running on the local host. On a host with multiple IP addresses and interfaces, various addresses will be listed. Some connections will be listed as "127.0.0.1," meaning that they only accept connections from local processes—a remote machine cannot connect to these ports. A list containing "0.0.0.0" is accepting connections on all IP addresses and interfaces.
- Foreign address: The IP address and port of a remote host communicating with a service on the local host. If this column reads "0.0.0.0:," it is because the port is listening for connections.
- State: Lists the connection state. In the example, you see both LISTEN and ESTABLISHED due to the use of the –a (all states) parameter in the command.
- PID program name: Lists the PID and the name of the process running on the port. This information is displayed in the example due to the use of the –p (program) parameter in the command.
Viewing Connection Status
Connection states can indicate if services are listening, in which case the status will say LISTEN; or have an active connection, in which case the status will say ESTABLISHED. There are other states that you may see depending on whether a connection was in the process of being established when you ran the command. In this case, you may see SYN_SENT reported as the connection state. Or, if the connection was in the process of being closed, you may see a state of CLOSED, or CLOSE_WAIT to indicate that one side of the connection is waiting for the other to finish tearing down the session.
The lsof Command
LSOF stands for “list open files.” The lsof command can produce much of the same information as the netstat command with some added flexibility. The lsof command is primarily concerned with open files and the processes that are using them. However, it also makes provisions for files that are used by network services. Some usage examples are shown in the following list. To get the maximum level of output, you should run lsof with root privileges so these examples include the sudo command.
- sudo lsof –i: List files that are associated with an internet address.
- sudo lsof –i tcp: List files that are associated with an internet address using the TCP protocol.
- sudo lsof –i tcp:80: List files that are associated with an internet address using the TCP protocol under port 80.
- sudo lsof –i udp:53 -P: List files that are associated with an internet address using the UDP protocol under port 53. The –P (upper case) lists the ports with their numeric values rather than symbolically.
- sudo lsof –i @192.168.222.1: List files that are associated with the specified internet address. The address could be either the source or destination address.
- sudo lsof –i @192.168.222.1:21 -P: List files that are associated with the specified internet address and port. The address could be either the source or destination address. The –P (upper case) lists the ports with their numeric values rather than symbolically (for example,. "443" instead of "https").
An example of lsof usage follows. The command includes the IP address, port, and numeric port display parameters.
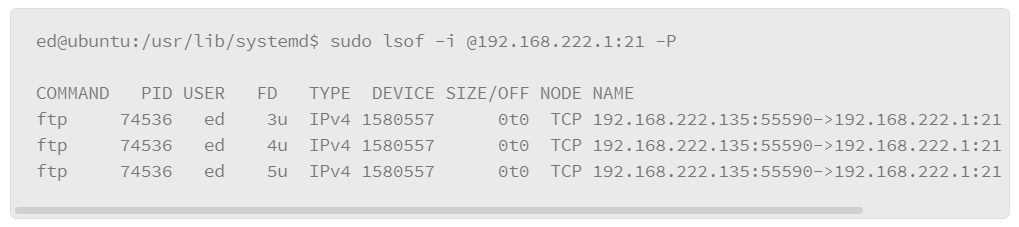
The output from this command includes the following information:
- Command: Displays the file that is associated with the process using the network connection
- PID: Displays the PID of the process using the network connection
- User: Displays the username of the user that initiated the process
- FD: File descriptor: a reference number that is used by the kernel to identify an open file. File descriptors may be followed by a code letter to further describe the state of the file.
- Type: Displays the type of file. For network connections, it displays the protocol that is used by the process.
- Device: Device number that represents the device being called to perform the I/O
- Size/off: The file size or memory offset. The lsof command will display whichever one is appropriate for the file being listed.
- Node: The file’s INODE number which is used to uniquely identify the file. For network connections, the protocol that is used by the process is listed.
- Name: Displays the file name. For network connections, it lists the two network nodes that have connected. It also includes the port number each host is using and the connection state.
Name Resolution: DNS
Linux relies on the DNS to resolve host names and IP addresses. DNS is a critical aspect of networking and if it is misconfigured or its operation is not well understood, it could impact the security or availability of a system.
Name Resolution Configuration Files
The resolv.conf file is the primary configuration file for DNS name resolution. You will often find this file in the /etc directory. The resolv.conf is a simple text file that contains a series of directives for configuring name resolution. There are two types of directives:
- Search domain: This directive lists domains to append when resolving a host name with no domain.
- Name server: This directive identifies the IP addresses of the DNS servers to use for resolving host names.
The following is an example of the contents of the resolv.conf file in a typical Linux system:

The search directive can specify multiple domains that are separated by spaces. Next is the list of name servers. The directive begins with the term nameserver followed by a space or tab and the IP address of a DNS server. You can have multiple nameserver directives to identify fallback servers if the first one does not respond to a lookup request.
From a security perspective, some interesting things in this file include the following:
- Nameservers or domains that are not valid for your organization. Be advised however that certain devices such as laptops that tend to roam may have other domains or DNS servers that are listed here if you view the file before connecting the device to local network resources.
- Public DNS server entries. In particular, the Google public DNS servers with IP addresses such as 8.8.8.8, 8.8.4.4, or 4.2.2.1. There are other public DNS servers too, so it may be wise to have a list of common servers that you can reference. Often times, public servers are used to get around enterprise DNS servers that may be enforcing usage policies through DNS sink holes or IP blacklists.
The next file to discuss relative to name resolution is the “hosts” file which is also stored in the /etc directory. The “hosts” file was one of the first name resolution mechanisms. It is a simple, plain text list of IP addresses followed by the host names they map to. Of course, this solution did not scale well and was quickly replaced by DNS. However, the file still exists and can be used to manually map IP addresses to host names.
A default hosts file typically only contains the local loopback addresses for both IPv4 and IPv6. You may also find the host’s name that is associated with the local loopback address. The following is an example of a default hosts file:

In the example, you can see the localhost addresses in both IPv4 and IPv6.
The last file to discuss relative to name resolution is the nsswitch.conf file which is also located in the /etc directory. This file is used to configure where various elements of the operating system go to fetch the information they need such as user information, password data, and name resolution. The structure of the file is such that the values in the first column represent the repositories that need to be populated with data and the remaining columns list where the data should come from.
The following is an excerpt from the nsswitch.conf file:
There are several data sources that you can identify, and each entry can have multiple sources in a space-separated list. The sequence of the source list is the sequence that the system uses to access the data that are required by the element. The list that follows describes the sources that are used in the sample nsswitch.conf file:
- files: Represents local files on the host
- compat: Similar to files, but extends its capabilities by allowing entries in the files to grant users or user groups access to the system
- dns: Reference DNS servers
- db: Do lookups in database files on the local system
For the purposes of name resolution, the entry of interest is the one that is labeled hosts. In the example, two sources are identified: files and dns. The sequence in which they appear means that the system will first reference a file on the local host (for host name resolution, that file is /etc/hosts), and if that fails to return a result, it will then use DNS to perform the name resolution.
From a security perspective, there are some things to watch out for concerning these files and their relationship to one another. Consider the following scenario:
- A user on the system executes malware.
- The malware creates an entry in the /etc/hosts file with the IP address of malicious web server.
- The malicious web server is configured to look like a banking web site that is frequented by the operator of the system.
- The IP address of the entry in the /etc/hosts file maps to the host name of the user’s banking web site. - The malware also configures the nsswitch.conf file to do a file lookup first followed by a DNS lookup.
- The next time that the user goes to visit the banking site, the host looks at the /etc/hosts file first and finds the name of the banking site in the file.
- The IP address that is mapped to the banking site is that of the malicious server that is disguised as the real banking site.
- Since the name was resolved with the /etc/hosts file, there is no need to reach out to DNS to resolve the name. - The user is presented with a web page that looks exactly like his or her regular banking site’s page.
- The user enters his or her banking credentials which the malicious server records.
- Instead of granting the user access to his or her bank account, the malicious server pops up a message indicating that the banking site is down for maintenance and to try again later.
Testing Name Resolution
With DNS properly configured, the Linux operating system provides several tools that you can use to make sure that names are resolving correctly. One of the most common tools is the nslookup command, which allows you to enter a host name to look up. When the lookup completes, it returns the IP address, or addresses, of the host name that you specified.
The following is an example of the nslookup command:
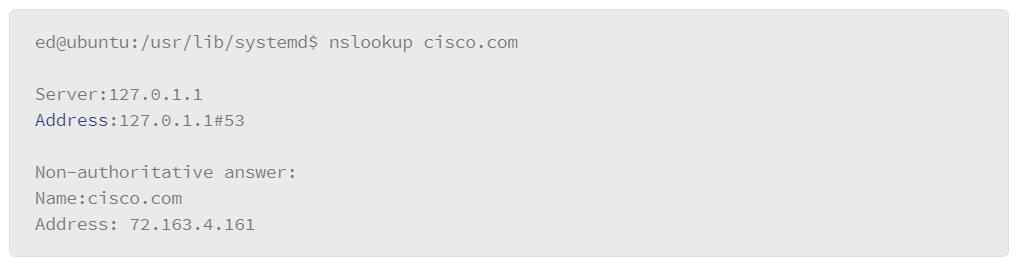
In this example, the local host is running a DNS service. Note that the entry in the Server field and the IP address in the Address field show the local loopback address. The non-authoritative answer message means that the DNS server that gave you the response is not the server for the domain you looked up. Then, it returned the name of the host you looked up followed by its IP address.
Another useful option that you can exercise with the nslookup command is that you can specify a server to do the lookup rather than use the servers that are configured in your local system. For example, if you add the IP address of a different DNS server at the end of your nslookup command, you are forwarding your request to that server as seen in the following example:

The nslookup command also allows you to perform reverse DNS lookups. A reverse lookup is one in which you provide the IP address of a host in order to learn its host name. Normally, you supply the host name to learn its IP address. The following example demonstrates this process using the nslookup command:
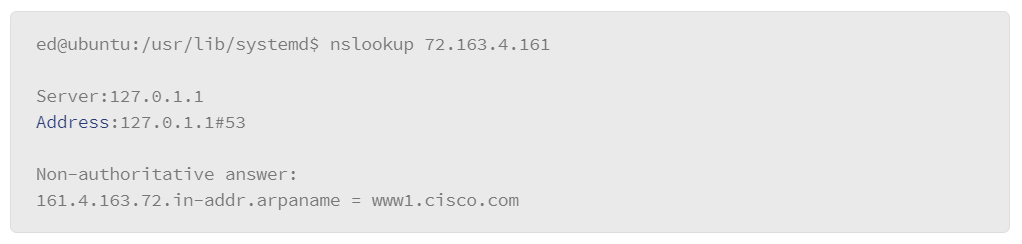
Being able to find host to IP mappings with a tool such as nslookup enables some investigative opportunities for analyzing suspicious activity on a host. For example, if you detect an IP address connecting to a host that is suspect for some reason, you can use tools such as whois to help determine who owns the IP address. whois is protocol for querying the databases of registered users of Internet resources such as IP addresses or domain names. Many Linux distributions ship with a whois command line tool, or use a browser to go to the ARIN or its European and Asian counterparts.
The following is an example of the command line usage:
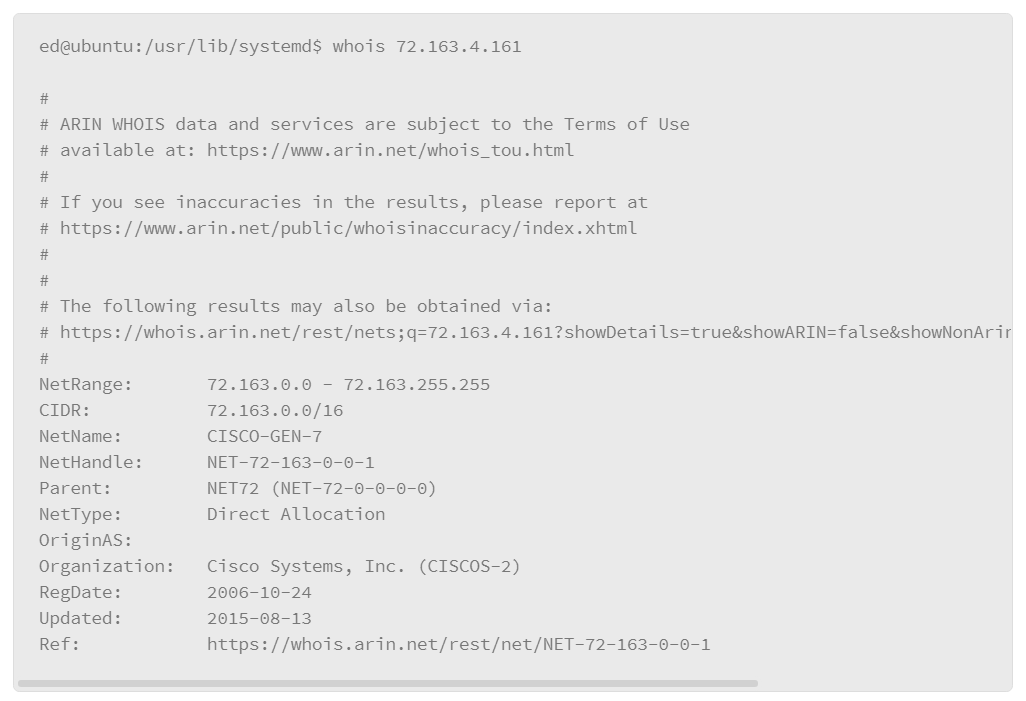
As you can see in the example, the output that it produces is rather lengthy, and not all is included. However, it is a good starting point for identifying who the responsible party is for addresses or host names you believe may be involved in suspicious activity against assets in your environment.
Viewing Network Traffic
One of the features that makes Linux such an attractive platform for security and development is the powerful set of tools, both command line and desktop, that natively ship with most distributions. From a security perspective, one of the more compelling capabilities present in most distributions is the ability to promiscuously sniff network traffic with tools such as tcpdump. With tcpdump, you can quickly view or capture network traffic and apply filters to observe or capture the traffic that you are specifically interested in. You can also configure tcpdump to include specific portions of packets, such as the header, or entire packets including their Ethernet frame data and payload data.
tcpdump Basics
tcpdump is a powerful tool with many features and options. This topic describes the basics of tcpdump with some examples you may find useful to get you started right away.
First, tcpdump’s basic syntax is as follows. Note that it requires root level privilege so the examples will use the sudo command.

The options come in the form of command line switches to control tcpdump’s packet collection parameters. The filters section defines the traffic to view or capture. The absence of a filter instructs the command to act on all the network traffic it sees.
The following is an example of how it can be used:

The syntax that used in the example represents the following:
- -i: Lets you specify the interface on which to listen. If you omit the –i, tcpdump select the first interface of your available interfaces. If there is an inline device with bridged interfaces, list them as follows: -i ens32:ens33.
- -X (upper case): Outputs the payload in both hex and ascii.
- -nn: Outputs host addresses and ports in numeric format.
- -s: Snap length. Refers to the number of bytes to include in the capture or output. If you don’t specify a snap length, it reverts to a default which varies based on the local environment – sometimes to as small as 64 bytes. If you enter a value of 0 for the snap length, it includes all the bytes of the payload.
- host 192.168.222.1: The filter portion of the command. It instructs tcpdump to only evaluate packets to or from the specified host.
The output that this example would produce is as follows:
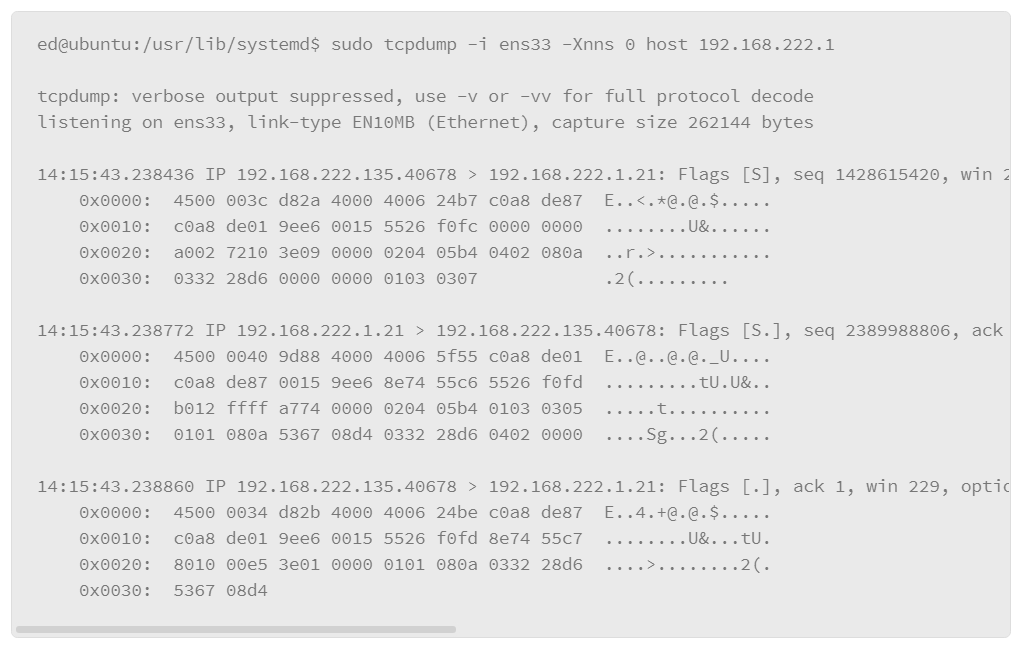
To stop the capture, press <Ctrl+C>. Each of the packets that are displayed begins with the timestamp of when the packet was seen. It also includes the source and destination IP addresses expressed in a five tuple formation in which the fifth byte represents the port number, which is followed by the remaining header information. The payload is the portion that appears indented to the header. Note that the output is in both hexadecimal and ASCII per the command line configuration.
Further refine your filter by adding a port constraint as follows:

The effect is limiting the capture to just the specified host and the specified port number, which is useful in situations where you may only be interested in a certain type of traffic.
You can also use negation in the filter as follows:

In cases where you have an SSH session to the monitored host and you may want to exclude the SSH traffic.
There are times where you may want to save the data output from the tcpdump command. Consider intended usage of data before selecting an output method. For example, if you are only interested in producing a text file of the data that can be read and searched by any text editing tool, you can do the following:

This syntax directs the output of the tcpdump command to a text file called dump.txt in the current directory. The benefit of a text file is the ability to read it in any text editing tool and potentially use its search features to look for interesting things in the output file.
If your intent is to save the capture in native PCAP format, you can do the following:

This command instructs tcpdump to capture on the ens33 interface with a snap length of 0 to capture the complete payload. The traffic must also be coming from or going to host 192.168.222.1 over port 21. The last part of the command includes the –w option, which instructs tcpdump to write the raw capture data to a file. In this example, the file is called capture.pcap. The file will be placed in the directory from which you ran the command.
The benefit of capturing traffic this way is that you can open the PCAP file in any application that reads PCAP formatted files, such as Wireshark and Snort, or can even read it back in with tcpdump as shown in the following example:

The –r followed by the file name instructs tcpdump to read in that PCAP file and produce output that is formatted per the command parameters—in this case, –X to output in both hex and ascii, -nn for numeric IP addresses and port numbers, and –s 0 for displaying the entire payload.
In this example, it was not necessary to apply any filters since the PCAP file was created with filters already applied. However, to further refine the output by adding more filters is possible. The capture can also be created with less filtering to include a broader set of network traffic in the capture file and apply the filtering that is needed when the PCAP file is read back in.
If you are performing captures with tcpdump on a production system, you should use the following guidelines:
- The less restrictive the filter, the more traffic you are capturing, which could impact the performance of the host. However, it does give you the benefit of having more data on hand if you need to reference it later.
- Capturing traffic to the screen (STDOUT) is more resource intensive. You can capture the raw packet data to a PCAP and read it back in later. This way, the host is not burdened with both capturing network data and formatting the data for output to the screen.
System Logs
Linux systems provide rich logging functionality. Operating system events of all kinds are logged in a central location. Also, most applications will log events to these same locations or dedicated log files. Usually, when you are investigating an issue on a Linux-based system, the log files are one of the first places you should visit for information on what transpired.
Logging is handled by a dedicated logging process called syslogd. The more recent versions of Linux use a variant of syslogd that is called rsyslogd, which provides all the same functionality of syslogd, in addition to several extensions that add functionality to traditional syslog capabilities.
Log File Locations and Log Files
The file system location for system events is the /var/log directory. Find a series of files that contain log data for various event types. Not all the files in the /var/log directory are used by rsyslogd. Some may come from applications with dedicated logging facilities. The rsyslogd configuration file lists all the files that it uses for logging.
The primary log file on most Linux systems is /var/log/messages or /var/log/syslog, which is because a default rsyslogd configuration file has been configured in such a way that it will match with many of the events that are produced by the system. However, the configuration file ultimately determines which files get used for what purpose. Another logging option is to send logs to the console, which is often used when an event that requires system user’s attention is generated.
You can also configure your local syslog events to forward to a remote syslog server or SIEM (Security Information and Event Management) tool. Organizations will often aggregate logs from important hosts around the enterprise in one central place, which makes it easier to correlate events from different sources to try and surface patterns of activity that may indicate a compromise or security policy violation.
Configuring syslog
Syslog configuration takes place by way of the /etc/syslog.conf file or /etc/rsyslog.conf in more recent Linux installations. Sometimes, systems running rsyslogd may split the configuration over multiple files. The primary configuration file, /etc/rsyslog.conf, specifies additional files to include by way of a directive.
The configuration file consists of comments with sample configurations and notes. It also contains a series of rules that define event types and where their logs should go. A rule consists of a selector to indicate the source of the event and an action to indicate where to send the event.
The following excerpt shows some sample rules from a rsyslogd configuration file:
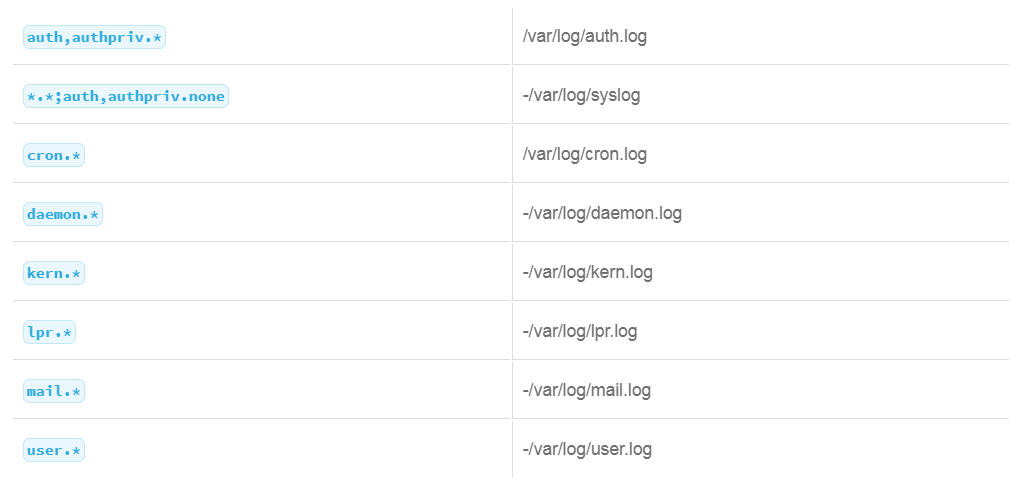
Selector Syntax
The selector is the first column, which consists of two components that are separated by a dot (.): the facility and the severity.
- The facility indicates the component reporting the event.
- The severity establishes a priority for the event. The following severity labels are listed from least severe to most severe:
- Debug: Debug information from running processes.
- Info: Simple informational messages.
- Notice: A condition that may require some attention.
- Warn: A warning.
- Err: An error condition
- Crit: A critical condition
- Alert: A condition that requires immediate attention
- Emerg: An emergency condition.
- Some examples follow:
- mail.info: Translates to the mail facility with a severity of info. This format will include severity of info or greater (notice, warn, err …).
- =mail.info: Translates to the mail facility with a severity of info. This format means only include the info severity.
- You can list multiple facilities in front of the dot. Each facility is separated with a comma.
- auth,authpriv.*: This example translates to facility auth and authpriv with a priority of any. - You can list multiple facility.severity pairs that are separated by semi-colons.
- *.*;auth,authpriv.none: This translates to any facility with any severity, except auth and authpriv facilities with no severity. Basically, everything except auth and authpriv.
Action Syntax
The action portion of the syslog rule indicates which file should receive the event that is based on the facility and severity that is specified in the selector.
mail.info /var/log/maillog: Translates to: Send events with a facility of mail and a severity of info or greater to the /var/log/maillog file.
Some action entries begin with a dash character, which is a remnant from older versions of syslogd that performed a sync after writing an event to a log file. In more recent syslog implementations, this functionality is disabled for performance reasons so the dash is essentially meaningless. See the example that follows:
-/var/log/messages: The dash has no impact.
Alerts can also be directed to the console instead of a file, which is a good way of getting user’s attention if the situation warrants it.
kern.* /dev/console: This configuration sends alerts from the kernel facility with any priority to the console.
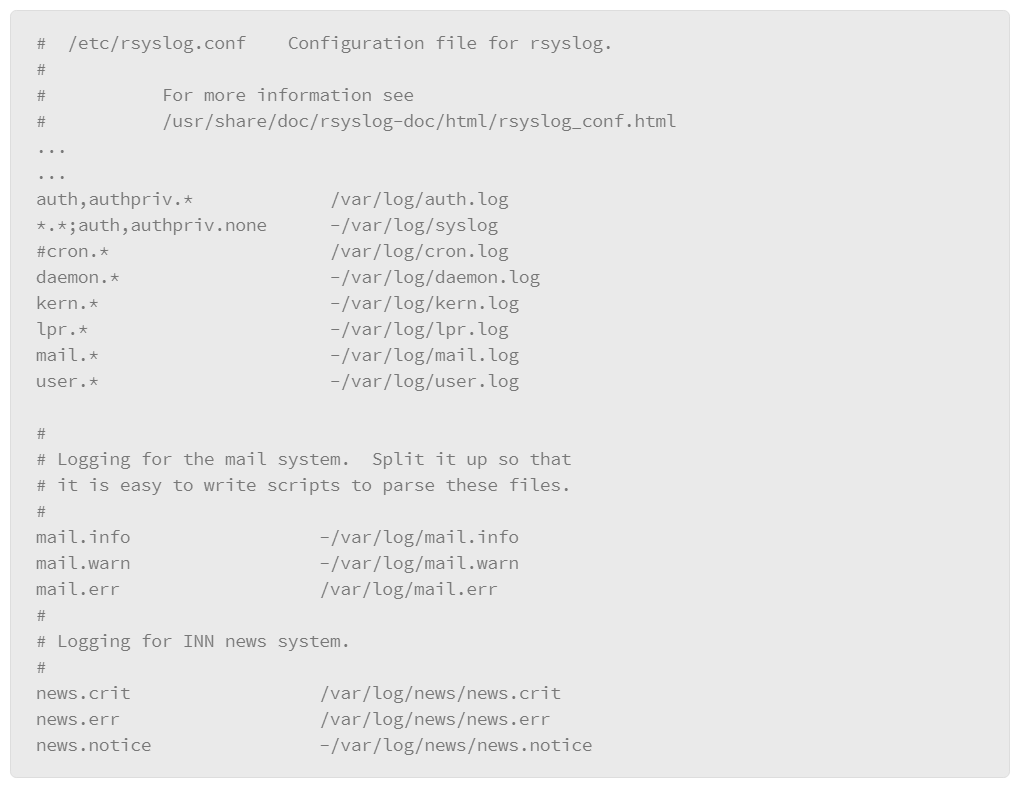
Configuring Remote syslog
Many organizations use SIEM tools to aggregate log data in a central location, which allows them to monitor events from important systems in a single place. Many of these tools have the ability to correlate data from various sources to surface patterns that could represent malicious or suspicious activity. syslog sends alerts to remote hosts by way of some simple settings in the configuration file.
To send all events to the remote server over UDP, you can add the following rule:

For TCP, use two at symbols (@@) rather than one.

Another option is to selectively send alerts by specifying a facility and severity. In the example, any facility with a severity of emerg will be forwarded to the host 192.168.222.1 over UDP port 10514.
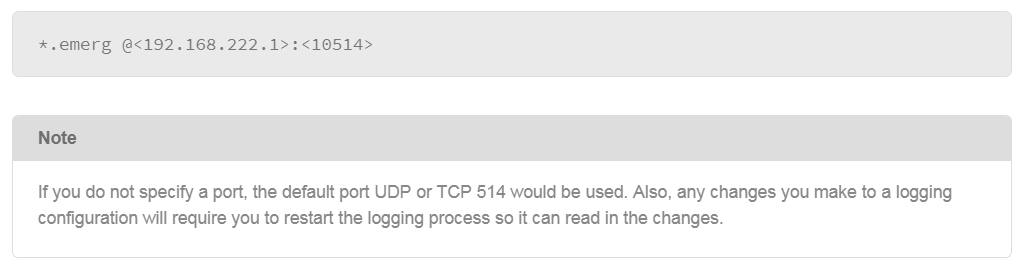
Testing Your Logging Configuration
If you have altered your logging configuration in some way, test it to make sure it is working as expected. The logger command lets you manually make entries into log files. Specify a facility and severity to make sure that the entry is going to the correct file based on your rule configuration.
For example, your configuration file contains the following rule:

This rule sends alerts from the auth or authpriv facilities with any severity to the /var/log/auth.log file. To test, use the following command:

After you execute the command, you open the /var/log/auth.log file and navigate to the end of the file to see the following entry if the rule worked correctly:

You can also use the logger command to send messages to remote syslog servers. The following example adds the –n parameter, which lets you specify a remote host, the –P (upper case) parameter to specify the port number and you can add –UDP to send as a UDP connection or –TCP to send it over TCP. If you do not specify a protocol, it will first try UDP and if that fails it will try TCP. Also, if you do not specify a port, it will use the default port 514.

Running Software on Linux
Running software in a Linux installation requires two things. First the file must be structured in a format that either allows it to run on its own or run through an interpreter. The file must also have the execute bit set in its permission properties for the user that wants to execute the file.
Binary executable files are created from source code that is then compiled with a compiler application. The source code can be produced in various programming languages. One of the most common language platforms that are used on Linux is the C programming language. This section will assume that C was used to create the source code in the examples that follow. As such, the compiler that used in these examples is gcc, which is a popular, open source compiler for C source code.
Overview of the Process for Compiling Code
The general process for compiling code is to first obtain the source code of the program you wish to compile into a binary executable. You can produce the source code yourself if you are skilled in programming. Or you can obtain the code from other sources.
In Linux environments, applications are often distributed as source code and it is incumbent upon the user of the system to compile the code to produce working binaries. This is done to overcome potential differences between Linux distributions that may allow the application to run on one platform but not others. Compiling locally ensures that the binary code that is produced takes platform-specific differences into account at compile time.
If you obtain software from another source, the code is often compressed into an archive that contains the source code and other supporting files that may be required to produce a working application. These archives will also often contain reference files with instructions on software prerequisites and any special instructions for compiling the application. You will often find files that are called README or INSTALL with this information. There may be other files with instructions or installation information as well so before compiling an application it is a good practice to review the files that are contained in the archive first.
One of the most commonly used compiler applications is the GNU C Compiler, gcc compiler. It is open source software that is freely available for anyone to use. Some Linux distributions may ship with this compiler already installed. However, the software usually needs to be obtained and installed independently. This software package contains the tools that you will need to create executable binaries from source code.
The GNU C Compiler works on C-based languages, including C, C++, and Objective-C.
Types of Files Used in Compiling Software
Compiling source code to produce an executable can be as simple as specifying the source code file name and the output, executable file name. Or, it can involve referencing various file types to produce the final executable in the case of more complex programs.
File types that may be encountered when compiling software include the following:
- Source: Source files represent the source code or the actual program that is written out in a programming language such as “C.” Source code files typically use the .c extension to identify them, for example, myprog.c.
- Object files: Object files are essentially libraries of compiled (binary) code that can be read in when you compile an application. The code from the object file is included as a part of the executable file you produce at compile time. Object file names typically end with a .o extension, for example, myobjectfile.o. There is another type of object file that is called an archive file that acts as a container for multiple object files. These files can be called up at compile time and your source code will determine which object code to use from the archive. These files typically end with a .a extension, for example, myarchivefile.a.
- Shared object files: Files that contain code the application being compiled can reference when it runs. This code exists as a separate file in the file system and must be present when you compile your application and when the application runs. The benefit of using shared objects is that the code itself is not inserted into the final binary. Rather, it is read into memory when the application runs, so it must be present on the system as long as you are using the application. Another benefit is that you can update the functionality of an application without having to recompile it by updating the shared object file. Shared object files typically end with a .so extension, for example, mysharedobjectfile.so.
- Header files: A header file is a file that contains function declarations, macro definitions, constants, and system variables. If the program or application you are compiling consists of multiple source code files, rather than declaring all these items in each source file, you can read them in at compile time with a header file. A header file can be written by the author of the application or it can exist as part of the host’s operating system. Header files typically end with a .h extension, for example, myheader.h.
Compiling Code
The general process for compiling a program with gcc is as follows:

The –o lets you specify the file to output. It is the binary file that is produced as a result of compiling the source code. The source file is the file that contains the source code, which is what gets read in to produce the binary output file.
The most basic implementation of gcc is to produce a binary file from source code. Most applications that you obtain for your Linux installation will be much more complex, and will require more tools to help in building the application.
One of the most popular tools available today is a suite of tools that are collectively known as autotools. This suite of tools allows the author of the application to create a series of scripts to automate the compilation and installation process. It also provides features to package the application in an archive so it can be easily distributed to users that want to compile and install the application.
The three scripts you use to compile and install the application are as follows:
- configure: This script probes your system to make sure everything that is needed to compile the application is there. It also grabs information about the host on which you will be compiling the application to produce binary files compatible with your system, which will ensure that the application runs properly. The configure script can also accept parameters to customize the application in some way. This technique is often used to enable or include specific features of the application you are compiling.
- make: Once the prerequisites have been accounted for and the local environment has been detailed by the configure script, run the make script, which actually invokes the compiler (gcc) to produce the binary files for the application.
- make install: When the application has been compiled, run the make install script to copy the application files and any supporting files to standard file system locations, which ensures that the application can be executed and supporting files can be accessed from any location in the file system.

With autotools, the process of installing an application in Linux follows this general sequence:
- You obtain the archive package that contains the application source code and any supporting files.
- Often, the supporting files include README files with instructions on how to install the application and information on any prerequisites that must be present on the system to compile the application. - You unpack or uncompress the archive so the files you need to install the application are all available.
- You run the configure script.
- You run the make script.
- Then, you run the make install script.
At this point, the application is installed and ready for you to use. The example that follows illustrates how to install Snort using autotools:

This command unpacks the archive file in which the software is distributed. Upon doing so, a subdirectory is created that contains all the source code and supporting files.

With this command, the user enters the directory that was created when the archive was unpacked.

This command executes the configure script. Note that it includes command line parameters to add functionality to the binary executable file that is produced as a result of this process.

This command executes the make script that actually compiles the code to produce the application binaries.

Lastly, you use the make install command to copy the files to their destination directories including info and man page files.
Executables vs. Interpreters
Executable files are binary files able to run CPU code and perform tasks independently. However, there are other types of files that can execute code by way of an interpreter. The interpreter is an application that reads commands from a source file and performs the tasks on behalf of the source file. The source files are referred to as scripts, which are based on some scripting language that is installed on the Linux host.
Linux offers a wide variety of scripting options. The examples that follow describe some of the most widely used options.
- bash: bash is the command line shell that is used in most Linux installations. It provides a very feature rich set of commands you can execute from the command line or as a script.
The first line is often referred to as a “shebang” and it’s purpose is to point the system to the interpreter that will run the file. In this case, /bin/sh -or- /bin/bash is the command to run the bash shell. The remainder of the file will contain the shell commands to execute as part of the script. Lines that begin with the # character are not executed. They are used to enter comments so script authors can document information about the operation of the script for other users.
Bash file names typically end with the extension .sh, for example, MyBashScript.sh - Perl: Perl is a powerful, interpreted programming language. It is used extensively throughout the Internet for virtually every application imaginable. Once installed locally, you can write Perl scripts, and have Perl interpret and execute them.
A Perl script file begins with a line (shebang) to identify the application that should run it. It appears as follows:
#!/usr/bin/perl
The path may differ depending on where Perl is installed on the local host, but the purpose remains the same: to point to the Perl application when the script is executed. The remainder of the file consists of comments and the Perl code to execute. - Python: Python is another very popular interpreted programming environment. It is not as widely used as Perl but it is gaining popularity because it is considered an easier programming environment to use than Perl.
Python script files begin with a shebang to point to the location of the interpreter. The following is an example of a Python shebang:
#!/usr/bin/python3
The path may differ depending on where Python is installed on the local system, but the purpose remains the same: to point to the Python application when the script is executed. The remainder of the file consists of code and comments.
Python files typically end in a .py file extension, for example, MyPythonScript.py.

Using Package Managers to Install Software in Linux
As Linux has become more pervasive in enterprise, options for using Linux-based systems to host applications have expanded greatly. Many enterprise-scale applications are now supported on Linux platforms. Linux has also enjoyed expanded popularity as a desktop platform as well. Many desktop applications are also available to run on Linux platforms.
In order for Linux to make this move into the mainstream, mechanisms for packaging and distributing software had to be improved. While compiling code at the local level works, it is not scalable, and it assumes that the enterprise has skilled people to compile code and resolve the code dependencies that inevitably crop up when you install software. Code dependencies refer to software prerequisites that must be resolved for code to install properly. For simple applications, this is often easily resolved by following the guidance in README files or searching Internet forums. However, for larger, more complex applications, resolving code dependencies was often a time consuming and burdensome process that could easily frustrate even experienced Linux users.
Over the years, the Linux community developed package management systems to mitigate the problems that are associated with locally compiling code to install an application. Package management systems were designed to distribute software as pre-compiled binaries. They also provide mechanisms for resolving dependencies, and ship with tools to verify the integrity of the software installation and facilities for updating and removing software as well.
Because package managers distribute pre-compiled software, you must make sure that the package you obtain is suited for the operating system you intend to run it on. So, you will often find packages for specific Linux distributions and even specific versions of a given distribution.
Package management systems that are used in current Linux distributions are based on architectures that generally consist of remote repositories where the software is stored, a standardized package format and tools to access the repositories and manage the locally installed software.
There are many package management systems in use with various package formats. However, two package formats that are the most universally used as follows.
- Red Hat Package Management: The Red Hat Package Management (RPM) format is used in Red Hat-based installations or Red Hat derivative distributions, such as Red Hat Enterprise Linux, Fedora Core, or CentOS.
- .deb: The .deb package format is primarily used in Debian-based installations, including Ubuntu and any of its derivatives, for example Linux Mint or Knoppix.
Package Managers
Package managers refer to the tool sets you use to manage software packages. The package management platform is what greatly enhances the software installation experience as the tool sets contain features that allow you to resolve or identify package dependencies, update or upgrade software, uninstall software, and select the remote repositories for fetching software that are very robust tools with rich feature sets. The two package management applications that are listed here are the most commonly used ones today.
- yum: yum is a package management system that is used to manage RPM-based packages. As such, it is used primarily on Redhat-based installations. An example of a yum command to install an application is as follows:

- apt: apt is the package management system that is used in Debian-based Linux installations. An example of using apt to install software is as follows:

These commands fetch the package that you specify from the repositories that are listed in its default configuration. You can modify the configuration to add or remove repositories.
System Applications
Linux provides a stable, scalable platform for delivering services to the enterprise. You can run open source applications or commercially available applications as well. Linux installations are primarily used as platforms for serving applications to clients.
web
One of the most common services that are deployed on a typical Linux server is the web service. Apache is one of the most commonly used open source web servers and provides variants for virtually every Linux distribution.
Apache provides various features including data compression, SSL connection encryption, and server-side language interfaces to support server-side scripting in popular languages such as Perl, Python, and PHP. These are just a few of the features it provides, which is one of the primary reasons it became the most commonly used web server on the Internet.
From a security perspective, one of the most useful resources for gathering information about Apache activity is the log data it produces. The specific location of the log files depends on the Linux distribution that you are running it on, and whether you modified the log file directives in the server configuration file. However, usually the log files will be in a subdirectory of the /var/log directory. A typical installation will store log data in /var/log/apache2/access.log. The Apache log file records web server access events, including the hosts requesting server resources and files that were uploaded or downloaded to and from the server.
Database
Other commonly used applications on Linux-based platforms are database services. There are many open source or commercial options to choose from. And there are different types of databases, such as relational or NoSQL databases.
Relational databases use linked structures or tables for storing information. The structured nature of such systems gave rise to SQLs that were used to interact with the database and extract information from it as needed.
Non-structured databases, sometimes known as NoSQL, are data storage systems that do not rely on strict data structures and can store data in more of a free-form manner. They often require large storage capabilities but are faster at data retrieval than their structured counterparts.
One of the more commonly used database platforms is MySQL, which is a structured, relational database system. It has a wide installed base and uses SQL for interacting with it.
Like many of the applications on a Linux system, much of the information of value from a security perspective can be obtained from the database log files. The logging for a specific database product can differ between products, but usually the database logs are in the /var/log directory or a subdirectory of /var/log. Also, logging may not be enabled by default, so you would have to consult with your database documentation to enable it. In cases where logging may not have been enabled, the database application itself may generate some log data in the syslog file.
In MySQL installations with logging enabled, you will find several files that can provide forensic information:
- Error log: Stores information about system errors including database starts and stops. This log file is commonly found in the following location: /var/log/mysql/mysql_error.log.
- General query log: Stores general information about database access for storage or retrieval. This log file is commonly found in the following location: /var/log/mysql/mysql.log.
- Slow queries: Lists slow queries or incomplete queries that could indicate problems with the system or tools being used to access the system. This file is most commonly found in the following location: /var/log/mysql/mysql-slow.log.
Lightweight Directory Access Protocol
LDAP is a protocol designed to store information about an organization, which could include information about users, user groups, organizations, or other resources such as files or devices on the enterprise network. It uses open standards for storing and locating objects. Other applications and services can query an LDAP server, which makes it a versatile tool commonly used in most organizations.
LDAP uses syntax that is derived from the x.500 standard for identifying objects in the LDAP structure by way of a series of attributes. Attributes consist of an attribute name followed by the attribute value. For example:

An entity in the LDAP structure is uniquely identified by its DN (Distinguished Name). For example, the user Ed Smith that works for MyOrg may have the following DN:

The component that is called cn is known is the canonical name. The dc components are known as domain components. In the example, the first dc entry is the organization’s primary domain name: MyOrg. The second is the top-level domain that the organization is registered as: com.
An LDAP record for this user may appear as follows:

In the example, you can see the user’s DN, which is used to uniquely identify the user, followed by a series of attributes to further describe the user. There are many more attributes that you can associate with a user. For example, you could include the user’s manager, the organization within the enterprise that the user works for, his or her telephone number, and many others.
The most common LDAP implementation in Linux is OpenLDAP. You’ll see its configuration and log files referred to as slapd, which stands for “stand-alone LDAP daemon.” The log files it produces are generally found in the /var/log/slapd directory assuming a typical OpenLDAP installation and no changes to its default configuration.