Cisco CCNA Cyber Ops SECFND 210-250, Section 8: Understanding Windows Operating System Basics
8.2 Windows Operating System History
8.3 Windows Operating System Architecture
8.4 Windows Processes, Threads, and Handles
8.5 Windows Virtual Memory Address Space
8.6 Windows Services
8.7 Windows File System Overview
8.8 Windows File System Structure
8.9 Windows Domains and Local User Accounts
8.10 Windows Graphical User Interface
8.11 Run as Administrator
8.12 Windows Command Line Interface
8.13 Windows PowerShell
8.14 Windows net Command
8.15 Controlling Startup Services and Executing System Shutdown
8.16 Controlling Services and Processes
8.17 Monitoring System Resources
8.18 Windows Boot Process
8.19 Windows Networking
8.20 Windows netstat Command
8.21 Accessing Network Resources with Windows
8.22 Windows Registry
8.23 Windows Event Logs
8.24 Windows Management Instrumentation
8.25 Common Windows Server Functions
8.26 Common Third-Party Tools
Windows Operating System History
Microsoft Windows has been a family of operating systems for personal computers since 1985. In addition to Windows OS for personal computers, Microsoft offers operating systems for servers and personal mobile devices. Originally developed by Microsoft for IBM, MS-DOS was the standard operating system for IBM-compatible personal computers. The latest Windows OS is Windows 10 (the successor to Windows 8), which debuted on July 29, 2015.
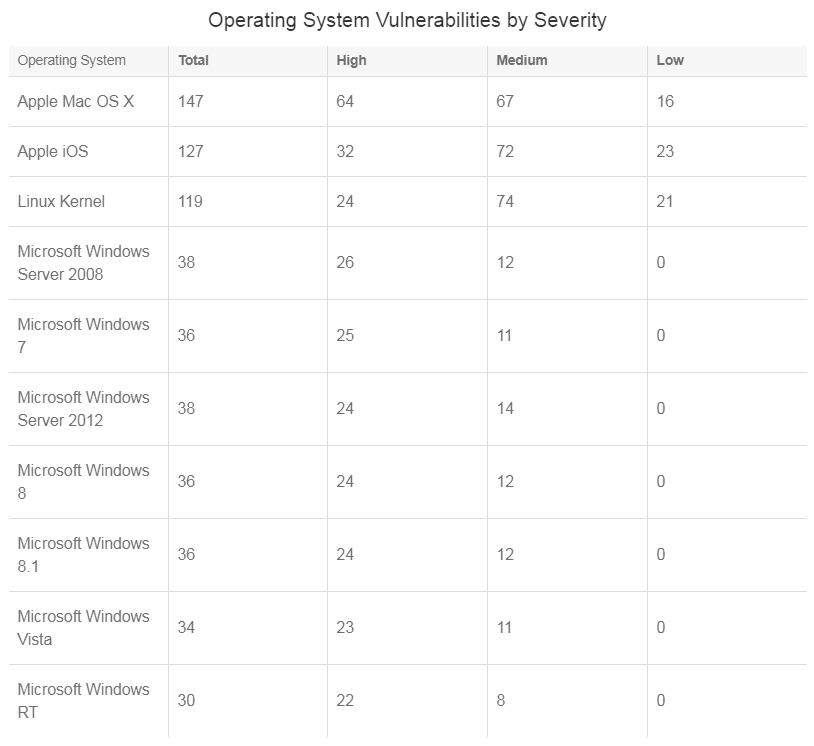
It is interesting to note that although Microsoft operating systems have several vulnerabilities, they are not in the top three, as reported in the 2014 NIST National Vulnerability Database, as shown below.
Note:
Go to https://nvd.nist.gov/ to view the National Vulnerability Database on NIST's web site.
Windows Operating System Architecture
The Windows OS has evolved into a robust enterprise computing platform that ranges in use from everyday end user desktop environments to data center-scale server platforms. Its architecture has matured to include features that provide system stability and security. Although Windows is used most often as a desktop computing platform, its server platforms are used extensively in corporate data centers by IT professionals. The operating system’s architecture is common across all its offerings and consists of two major components:
- User mode: This component manages processes on behalf of system users. It runs with lower privilege so users can’t directly interfere with system level processes. It also provides communication pathways that are known as APIs so that user processes can request access to system level resources.
- Kernel mode: This is where the core processes of the operating system run. Its processes run with the highest level of privilege so it can manage system CPU and memory resources.
The figure illustrates the various architectural components of the Windows OS, and outlines major processes that each component handles.
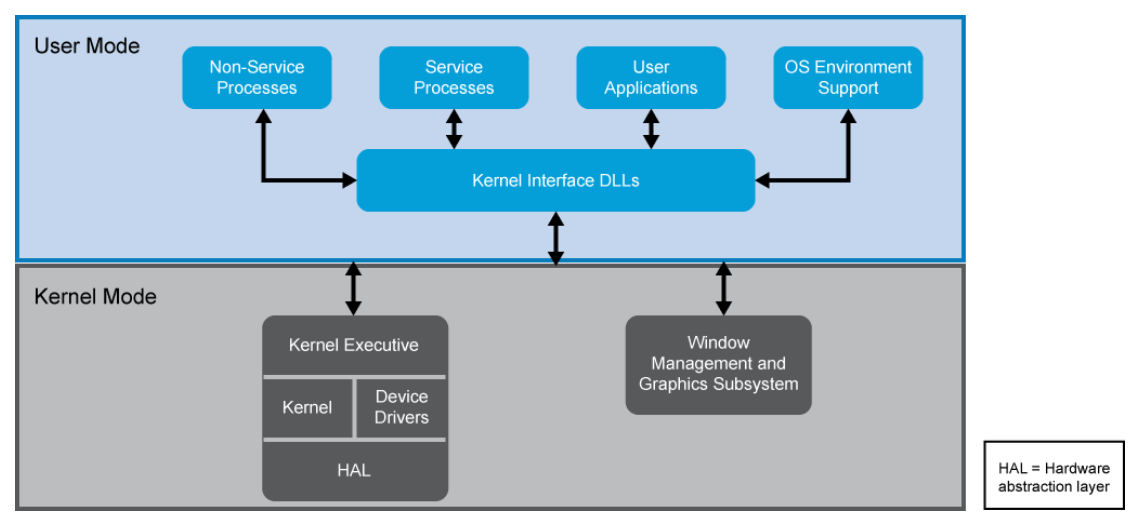
This is not an exhaustive list of all the elements for each component, but it does outline the major processes and which mode is responsible for each. One of the concepts of the Windows architecture is how processes are treated relative to the mode in which they reside. For example, the user processes appear to occupy their own distinct spaces, which roughly equate to the memory resources the operating system dedicates to each. By design, this prevents a user mode process from accessing the memory space of another process. This mechanism enhances the security and stability of the system.
Kernel mode processes also operate within the same memory space. However, kernel mode processes are higher privileged functions that cannot be directly accessed by lower privileged user mode processes. Executing processes in the same memory space increases the overall efficiency of the system.
User mode and kernel mode processes are the Windows subsystems that form the core of the operating system. They are started at system initialization by the Session Manager (Smss.exe). The following registry key will identify the system’s operating mode HKLM\SYSTEM\CurrentControlSet\Control\Session Manager\SubSystems.
User Mode
User mode processes are specific processes initiated or owned by Windows users. These processes operate within the confines of their own memory space or spaces. This prevents one user’s process from accessing another user’s process space or resources. The system does provide mechanisms for one user process to request resources from another. This is handled through specific API calls that are tightly controlled by the system, which prevents a process from arbitrarily impinging on another user’s process space while reducing the potential of system corruption. Remember, user mode processes operate at lower system privileges than kernel mode processes to maintain the separation between the user and kernel mode spaces.
The types of processes that run in user mode can fall into one of four general categories:
- Non-service processes: These are fixed processes that support user access to system resources such as logon services and Session Manager. These are not services in a strict sense because they are initiated by user activity and not started by the service control manager.
- Service processes: These are services that run in support of user system requirements; they are not system services that run independent of users, and are generally initiated by the system through the service control manager. Some examples include the Task Scheduler and Print Spooler.
- User applications: As the name implies, these are the processes that are needed to run applications that are initiated by users.
- OS environment support: Windows NT originally shipped with support for Windows, OS/2, and POSIX subsystems to support a Windows design goal of code portability. Recent versions of Windows have dropped support for OS/2 and POSIX in favor of an enhanced version of POSIX that is called Subsystem for UNIX-based Applications (SUA). The OS environment support subsystem manages the subsystem components to use based on what is required by running applications.
User mode applications and services often need to utilize resources that are managed by kernel mode processes. For example, a user mode process may need to write to a file or initiate a network connection. To support user application requirements, Windows can allow a process to switch contexts from user to kernel mode. When the operation requiring the system level resource completes, the system will switch the context back to user mode. This function is handled by a kernel interface layer that manages context switches and will prevent user mode processes direct access to system level resources.
Kernel Mode
A large portion of the Windows OS runs as kernel mode processes. Unlike user mode processes, where each process runs in its own protected memory space, kernel mode processes share the same memory space. This provides speed and efficiency, along with the opportunity for a misbehaving process to potentially impact the entire system. To mitigate this possibility, Windows enforces kernel mode code signing, which means that drivers and critical system files must be signed by a cryptographic key from a public certification authority.
Major processes that run in kernel mode include the following:
- Kernel executive: Performs base operating system services such as I/O, networking, and memory management
- Kernel: Responsible for managing low level system operations such as thread scheduling and managing system interrupts
- Device drivers: Handles the requests for I/O to and from connected hardware devices
- Hardware abstraction layer: HAL is a layer of OS code that handles interaction between the kernel and hardware to account for differences between platforms such as motherboards. This allows the OS to be insulated from the hardware so that the OS itself does not need to adapt to hardware differences. Rather, the HAL handles low level hardware contingencies by translating them to standard OS functions.
- Window management and graphics subsystem: Implements the GUI and manages graphic functions for Window management and interface controls
- Ntoskrnl.exe: Windows executive and kernel
- Hal.dll: HAL module
- Win32k.sys: Kernel-mode device driver for managing Windows displays and screen output. Also collects input from devices such as the keyboard and mouse
- Ntdll.dll: System service dispatcher to executive
- Kernel32.dll: Kernel interface core Windows subsystem
- Advapi32.dll: Core Windows subsystem
- User32.dll: User-mode management subsystem
- Gdi32.dll: Graphical user interface management subsystem
Windows Processes, Threads, and Handles
A Windows application consists of one or more processes. In the simplest terms, a “process” is an instance of an executing program.
One or more threads run in the context of the process. A thread is the basic unit the operating system allocates processor time to. A thread can execute any part of the process code, including parts currently being executed by another thread. Each process provides the resources to execute a program and contains the following characteristics:
- Runs in virtual address space
- Consists of executable code
- Opens handles to system objects
- A security context
- A unique process identifier
- Environment variables
- A priority class
- Minimum and maximum working set sizes
- At least one thread of execution
Each process is started with a single thread that is often referred to as the primary thread. However, the process can create additional threads from any of its existing threads.
A thread is the entity within a process that can be scheduled for execution. All threads of a process share its virtual address space and system resources. In addition, each thread maintains exception handlers, a scheduling priority, thread local storage, a unique thread identifier, and a set of structures the system will use to save the thread context until it is scheduled. The thread context includes the thread’s set of machine registers, the kernel stack, a thread environment block, and a user stack in the address space of the thread’s process. Threads can also have their own security contexts, which can be used for impersonating clients. All threads within a process can access its virtual address space. In general, threads cannot access the memory space that belongs to another process. This protects the process from being corrupted by another process.
Microsoft Windows supports preemptive multitasking, which creates the effect of simultaneous execution of multiple threads from multiple processes. On a multiprocessor computer, the system can simultaneously execute as many threads as there are processors on the computer.
An object is a data structure that represents a system resource, such as a file, thread, or graphic image. An application cannot directly access object data or the system resource that an object represents. Instead, an application must obtain an object handle, which it can use to examine or modify the system resource. Each handle has an entry in an internally maintained table. These entries contain the addresses of the resources and the means to identify the resource type.
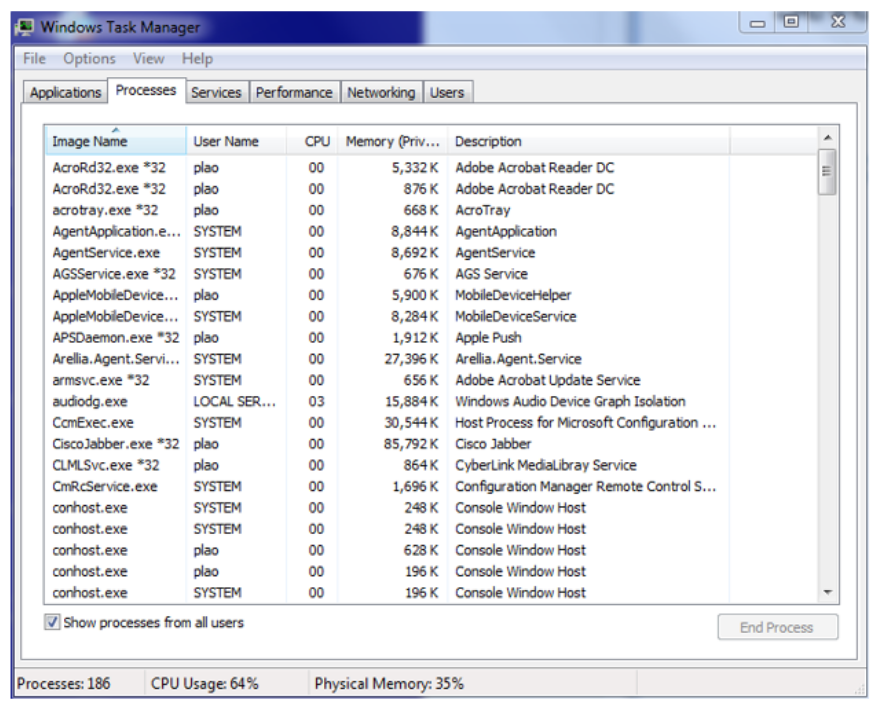
The Windows Task Manager can be used to view the running applications and processes. Here are two ways to start the Windows Task Manager:
- Right-click the taskbar and choose the Start Task Manager option.
- Run the taskmgr command from the Windows command line.
Windows Virtual Memory Address Space
In modern computing systems, temporary data instructions that are processed by the CPU are stored in the computer’s RAM. Virtual memory is a memory management technique that helps the system execute programs when the environment is running low on RAM memory. Virtual memory temporarily transfers content directly from RAM into the disk storage system. This process helps to compensate for a shortage of RAM.
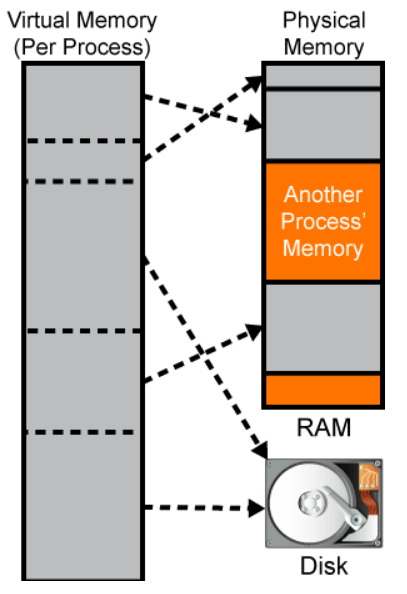
A process is allocated specific memory addresses from the available virtual address space. The address space for each process is private and cannot be accessed by other processes unless it has permission to open the process for read or write access. All Windows applications and processes have to be granted specific access to various kernel system resources or objects, such as TCP ports and Windows sockets. By design, processes are not allowed direct access to kernel level functions. A process “handle” provides the process with access to a specific kernel level resource. Typically, the process has to release the “handle” in order for other processes to be able to access the same kernel level resource. However, if the process has kernel level access to a function and the handle has granted PROCESS_VM_READ (function) access, other processes can be granted read access to the same kernel level function’s memory space via the ReadProcessMemory function. In addition, if the process has kernel level access to a function and the handle has granted PROCESS_VM_WRITE (function) access, other processes can write to the same kernel level function’s memory space via the WriteProcessMemory function. It should be noted that processes need SeDebugPrivilege in order to open such handles. This potential violation of the process’s memory privacy is very common when dealing with malware, and is a technique that is used to insert malicious code with the intent of gaining access to a system.
A virtual address space does not represent the actual physical location of an object in memory; instead, the system maintains a page table for each process. The page table is an internal data structure used to translate virtual addresses into corresponding physical addresses. Each time a thread references an address, the system translates the virtual address to a physical address.
Each process on 32-bit Microsoft Windows supports a virtual address space that enables addressing up to 4 gigabytes of memory. Each process on 64-bit Windows supports a virtual address space of 8 terabytes.
Windows Services
Microsoft Windows services (formerly known as NT services) will create long-running executable applications that run in their own Windows sessions. These services can be automatically started when the computer boots. These services can be paused and restarted, and do not show any user interface. These features make services ideal for use on a server or whenever you need long-running functionality that does not interfere with other users who are working on the same computer.
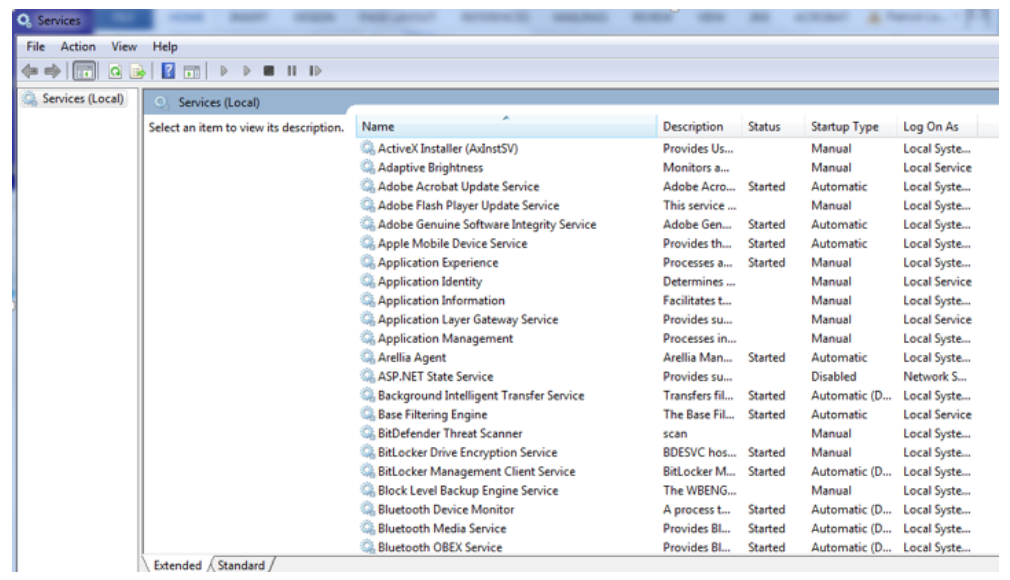
Services Control Manager is used to start, stop, pause, resume, and configure the services.
To start Services Control Manager using the Windows interface, complete these steps:
- Click the Start button
- Click Control Panel
- Click Administrative Tools
- Double-click Services
To start the Services Control Manager by using a command line, open a Windows command prompt and enter the services.msc command.
Windows File System Overview
The NTFS file system is predominantly utilized in most Windows installations today. A file system is a mechanism for organizing files on storage media. The type of media may influence which file system is appropriate to use. For example, optical media typically uses ISO 9660 or UDF. The focus of this section is on disk storage since the operating system and user data are typically stored on hard disk media.
The following file system options are supported in Windows installations:
- File allocation table: FAT is a general-purpose file system that is supported by Windows and other operating systems such as Mac OS X and Linux. Because of its simplicity and portability, it remains a popular file system. It is mostly used as the default format for USB-based storage media such as flash drives. However, it does have some limitations in terms of the file sizes it supports and the maximum partition size, so it is not widely used for hard drives. There are varieties of FAT known as FAT16 and FAT 32. The FAT32 variant is the most commonly used because it is the least restrictive of the variants, less than FAT16.
- exFAT: The extended version of the FAT file system removes some of the file and partition size limitations of FAT, but is not widely supported on OSs other than Windows and later versions of Mac OS X.
- Hierarchical file system plus: HFS+ is the file system that is used on Mac OS X-based systems. HFS+ permits file names up to 255 characters in length and supports larger file sizes and drive partitions than the original HFS. It is not supported on Windows platforms without the aid of additional software. However, a Windows system can read data from an HFS-formatted drive.
- Extended file system: EXT is the default file system on Linux-based installations. Its most current version is EXT4, which has the benefit of maintaining backward compatibility with the previous versions 2 and 3. It is not natively supported on Windows platforms, but a Windows system can read data from EXT-formatted drives with additional software.
- New technology file system: NTFS is the most commonly used file system in Windows installations. It is natively supported across all versions of Windows operating systems. Mac OS X-based systems can read NTFS partitions but can only write to them by installing additional driver software.
NTFS Basics
The NTFS file system provides many features that make it a good choice for both enterprise-scale systems and desktop systems. Some key features are:
- Performance and reliability
- Compatibility
- Large file and partition size
- Disk quotas
- Recovery features
- Security
It also supports file system encryption to further secure data at rest on the storage media. NTFS supports data access control through security descriptors that include file ownership and permission characteristics for each file. This capability is one reason that NTFS is used so extensively throughout Windows deployments.
NTFS Volume Structure
Formatting a drive with the NTFS file system creates several system files, and the basic structures for reading and writing files and recording their locations.

The partition boot sector occupies the first 16 sectors of the drive. It contains information that points to the system bootstrap instructions and the location of the Master File Table (MFT), which contains an index of all the files on the partition. The last of the 16 sectors is a copy of the boot sector, which can be referenced if the primary is corrupted.
The MFT contains a file that maps the location of all the files and directories on the partition. NTFS also maintains a mirror or copy of the MFT that can be used if the primary is corrupted. In addition to file location, the MFT stores file attributes such as file name, security descriptor, and time stamps.
The system files are created when the NTFS volume is first initialized. These files are hidden and are used to store metadata about files, NTFS volumes, logs, and file attribute definitions.
The file area is where the files and directories are stored.
NTFS Alternate Data Streams
An interesting feature of the NTFS file system is ADS (Alternate Data Streams) technique. Files in NTFS are stored as a series of attributes such as the file name and date stamp. One attribute is called $DATA, which represents the actual file data, and is known as a “data stream.” However, NTFS allows you to attach ADSs to a file that provides for various interesting cases. ADSs are primarily used by applications to store additional information about a file.
ADS data is not readily visible and can be difficult to detect. In fact, recent versions of Windows just started providing tools for identifying files with ADS. A file with ADS can be referenced with the following format:

In the example below, the base file name is myFile.txt. The colon character (:) separates the base file name from the name of the ADS, which is ADStest. To test this feature, you can easily create a file with an ADS as follows:

This command sends the text that is specified in the echo command to an ADS that is associated with a file called myFile.txt. List the files in the directory with the dir command to confirm that the file was created.

Note that the myFile.txt file exists, but the size of the file is 0 bytes. The reason for this is that the data that we entered into the file did not go to the primary data stream which is what the dir command is reporting. It went to an alternate data stream that we called ADStest.
To see the data that you put into the alternate stream, do the following:

This illustrates an important ADS issue: it is easy to hide things in an ADS. This technique has been leveraged for malicious purposes, so it is important to be aware of it. Recent versions of Windows have added tools to help administrators identify the presence of ADS. For example, the dir command now includes support for the /r parameter, which lists the ADSs that are associated with a file. Consider the following example:
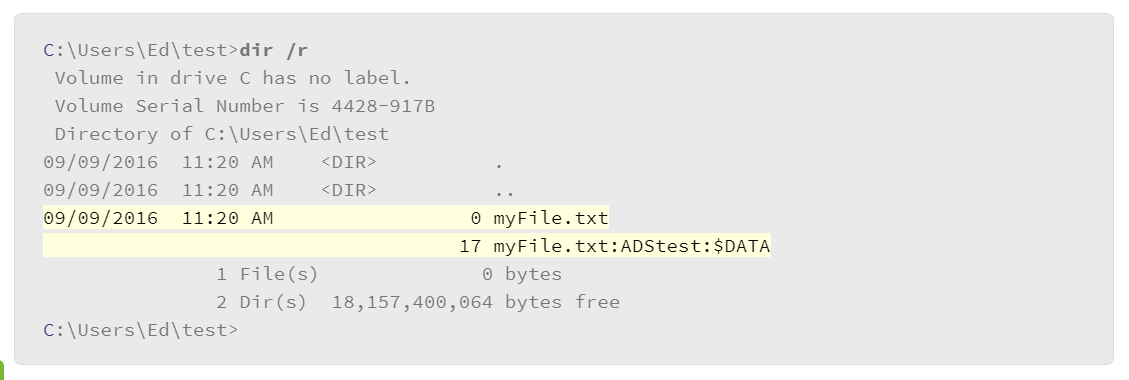
Note that the dir command with the /r parameter is now reporting the presence of the ADS attached to the file. Also note that the byte size of the ADS is also being reported and that the byte size of the file remains 0.
Windows File System Structure
In a Windows-based system, every storage device that is connected to a host contains its own file system. The Windows OS can be installed on virtually any drive that is connected to the host. However, it is most often installed on the first physical hard drive that is connected to the host. Hard drives, or any storage media for that matter, are identified with letters.
The first hard drive is given the letter C, followed by a colon (:). The Windows file system is not case-sensitive by default (although Windows can be configured to support case-sensitivity). Consequently, accessing the C: and c: drives will reference the same device. Additional storage media is given the next sequential letter designation.
The hard drive on which the Windows OS is installed is typically organized in the following manner:

This is not an exhaustive list of the full Windows file system, but it does include the major directories.
- Boot: A hidden directory that contains system boot files.
- Logs: As of Windows 10, the directory where event logs are stored.
- PerfLogs: Stores performance logs if this feature is enabled in the operating system.
- Program files: In 64-bit Windows installations, stores 64-bit applications.
- Program files (x86): In 64-bit Windows installations, stores 32-bit applications.
- ProgramData: Directory used to store application-need data. Applications are not able to write directly to this directory, but they can create subdirectories used for their own purposes.
- Users: Directory where users store their data. Each user with an account on the system has a folder that is dedicated to them. Users with standard account privileges are only able to access the data in their assigned directory.
- Public: This subdirectory of the Users directory can be shared among all the users of a system. Normally, Windows access controls do not allow users to access data in other users’ directories. However, the public directory allows anyone on the system to store data, making it ideal for sharing data among users.
- username: All users with accounts on a Windows host are given areas for their use. The area for each user resides under the Users directory and bears the name of an individual user’s account. This area allows users to privately store their documents and other data since other users are permitted access to their own directory only. Each user’s directory includes a subdirectory that is called AppData. This location is used by applications that need to store things specific to a user, for example a user’s browsing history. - Windows: The directory that stores the operating system and its various subsystems.
- System: This directory is used to store 16-bit system DLL (dynamic link library) files. In 64-bit Windows installations, this directory is normally empty.
- System32: This directory is used to store 64-bit system DLL files in 64-bit Windows installations.
- SysWOW64: 64-bit Windows is backward compatible with 32-bit applications. This directory stores 32-bit system DLL files.
- WinSxS: This directory stores copies of system DLL files. Often, these files represent older versions of the DLL files that may be required by older applications. The folder name stands for Windows side-by-side because it allows older applications to co-exist with newer ones that require the most current DLL files.
File System Paths
The Windows file system is a hierarchical system in which the root of a disk drive represents the top of hierarchy with multiple levels of directories that can store files or other directories. The term “path” refers to the location of an object, such as a file, which includes the drive and hierarchy of directories that uniquely identify the location of the object. For example, if you use your browser to download a PDF document, the system will store the document in the downloads directory of your user directory, which resides on the disk drive on which the operating system is installed—usually the C: drive.

Each element of the path is separated by a backslash () character. Note that the path starts with a reference to the disk drive, followed by the series of directories that you must traverse to get to the file, and lastly, the file name. This is known as a “fully qualified” path because it includes all the information that is needed to identify the specific location of the file.
Windows also supports relative paths to identify the location of an object. For example, when you open the command line window, the system puts you in your user directory. The command prompt itself specifies the directory that you are in. To locate the PDF file that you downloaded with your browser, you only need to specify the location of the file relative to your current location. In the example that follows, the user wishes to copy the PDF file from the downloads directory to the documents directory:

Note that with the relative notation, the leading backslash is omitted since that would represent the root of the drive. Because the user was already in their user directory, and both the downloads and documents directories reside in the user directory, only those directories that need to be referenced in the command, along with the file to be copied.
File Naming Conventions
File names in the Windows file system consist of two components:
- Base file name
- File extension
The maximum number of characters that can be used to express a file path is 256 characters. Four additional characters are included in fully qualified names (bringing the total maximum number of characters that is supported to 260), which includes the drive letter, the colon that follows it, the backslash that represents the root of the drive and a null character at the end of the file name to terminate the file name.
However, it should be noted that Microsoft provides the ability to increase the MAX-PATH length within Windows 10.
The unicode version of Windows file IO functions allow for longer paths, approximately 32,767 characters. By utilizing the extended paths, files and directories can be hidden in such a way that some tools are unable to find them. The Windows cmd shell only supports ANSI file paths. Any tool that uses ANSI file IO functions or fails to support \?\C:\ paths cannot access the directories and files that exist after the first 260 path characters.
In a Windows file name, a period or dot character (.) is used to separate the base file name from the extension. However, most other punctuation characters cannot be used in a file name because they have special meanings to the Windows command interpreter.
In Windows, the file extension is used to identify an association between a file and the application that is needed to open or execute the file. The list below contains examples of common file extensions and the applications with which they are typically associated:
- .exe: Executable file
- .txt: Text file
- .rtf: Rich text file
- .pdf: Portable document format
- .bmp: Bitmap graphic image
The list is just a small sample of file extensions. You will mostly see them expressed with three characters but that is not a requirement. File extensions are mapped in the operating system to specific applications. Often, a file format that is used by an application is assigned a unique icon by the application when the application is installed. It registers the extension association so that when a user double-clicks the icon that represents the file, the operating system will know which application to launch. Users can change these mappings but it is not done frequently.
File Properties, Attributes, and Permissions
File properties are essentially details about a file, including the file’s modification and creation date, file size, and other meta information about the file. Specific information that is stored as a property of a file can differ by file type. For example, an audio file will allow you to add a rating, but that same attribute is not supported for text files. Some properties can be modified depending upon the type of file and its ownership permissions.
Another aspect of a file’s properties is file ownership, which allows Windows to enforce a degree of access control so that only the user that creates a file and the administrator initially have permission to access the file. File owners and administrators can grant permission to others. Note that to implement Windows file permissions, you must be using the NTFS file system.
To view or modify the ownership and permission properties of a file, right-click the file, choose Properties, and then select the Security tab.
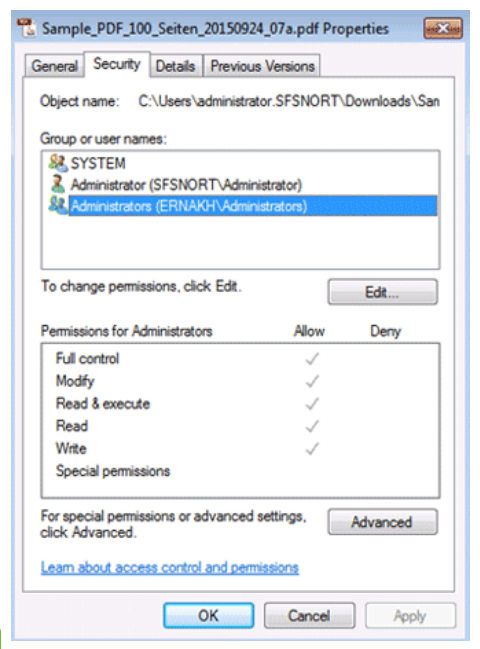
Currently, the administrator account (represented by the single person icon) and the members of the administrators group (represented by the two-person icon) can access the file. The system user that is listed is a special account that is used by the operating system. By default, the system user is granted full control to every file. You can add users to the list to give others access to the file by clicking the Edit button under the Group or user names box.
In the figure below, the user has added the Users group to the file properties.
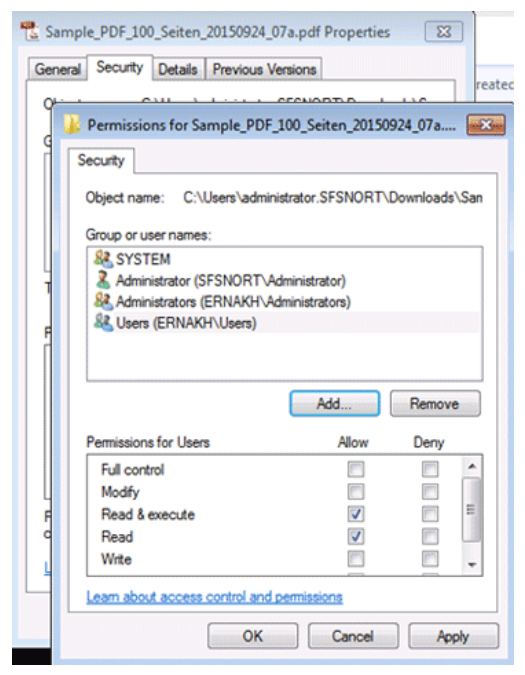
Once you have decided which users should have access to the file, you can specify the permissions to grant each user or user group. The permissions are defined below:
- Read: Allows users to view and list files and subdirectories.
- Write: Allows users to write to files or add files and subdirectories to folders.
- Read and execute: Allows users to view the contents of files, list files and subdirectories, and execute files if they are of an executable type. The read and execute permission does not grant permission to write to the file.
- Modify: Permits users to read and write to files and subdirectories and grants permission to delete files and directories.
- Full control: Permits reading, writing, modifying, and deleting files and subdirectories.
You have the ability to explicitly allow or deny file/directory permissions by checking the boxes in the appropriate column. If a specific permission level is not set, the deny permission will take precedence.

Another aspect of Windows file properties is file attributes, which is metadata associated with every file. File attributes are used to define how the system, applications, or users can interact with a file. You can view many of the attributes that are associated with a file by right-clicking the file and selecting Properties from the context menu.
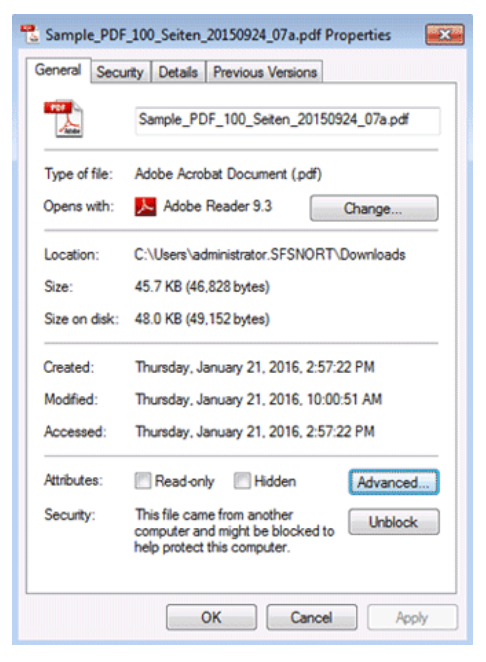
Note the attributes section that is near the bottom of the window. Click the Advanced button to expose more attributes.
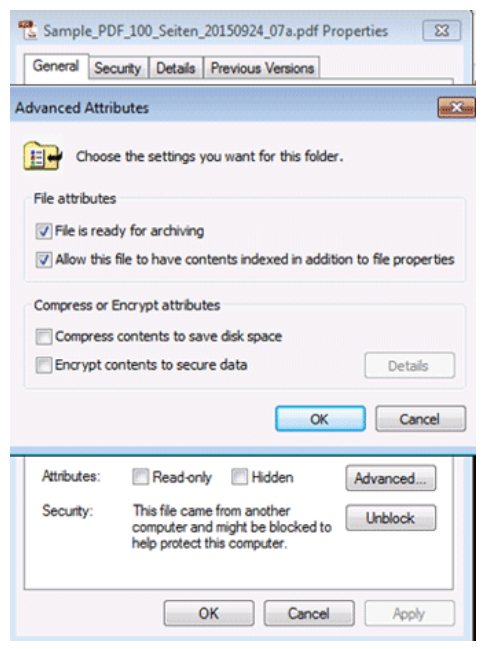
The following is a complete list of available file attributes:
- Archive: Used to mark files for backup
- Compressed: Indicates that the data in a file is compressed
- Device: Reserved for system use
- Directory: Marks the object as a directory rather than a file
- Encrypted: Indicates that the file or directory is encrypted
- Hidden: Hides the file or directory from standard directory listings
- Normal: Identifies files that have no other attributes set. It is only valid when used alone
- Not Indexed: The file or directory is not indexed by the content indexing service.
- Offline: File data is not available because it has been physically moved to offline storage; used by remote storage applications.
- Readonly: Applications can read the file data but cannot write or delete it.
- Reparse Point: A file that is a symbolic link
- System: A directory that is reserved for use by the operating system
- Temporary: Indicates that the file is used for temporary storage. Typically, the application using the file deletes it when the file handle is closed.
- Virtual: Reserved for system use.
There are several mechanisms for setting or viewing file attributes. For example, from the file properties box, you can view or modify several, but not all, file attributes. You can also view and modify file attributes from the command line with the attrib command. The help text from the command line example that follows shows the various options that you can use with the attrib command:
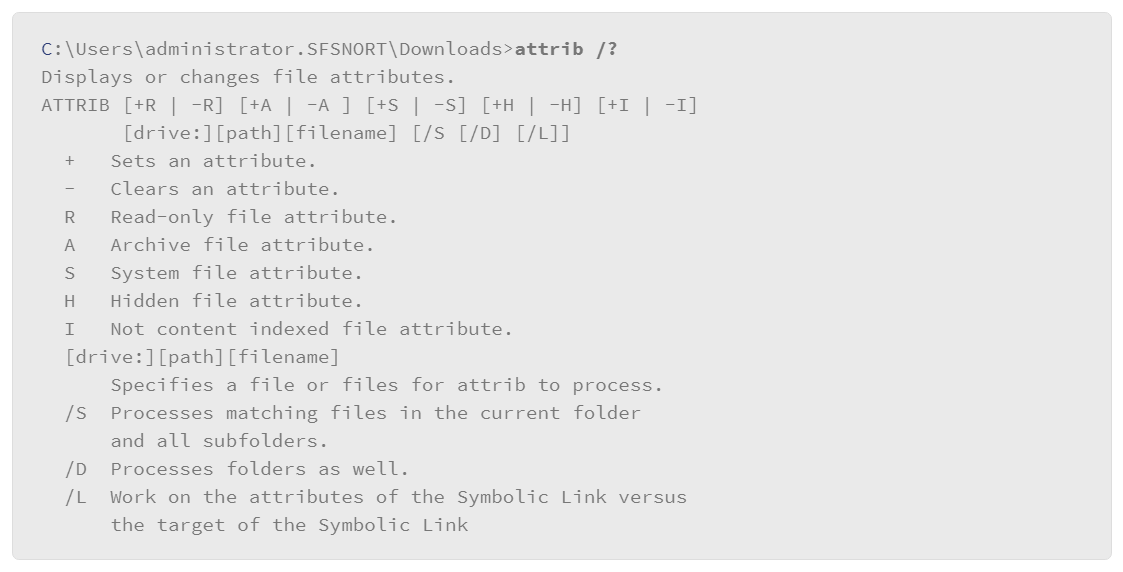
Not all the attributes are available for viewing or change with this command because some attributes are only modified by applications or the system. In the example that follows, the attrib command is used to set the read only attribute on a file:

Windows Domains and Local User Accounts
Windows systems can act as stand-alone hosts, or they can be members of domains. Domains are groups of Windows hosts that are managed by a centralized authority, which is known as a domain controller. One administrative aspect of system management that is handled at the domain level is users and user groups. Stand-alone systems are capable of hosting multiple user accounts; however, each account is managed locally on the host.
Windows Domains
Windows domains represent a closed system of users and computers that can share resources and adhere to one centrally controlled management structure. Each user and machine belonging to that domain must authenticate with a domain controller in order to access the system. A domain controller is a server that is running a version of the Windows Server OS and has AD domain services installed.
A small organization might need only one domain with two domain controllers for high availability and fault tolerance. A larger organization with many network locations will need one or more domain controllers in each site to provide high availability and fault tolerance.
One of the greatest advantages of Windows domain setup is the ability to use group policy to control all the settings of each workstation in granular detail. AD is based on the LDAP which is designed to store information about virtually any type of object in a network that anyone may need to locate. Objects can be users, hosts, devices, or virtually any type of resource. Objects are grouped in structures that are known as containers. Containers can be nested with sub-containers to create a hierarchy structure. Domains are the entities in which containers are stored, and an organization may have one or more domains that can be organized by department or geographic location, for example.
Local Users and User Groups
A default Windows system ships with two default user accounts and several user groups. The default user accounts are guest and administrator. Recent versions of Windows no longer enable the administrator account because it runs with elevated privileges. At system initialization time, the system prompts you to create a custom user account so that you can access the system without the administrator account. The administrator account can be enabled at any time but the best practice is not to do so. If an an administrator account or an account with administrator privileges is compromised, malicious code has greater access to critical system resources. Users that need to perform a task with administrator-level access can always select the “Run as Administrator” option when they select the object to act on, such as a file or connected device.
The second default user account is called guest. This account is disabled by default and for most installations it should remain this way. It is intended for situations where a Windows host may be deployed in a public space or a location where it is likely to be accessed by many people that do not necessarily have accounts on the host. It grants a limited amount of privilege and is not protected with a password. Normally, customizations that a guest user makes during a session are erased when the guest user exits. When a new guest accesses the host, they are presented with a default desktop environment from which the user can launch authorized applications and access authorized system resources.
User groups determine the level of privilege that users have on the system. For example, placing a user in the administrator’s group grants that user administrator privilege. Several user groups are present on a standard Windows installation that grant specific rights to the users that belong to the group. For example, a user can belong to the backup operator’s group, to perform backup and restore operations. Most users will be assigned to the users group, allowing them to perform common tasks, run applications, use resources such as network printers, or lock and shutdown the system.
Starting with the release of Windows 8, Windows products have been gaining greater integration with Microsoft cloud services. To support these features, you could log in to a Windows system with a Microsoft account rather than a local account. This allows user data to get synchronized between multiple desktop devices and mobile devices. For example, your files that are stored in the Microsoft cloud drive are automatically available at login time. And your desktop profile migrates to whatever host you log in to with your Microsoft account. A Microsoft account is available to any user that subscribes to a public Microsoft service, such as Hotmail or its web-based applications. Users of these versions of Windows can still create and use a local account on the host, but they lose cloud functionality unless they sign in to these applications manually.
Creating a Local User Account
There are several ways to access the application to manage user accounts on a Windows system, but the most common method is through the control panel. The exact method for accessing the control panel depends on the version of Windows, but, usually you can get to it from the Start menu in the lower-left portion of the screen. From there, you will either see an option to navigate to the control panel or, in recent versions of Windows, you will see a Settings option that opens a tablet-friendly version of the control panel. With the control panel or settings window open, you can navigate to the user accounts selection, where you can create or manage local user accounts.
When you create an account, you are prompted for the user name and domain. If you are creating a local account, you can leave the domain field blank. Next, you are prompted to provide the level of access to grant to the user. Choose standard user access, administrator access, or other, which lets you specify the privilege level from a drop-down list of options.
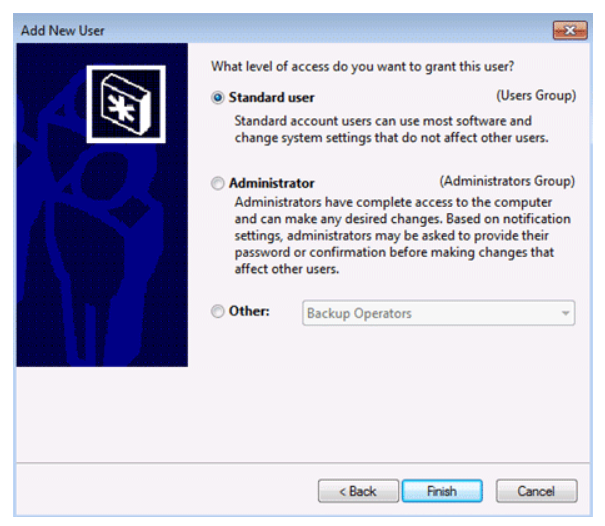
After making your selections, click the Finish button to complete the process. When the user attempts to log in with the new account, they are prompted to create a password for the account. Note that to create an account, you must either be logged in as the administrator or be a member of the administrator group.
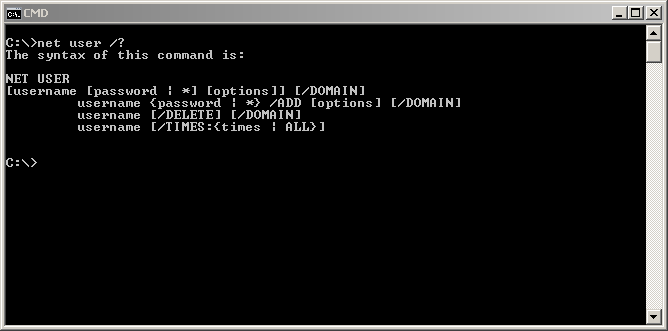
User accounts can also be created through the net user menu from the command shell.
Windows Graphical User Interface
One distinguishing feature of the Windows OS is that it is operated primarily from the graphical interface. It has a command line from which you can execute commands and navigate the file system, but usually a Windows-based host is operated from the graphical interface. The following figure shows a typical Windows 7 desktop.
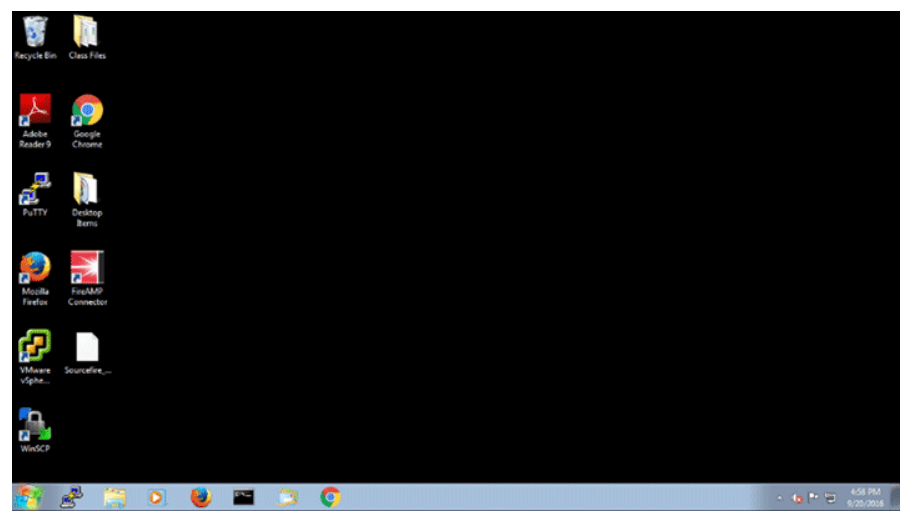
The main panel of the screen is known as the desktop. Each user is given a desktop, which is an environment that the user can customize in various ways, such as using an image for the desktop background or changing the color scheme. The desktop can also be used to store files, folders, or application icons. The recycle bin icon in the upper-left portion of the desktop is reserved for deleted files. Rather than making files unavailable immediately after deleting them, Windows stores deleted files in the recycle bin. Files are not fully deleted until you empty the recycle bin.
The lower portion of the screen contains the task bar which is further divided into three primary areas:
- Start menu: The icon that is at the far left portion of the task bar is the Start menu. The start menu gives you access to all your applications and other special features of the system such as the control panel. It also contains a field that you can type in to search for items or run commands.
- Quick launch icons: The middle portion of the task bar contains a series of quick launch icons, which act as launch buttons for applications that you place in the task bar. It also creates an icon for each application that is currently running. Clicking the icon of a running application brings it to the foreground so you can use it. You can also pin application icons to the task bar for easy access to frequently used applications.
- Notification area: This area contains several features for viewing notifications and controlling applications or processes that run in the background. The arrow icon opens the system tray which is where you can access options for controlling background applications. The flag icon lets you view system notifications and the icon to its right lets you view and control networking status. The shape of this icon will change depending upon how you are connected to the network. If you are wired to the network over an Ethernet connection, the icon will appear as a computer terminal; if you are connected over a wireless adapter, you will see the wireless icon here instead. This area also contains a clock so you can view the date and time. Lastly, there is a rectangular button in the far right portion of the task bar that is used to minimize all the running applications and show you the desktop.
Windows Context Menu
Another feature of the Windows desktop is the ability to bring up a context menu in virtually any part of the graphical interface. Right-click an item to open a context menu. Windows keyboards also contain a context menu key that exposes a context menu at the location of the mouse pointer. The context menu presents menu options that are relevant to where you opened it. Also, some third-party applications add items to the context menu.
Windows File Explorer
Windows provides a tool for managing files and navigating the file system, which is known as the Windows File Explorer and is sometimes referred to as Windows Explorer. It is a utility that runs in the graphical environment and can leverage many of the features of the graphical environment, such as drag-and-drop and the context menu.
The Windows OS is known for its rich graphical interface which makes for an intuitive and easy-to-use end user platform. Though it does provide a command line interface which is also quite robust, most users choose to operate the system using the graphical interface.
Run as Administrator
Certain tasks that you need to perform to administer a Windows system may require administrator privileges. Normally, the command interpreter runs with the permissions that are configured for the user who is operating the command line. However, you can elevate your permissions to administrator level using the following methods:
- Right-click a command icon: If there is a command you need to run as administrator, you can use the Windows File Explorer to find the command and right-click it to bring up its context menu. From there, you can Run as administrator, as seen in the figure. This technique can be useful in situations where you need to install an application with the administrator context. In the figure, the user is installing an AMP for endpoints connector which requires administrator privilege
- Open the command interpreter as administrator: Right-click the icon for the command line to see that the same option, Run as administrator, is also available. The difference is that all the commands that you execute from the command line will run with the administrator context.
Windows Command Line Interface
In addition to the rich graphical environment, Windows includes a robust command line interface that you can use to execute applications, manage files, and navigate the file system. You can also store commands in a text file and execute them, just as you would a shell script in Linux environments.
When using the Windows command line interface, consider the following:
- Case sensitivity: By default, Windows commands, file paths, and file names are not case-sensitive. However, the case-sensitivity of the text is preserved when creating a file or directory. Windows will not take case-sensitivity into account when expressing an item in the command line. However, Windows can be configured to support case-sensitivity.
- Directory references: Directory structures in a Windows installation are referenced with a starting point of the storage media on which the file you need to reference is located. Storage media is assigned a drive letter. After the drive is identified, you list the directories that the system must traverse to access the file. Drives, directories, and files are delimited with a backslash (\) character. For example:

- Commands and command options: You can execute commands from the command line. Often, the commands you execute will accept options. Command options are preceded with a forward slash (/) character. In the example that follows, a ping command is shown with an option to send a specific number of echo request messages:

- Accounting for spaces in file names: The Windows file system allows for file names to contain spaces, which can cause problems in the command line because a space is typically used to separate a command from its arguments. To ensure that a space in the file name is interpreted correctly, enclose the file name in double quotation marks (“).

In the example, the user is copying the Class Files.zip file to the D: drive. Note that the file name contains a space and that the user enclosed the file name in double quotation marks (") to prevent the command line from misinterpreting the command. - Auto-complete: A useful feature of the command line is the ability to automatically complete commands that reference directories or files. This is accomplished by pressing the Tab key as you enter file or directory references in the command line.

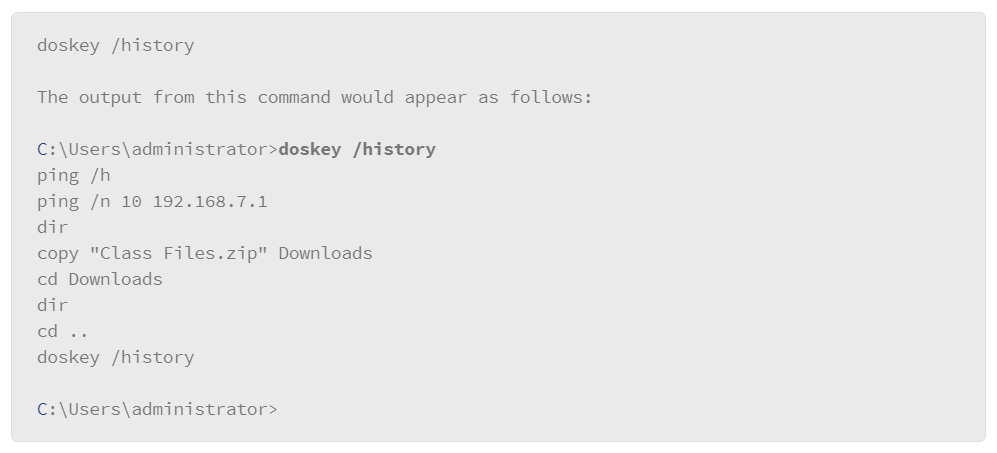
In the example, the user entered the copy command followed by a portion of the file name. Then the user pressed the Tab key to autocomplete the file name reference. If the command interpreter can determine the remaining portion of the file, it will complete the file name automatically. If the file does not exist in the location that was specified by the user, the command interpreter does nothing. In this case, check your syntax or spelling. Also note that the command interpreter recognized that the file contained a space character in the name and correctly enclosed the file name in double quote characters. - Command line history: The Windows command line maintains a history of the commands you used throughout the command line session. Once you exit the session, the command history is erased. A new command history is created the next time that you open the command line. To access recently used commands, use the up or down arrow keys. You can list the command history with the following command:
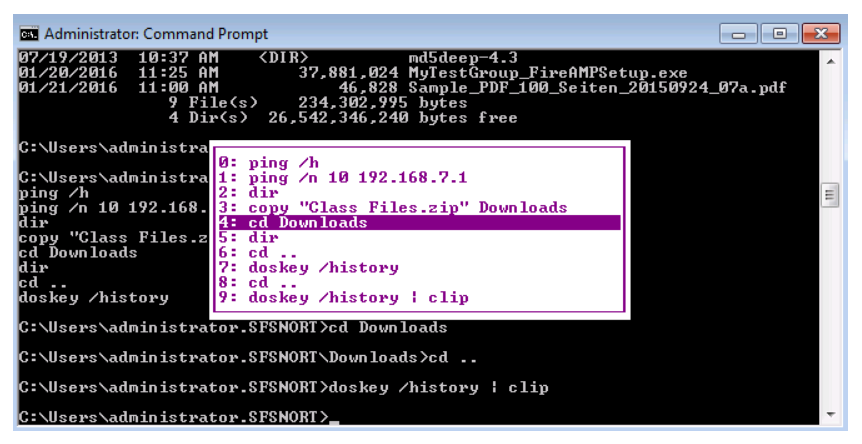
Another option is to press the F7 key while you are in the command line window. This opens a box in your command line session that lists the command history. Navigate the box with the up and down arrow keys or use the Home and End keys to go to the beginning and end of the command history list. You can also use the Page Up and Page Down keys to move a page at a time if the list spans multiple pages. When you highlight the command that you wish to use from the list, press the Enter key to execute it. The figure shows an example of the command history box after opening it using the F7 key:
The Windows command line history provides another feature that you may find useful if you are entering a lot of long commands that you don't want to type. Type a portion of a command and press F8 to have the command interpreter fetch the most recent command that begins with the string that you typed. If the command that is presented is not the one you want, press F8 again and it will search the history for the next most recent instance of the string.
File and Directory References from the Command Line
The Windows OS designates all storage media as unique entities with their own file systems. Therefore, referencing a file or directory location will always begin with a specific drive letter. A user can easily switch from one drive to another by simply specifying the drive letter followed by a colon.
With the drive that you wish to use selected, you can begin to navigate its directory structure, manage files, or execute commands from the command prompt.
The Windows command prompt allows you to reference files and directory locations in one of two ways:
- Fully qualified reference: Using this method, you must enter the entire directory starting from the root of the current drive or a drive letter if the item that you wish to reference resides on a different drive.

In the example, the user executed the type command, which is used to print the contents of a file to the screen. The user’s command prompt was in drive D:, but the file that the user was interested in was on the C: drive. The user referenced the file using the fully qualified path to the file. - Relative reference: Relative references to file or directory locations take into account the current file system location as the starting point of the reference. If a file or command resides in a directory level that is higher than the current directory, use the double dot (..) notation to move up the directory structure
Windows PowerShell
Although the Windows command line has a rich set of features, including the ability to create batch file scripts, it lacks the ability to interact with core Windows OS functions and graphical interface. The Windows PowerShell overcomes these drawbacks by providing a scripting environment that is deeply integrated with the operating system and graphical interface. It also provides a command line interpreter for executing commands and directing their output to the screen, as you would by executing a regular command from the command line. The true power of the PowerShell however, is the ability to use it as a scripting language for automating tasks. It is also interoperable with other operating systems such as Linux and OS X.
As of Windows 7 and Windows Server 2008, PowerShell has been included as an integrated component of the operating system. It can run on versions before Windows 7, but it has to be installed separately. Another recent development regarding PowerShell is that it became an open source project in August of 2016, paving the way for support under other operating systems. Open source code can be obtained from GitHub.
Windows PowerShell can execute several types of commands:
- cmdlets: Pronounced “command-lets,” cmdlets are programs that are designed to interact with PowerShell.
- PowerShell scripts: These are sequences of PowerShell commands that are contained in a file that can be executed. PowerShell script files have a .ps1 file extension.
- PowerShell functions: Functions are code snippets that can be referenced from within a script. Functions can be crafted to accept parameters.
- Standard executable files
PowerShell was also designed with security in mind. First, to execute PowerShell commands locally with escalated privileges, you must use the “Run as Administrator” option. Second, the PowerShell Remoting function is disabled by default, and once enabled, administrator rights are required to connect to a remote computer via PowerShell. Lastly, PowerShell includes an execution policy to determine whether the system can run PowerShell scripts at all, or, if it can, the execution policy can enforce whether the script has to be digitally signed.
There are four PowerShell execution policy elements as follows:
- Restricted: Default execution policy that completely restricts the use of PowerShell scripts on the system
- AllSigned: Indicates that any PowerShell script that you attempt to execute must be digitally signed
- RemoteSigned: The recommended execution policy mode that indicates that externally downloaded scripts must be digitally signed, but scripts that are created locally do not need to be signed. Windows considers a PowerShell script to be an externally downloaded script when the file contains an ADS to indicate that the file came from the Internet zone.
- Unrestricted: This places no restrictions on running PowerShell scripts.
From within the PowerShell environment, you can determine the current execution policy by using the get-executionpolicy command. You can also set the execution policy by using the set-executionpolicy command from within the PowerShell environment.
Another aspect of the security that is built in to PowerShell is that it does not run commands from the current directory. It searches the directories that are stored in the PATH environment variable. If the PowerShell script that you are trying to call up is not in one of the directories that are specified in the variable, the system will return a “file not found” error, even if the script is in the same directory where you attempted to execute it. To execute a PowerShell script, it must be in the PATH variable, or you can provide the fully qualified path. For scripts in the same directory, put a period+backslash (.) or period+forward slash (./) in front of the script name to instruct the system to search for the file in the current directory.
Entering PowerShell
The Windows PowerShell environment can be initiated in several ways. First, you can go through the start menu and find the icon to start a PowerShell session. If you simply click the icon, you will be restricted in what you can do. However, if you right-click the icon and choose the “Run as Administrator” option from the context menu, you will have full control of the PowerShell session.
Another option is to start a PowerShell session from the standard command line window. Again, for full control, you should be utilizing the command line as an administrator. The command to start the PowerShell is start powershell. The new window opens with the PowerShell command interpreter (it may look similar to the standard command line window, or have a different color scheme). What you see depends on the PowerShell version that is running on your system.
In all cases, the PowerShell command prompt starts PS, immediately followed by the directory path from which you started the PowerShell session. Note that the banner indicates that you are in the PowerShell command interpreter environment, as does the title bar of the Window running the PowerShell.
Test the PowerShell session by running a simple command as shown below:

In the example, the user executed the command to check the PowerShell execution policy. The value that it returned was “restricted” which means this host is not configured to run PowerShell scripts. To enable PowerShell script execution, enter the following command:

Note that the system returns a warning and gives the option to continue or exit. The default is to continue. Press the Enter key, or enter the letter y followed by the Enter key, to accept the default.
Another alternative for executing PowerShell commands or executing scripts is to use the -command option with the PowerShell command line start command, as follows:

This starts the PowerShell and executes the command that you enter as the argument to the -command option. This method closes the PowerShell window after the command executes, so it might be better suited for launching scripts. You, can, however, use the -NoExit option to leave the window open when the command finishes.
Using PowerShell
When you first start using PowerShell, you should explore the help system, which provides a quick means of giving you information and usage examples. Invoke the help system with the get-help command. Include the more command to prevent information from scrolling off the page before you have a chance to read it.
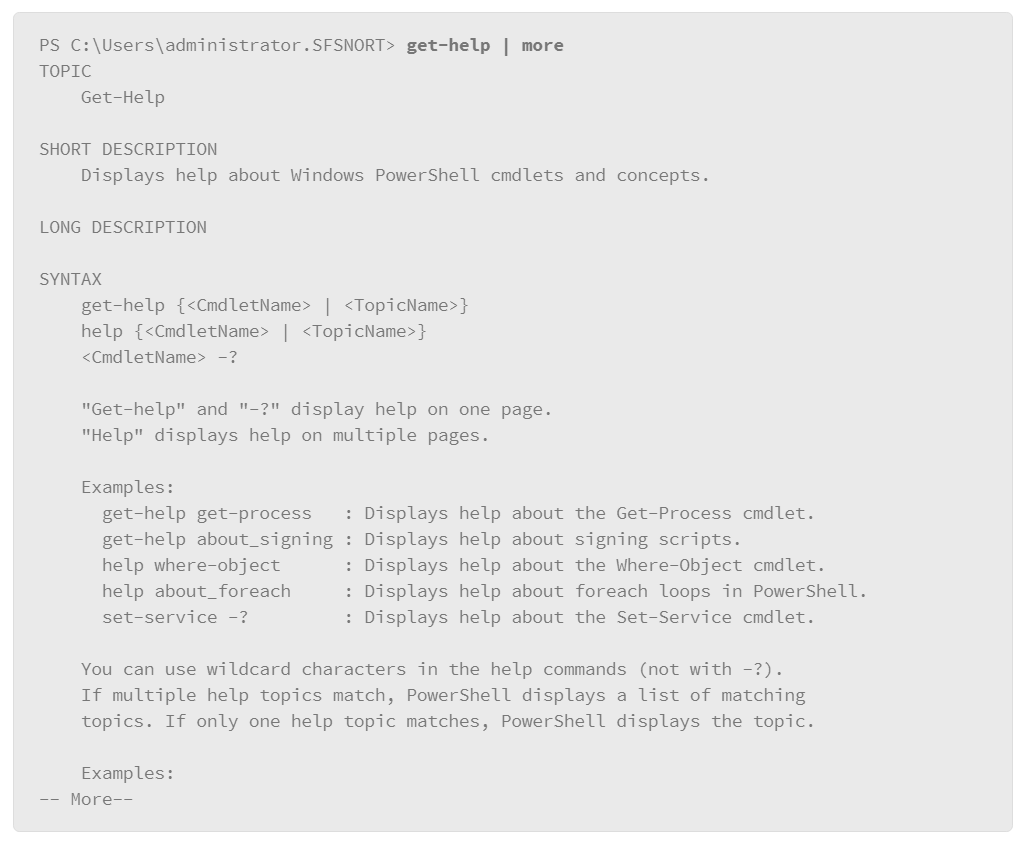
This is a partial representation of the help page, but it shows syntax examples, and examples of how to get help on specific commands.
To get the most out of the PowerShell, explore the four levels of help information further:
- get-help
: With no further parameters, returns the least amount of help information</li>
- get-help
-examples: Provides basic help information with examples.</li>
- get-help
-detailed: Provides a more detailed amount of help information with examples.</li>
- get-help
-full: Provides the most information with examples and greater technical depth.</li> </ul>
The previous example, where the get-help command output was piped to the more command, is another powerful capability of PowerShell. Piping the output of one command to the input of another greatly increases your productivity with PowerShell by getting directly to information that you may find useful, rather than wading through long lists of command output feedback. In the example that follows, you may be interested in finding out about services that are installed on the host that you are evaluating. Use the get-service command to do so, but it yields a great deal of information including stopped services and running services. You may only be interested in the running services, so pipe the output of get-service to the where-object command to specify the output criteria.
The following is an example of how to execute these commands to filter the output to just running services. This output is also piped to the more command due to the size of the PowerShell window. This way, the output does not scroll off the screen before you have a chance to read it.
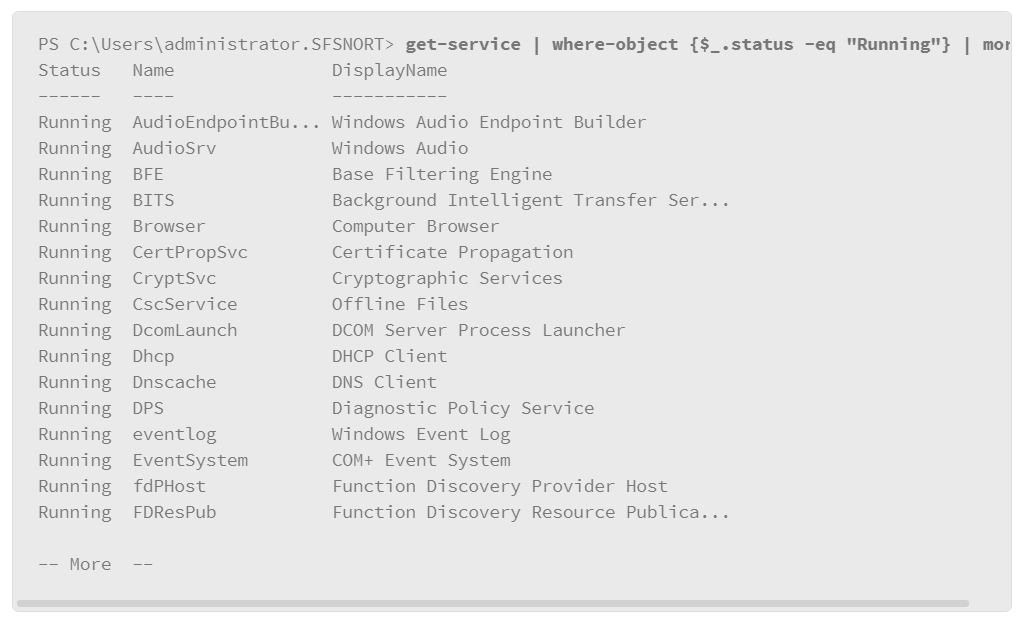
Now the command output is more precise and usable. The parts of the command that make this work are the parameters of the where-object command. The first parameter specifies the field of information that you are interested in. The second parameter uses an equality operator to let you specify the string in the field that you wish to search for.
Another interesting feature of PowerShell is the ability to send output from a command to an interactive table in the graphical environment that you can sort and filter. The example that follows places the output of the get-process command to the interactive table.

This command produces an interactive table as shown in the figure:
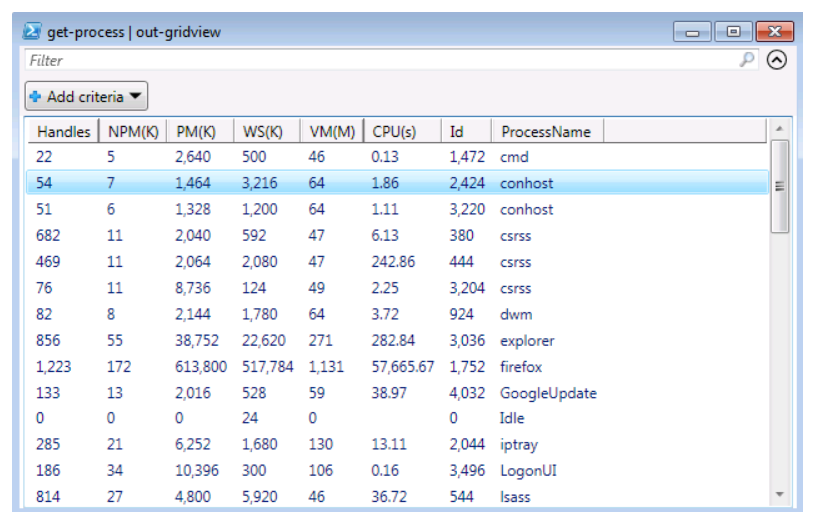
The window is the output of the command in a graphical table that you can interact with. Click column headings to sort on a column, filter items based on a fstring that you enter in the Filter field near the top, and add criteria to further filter the output. For example, if you click the Add Criteria button and select handles, you can enter logical operators as a filter, such as handles with a number greater than, less than, or equal to a value that you enter.
In this example, the output from the get-process cmdlet includes the following:
- Handles: The number of handles that are opened by the process
- NPM(K): Nonpaged memory in kilobytes
- PM(K): Pagable memory in kilobytes
- WS(K): The working set of memory pages that is used by the process in kilobytes
- VM(M): Virtual memory, in megabytes, that is consumed by the process
- CPU(s): Processor time, in seconds, that is consumed by the process
- ID: The process ID
- ProcessName: The name of the process
At a glance, this gives you an idea of the processing resources that are consumed by individual processes at the time that the command was executed. Clearly, the Firefox application was consuming most of the processing resources when the get-process cmdlet was executed.
Importing PowerShell Functions
PowerShell users have an active community that features sites, blogs, and various resources for users to support each other and share code. By taking advantage of these resources, you may find that a problem that you need to solve with PowerShell has already been solved by others. If you obtain code from another source or you wrote a function that you wish to use as a script, use the import-module command to do so.
For example, the Microsoft blogging community makes many useful code examples available. One entry, which was written by Shay Levy, includes a PowerShell function to find running processes that are listening for connections with their associated port numbers. You can copy the code example and import it, so that the function is available to run on your system as if it were a standard cmdlet. The process for performing the import is as follows:

In the example, the import-module command uses the -name parameter to identify the file with the code sample that you wish to import. It also adds the -verbose parameter to provide verbose output as it processes the file, which could provide useful information if the import were to fail. The extension of the file name is also provided; the convention is to use the .psm1 extension for importing this type of code sample.
With the code sample imported, execute it as if it were a regular cmdlet as follows:
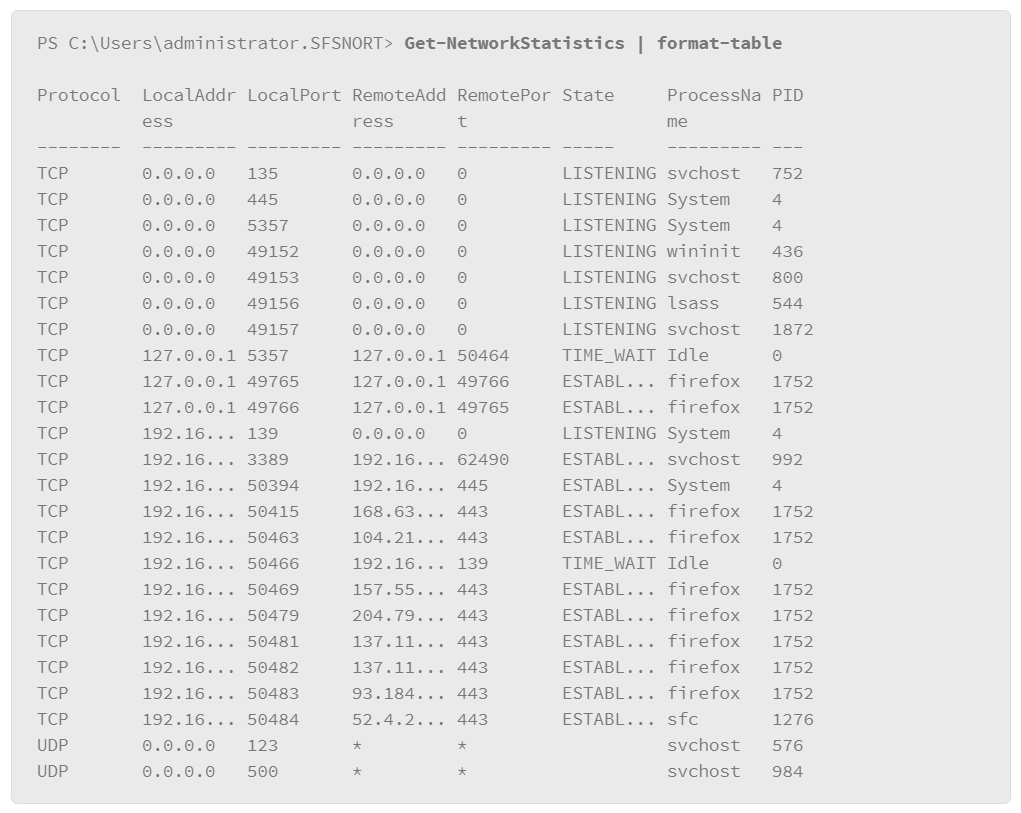
The example output is truncated, but you can see that it provides a great deal of information which could be useful if you are investigating suspicious processes that have opened a port to listen on, for example. Note that the data within some of the columns is truncated as well. Adjust the width of the PowerShell window to see the entire message for each field in the output.
Windows net Command
The Windows OS contains a robust suite of commands that are comparable to the command sets that are available in any other operating system. However, Windows OS includes a set of commands that are specific to Windows administration and maintenance. These commands are known as the net commands since the commands start with the term net and are often used to manage network resources, although there are also options that focus on local system resources.
To get information about using these commands, enter net help at the command prompt to display a list of various net command options, and instructions for getting help with specific options.

The syntax of this command is:
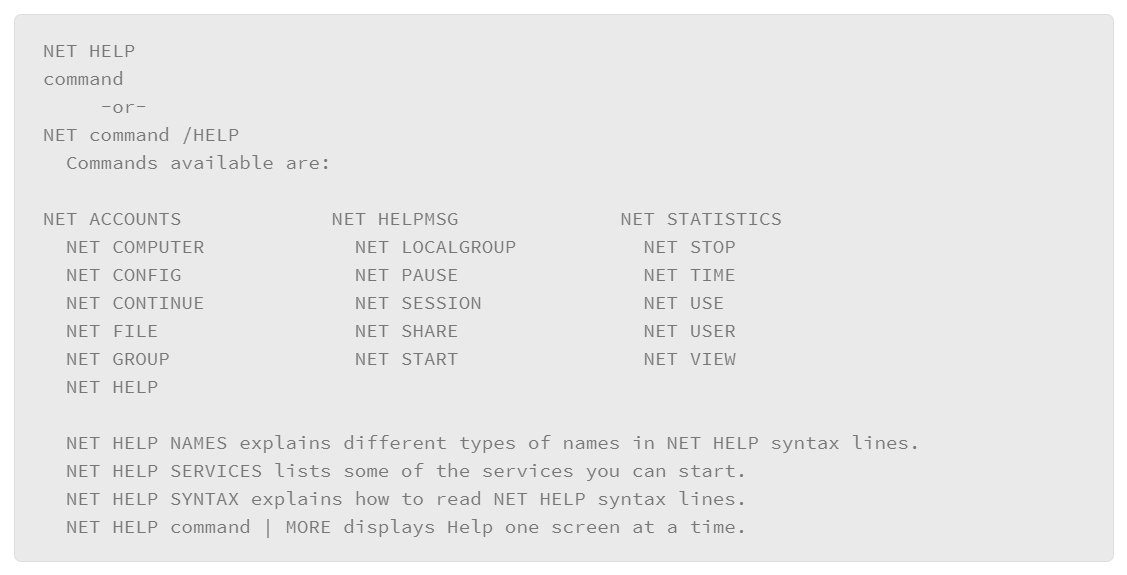
An example of using a net command is to view or edit local user account login policy. You can use the net accounts command as follows:

With this usage, you can view the local user login policy, and modify the policy if you wish. Currently, based on the feedback from the net accounts command that was issued previously, the Maximum Password Age is unlimited. You prefer that the user of this host periodically changes their password, but you are not sure how to structure the command. The following syntax to will provide help:

There are many more uses for the net commands. For example, if you need to mount a file share to your Windows host, use the net use option of the net command.

This command mounts a share to the remote host 192.168.7.88 and it connects to a share that is named “users.” When the share mounts, it will be mapped to the driver letter z:. So, the local users of this host will be able to use the remote share as if it were a locally connected disk drive. Lastly, the command specified a user name to log in with on the remote host. If the user name is a valid user on the remote host, the user is prompted for a password. Upon entering the correct password, the share becomes available to use on the local host.
This last example demonstrates how to use the command to stop and start network services. First, you must know the name of the service that you wish to control. In the example, the system admin will use a service that is called FileInfo. The following represents the sequence of commands to stop and start the service:

Mastering net commands is an important skill for Windows administrators. You've seen just a few examples, but there are many more useful features of the net commands.
Controlling Startup Services and Executing System Shutdown
It is possible to manually edit the registry keys directly with the registry editor to control auto-start services, but if you edit something incorrectly or delete a key that is required by the system, you can damage a Windows system. Tools are available to view auto-start services and change their start-up properties without directly manipulating the registry. For example, the Msconfig.exe tool ships with the OS and allows you to view and edit system start-up properties. Access the tool by entering the msconfig command at the prompt, or in the search field of the start menu.
The Msconfig.exe tool allows you to control various aspects of the system configuration. Options are grouped as tabs in the following categories:
- General: This group of settings allows you to control various options for starting up the system. The default is a normal startup, but you can choose a diagnostic startup or a selective startup where you can control whether to start system services, startup items or whether to use the original boot configuration.
- Boot: If multiple versions of Windows are installed, you can choose which one to boot on startup. You also have options for controlling the safe boot mode, which is a boot process that is used for troubleshooting system issues. Safe boot mode is normally turned off to allow the system to perform a normal boot.
- Services: This section lists the services that are loaded in the system and their state: Stopped or Running. It also gives you the option to disable or enable the services, which will require a reboot to take effect.
- Startup: This section lists the applications and services that are configured to automatically start at boot time. It also gives you the option to disable or enable the applications and services to start at boot time, which will require a reboot to take effect.
- Tools: This section lists the tools that ship with the OS. You can launch the tools directly from this window.
System Shutdown
The best practice when halting a Windows system is to perform a proper shutdown, rather than simply turning it off. This gives the system a chance to terminate applications and services with dependencies in the proper order, and allows the system to write any configuration changes or pending edits to their respective files. Shutting down the system incorrectly can corrupt open files or damage applications that were in the process of doing something when the system was turned off.
Part of the shutdown process is to inform applications and services that a user requested a shutdown. The system communicates this request to each process so that the processes can start terminating open threads, and cleaning up open file handles. If a process thread does not respond within a predetermined period (default is 20 seconds), the system displays the hung application warning box, giving you the option to wait or close the application. After user mode applications have closed, the system begins terminating system processes. These processes are also bound by the timeout, however, no warning is displayed. The system may appear to hang at this point while it waits for the offending process to terminate. In this situation, after you have waited a reasonable period, you may have no choice but to manually turn off the system.
There are several ways to shut down a Windows system:
- From the Start menu: The Start menu configuration may differ slightly from one version of Windows to another, but you can always find it in the lower left portion of the screen. From there, you will see an option to shut down the system. Selecting that option presents a message box for you to select the type of shutdown to do.
- Ctrl+Alt+Delete: Affectionately known as the “three-finger salute” because this method requires the user to press the Ctrl, Alt, and Delete keys at the same time. A screen pops up with a series of options, including system shutdown. Note that the most recent versions of Windows eliminated this option from the list and replaced it with an icon in the lower right that brings up the list of shutdown options.
- Command line: Execute the shutdown command from the command line to begin the shutdown process. The command can take various parameters to determine the type of shutdown to perform.
There are three options for shutting down/restarting a Windows host:
- Shutdown: The OS completely shuts down.
- Restart: The OS completely shuts down and the system automatically re-boots.
- Sleep/hibernation: Captures system state and writes it to a file. The system then enters a low-power state but it is not completely turned off, allowing users to resume operation quickly without having to boot the host. The feature is primarily designed to accommodate laptop and mobile devices.
Controlling Services and Processes
When Windows is up and running, administrators need to know about the services and processes that are operating on a given host. This can be the result of simple system maintenance or it can be part of an investigation to see if there are suspicious processes that are running on a compromised host. This topic presents several tools that are available to get information about processes and manage them.
The task manager is a primary tool that every Windows administrator should be familiar with. The figure shows an example of the Task Manager window from a Windows 7 installation.
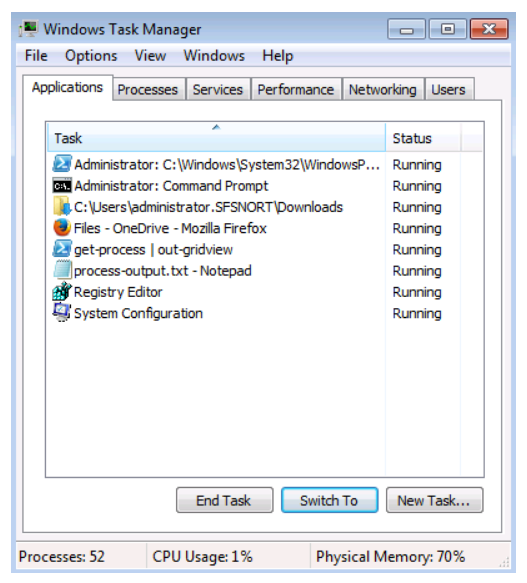
The task manager provides a great deal of information regarding what is running on the system including system performance metrics. Because it pertains to services and processes, the first three tabs provide the most useful information.
- Applications: Lists the applications currently running on the system and gives you the ability to end the task or switch to it. This area can be useful for killing hung applications.
- Right-clicking an application in this list gives you several options in a context menu. One of the interesting options you may find useful is to jump to the process that runs the application. - Processes: This tab lists processes running on the system and it also gives you the ability to sort applications several ways: by name, by the user that owns the process, by CPU resource consumption, by memory resource consumption and description. This view can help you identify processes consuming resources or acting strangely. You can also terminate misbehaving processes.
- Right-clicking a listed process opens a context menu for various things, such as opening the location of the file that starts the process or opening the processes properties. - Services: This tab provides a list of the services that are loaded on the system. It also shows you the service status: Running or Stopped. It also provides a button that opens the Services management console applet. From there, you have greater control over loaded services and configuring their properties.
- Right-clicking an item in the services list allows you to open a context menu with several options. For example, you can stop or start the service depending on its current state, and you can jump to the process that runs the service in the process list.
The msconfig utility also has the ability to show the status of the services. The figure below shows the Services tab of the msconfig utility.
The amount of management that you can perform from msconfig is somewhat limited: you can only enable or disable the services at the next reboot. But it allows you to view the services and potentially identify any that appear suspicious. You may also find useful tools to give you greater control through the Tools tab.
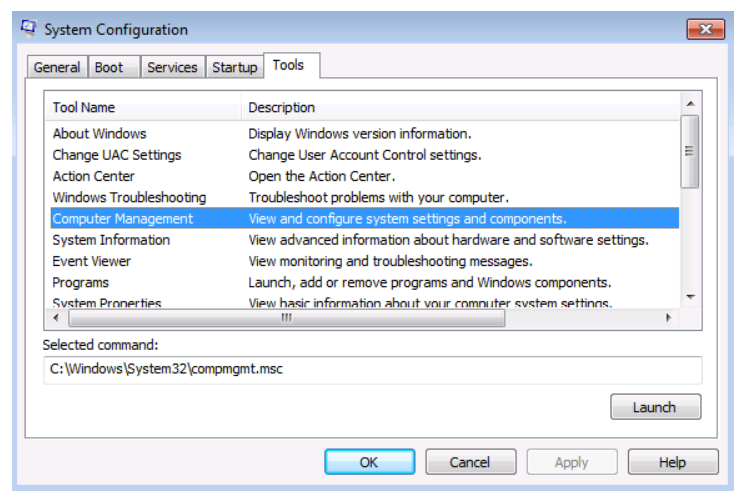
In the Tools tab, you can select a tool and launch it from this application window. In this example above, the user has selected the Computer Management tool which gives access to control a wide range of system settings, including services.
Evolution of Windows Task Manager
The task manager was updated in recent versions of Windows (version 8 or greater), and added some key enhancements and tabs that provide more useful information. This section provides an overview of the updated task manager.
First, the task manager opens as a simple window that lists applications that are currently running on the host.
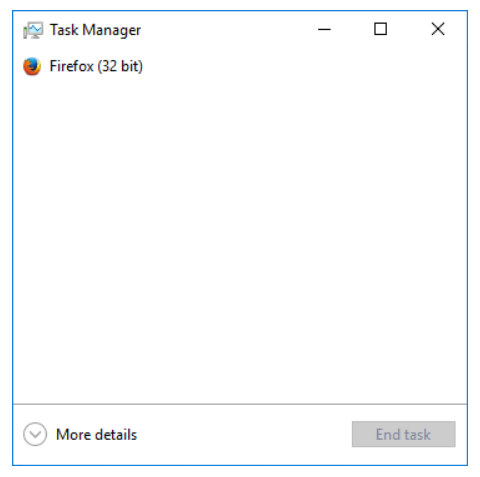
To get to all the task manager features, click the More Details button. This expands the window to reveal the full set of task manager features as seen in the figure below.
Note that the application tabs have changed and that the information is presented in a more graphically organized manner to improve what is presented at-a-glance.
- Processes: This presentation includes both applications and processes in a single list. Applications and processes consuming large amounts of resources relative to others get shaded in various ways. Generally, the darker the shade of yellow and then orange, the higher the resource consumption. If resource utilization has reached a critical level, the value will be shaded in red. Processes are organized in terms of Background processes and Windows processes. Each section of the list is labeled accordingly.
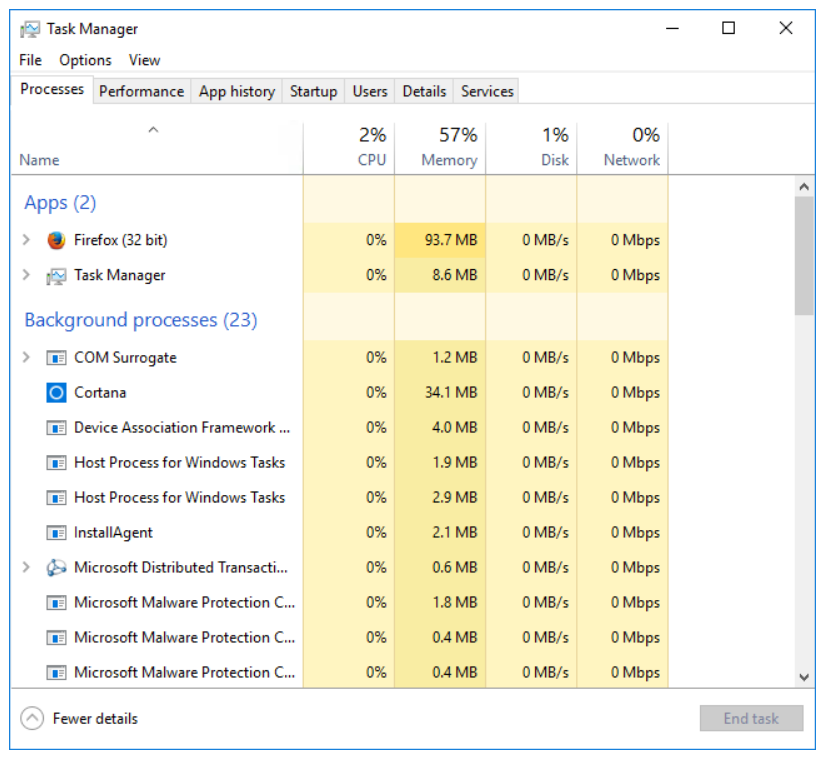
- Another enhancement is that processes running sub-processes are identified with a button in the shape of a greater-than symbol. Clicking this button expands the selection to show the sub-processes. In the case of applications that are running multiple windows, such as a browser with multiple tabs open, clicking the button lists all the windows or tabs belonging to that instance of the application.
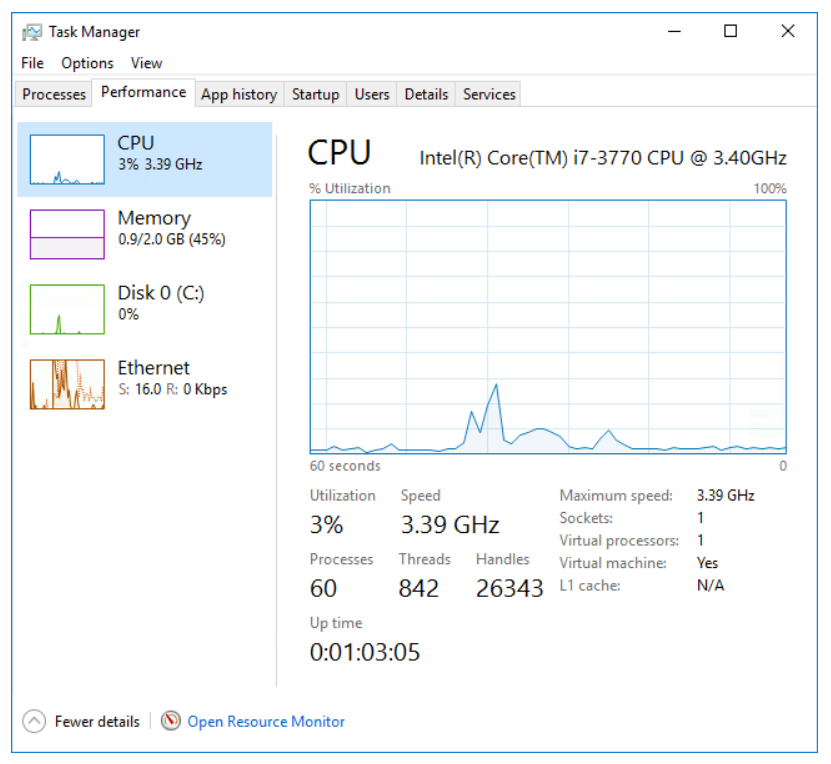
- One enhancement that could be particularly useful is embedded in the context menu. Right-click an application or process in the list to see a context menu that is associated with that item which contains an option that is called “Search Online.” This initiates a search for the item using the system’s default search engine. A key use case for this feature is to do a quick lookup on a process that is suspicious. However, be advised that many classes of malware either misrepresent what is displayed in the task manager or disable it all together. - Performance: This tab aggregates all the major performance metrics (CPU, memory, disk, and network) into a single section. You can click a resource in the left portion of the tab and the main panel populates with the performance details of that resource including a general performance graph over time and values of key metrics that are dynamically updated as resource consumption changes.
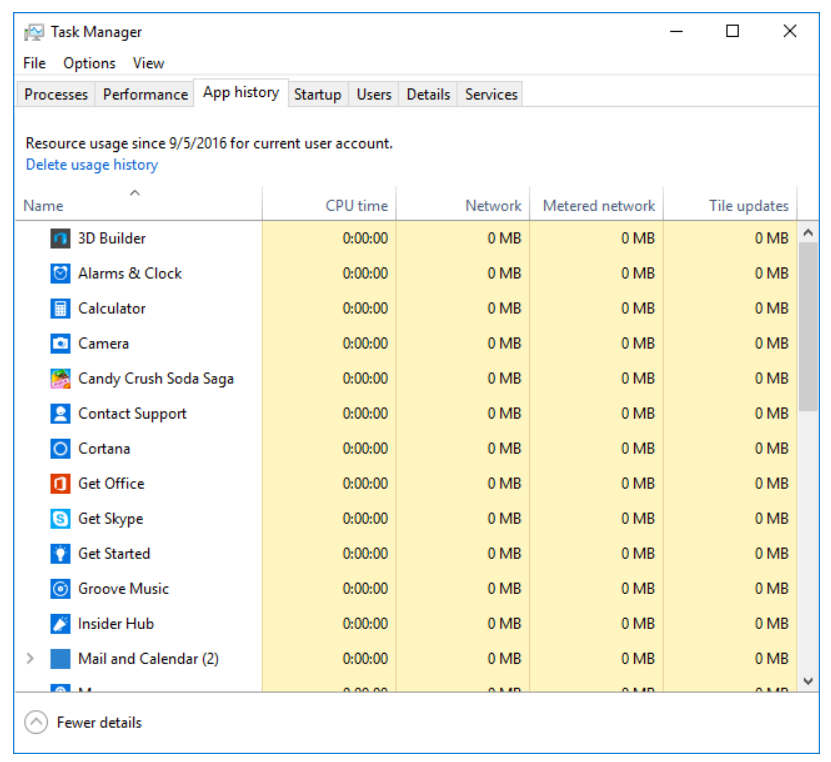
- App history: By default, this tab shows historical resource utilization of applications over time, giving you an idea of which applications may be consuming high amounts of resources. Edit the properties of this page to display historical resource consumption for all applications by clicking the Options menu at the top of the window.
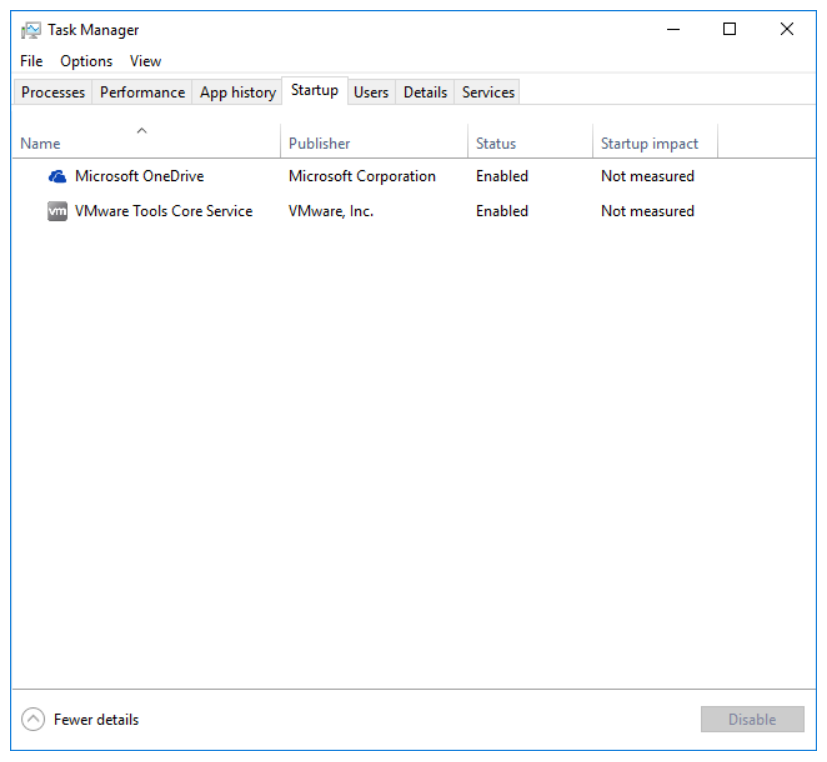
- Startup tab: This tab presents a list of applications and services that start up at boot time. You can select an item from this list and click the Disable button in the lower-right portion of the window to prevent the application from initializing at boot time.
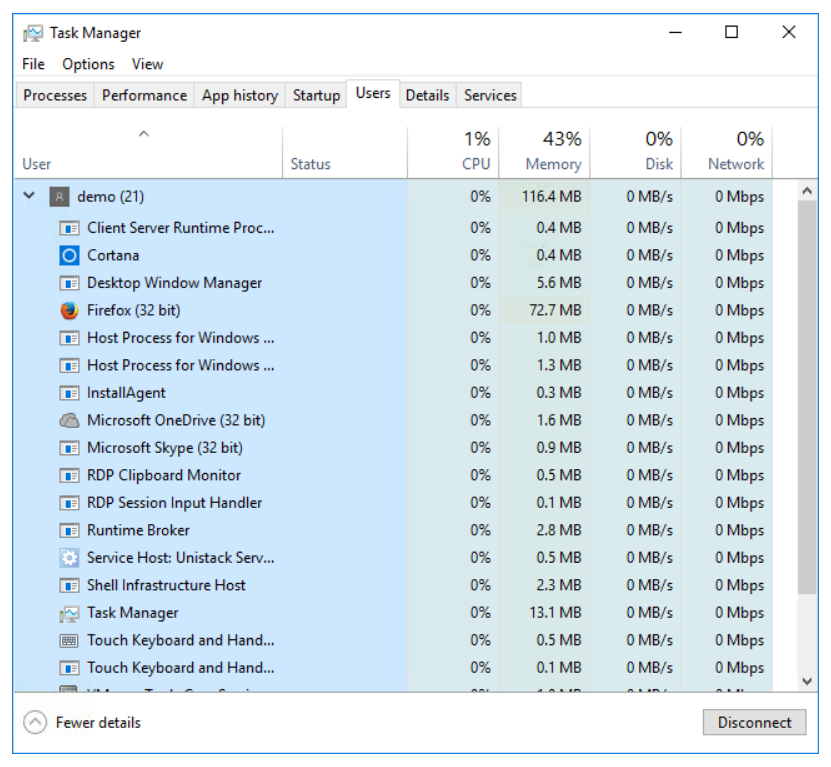
- Users tab: This tab displays users who are currently in the system. It also displays the resources that are consumed by the applications and processes that belong to each user. You can see a list of these processes by clicking the arrow button in front of the listed user to expose the list of processes belonging to the user. You can also select a user and disconnect him or her from the system if you have administrator privilege.
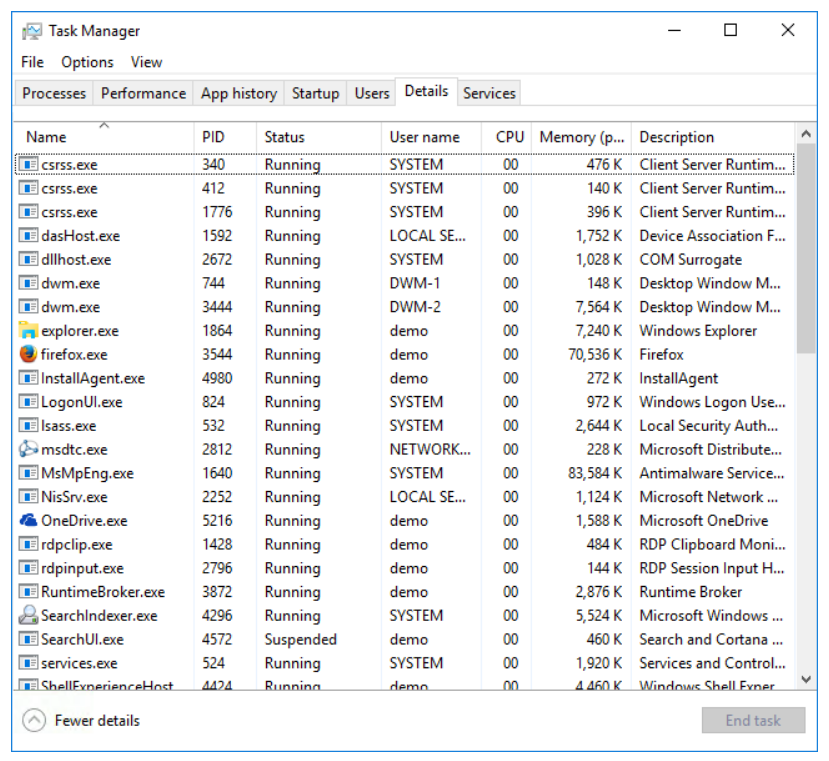
- Details tab: This tab displays a list of all the applications and processes running on the system. It expands on the capabilities of the Processes tab in that it displays status information for each item and it makes more advanced options for managing processes available through the context menu when you right-click an item. For example, it allows you to set a processing priority for an item. The context menu also allows you to set CPU affinity. Affinity is a feature that is used primarily on multi-core or multi-CPU systems, allowing a process to run on a specific core or CPU. Another option on the context menu is called, Analyze wait chain. This option will display the status of a process that might appear to be hung up. You can easily determine from this option whether a non-responsive application is waiting on another process.
- Services tab: This tab, as the name implies, lists the services that are loaded on the system and the service status (Running or Stopped). It is not much different than its predecessor from previous versions of Windows but it does include the ability to do an online search for a service that may not be familiar to you. It also allows you to open the Services applet from the management console application to give you greater control over the properties and configuration of services.

Monitoring System Resources
In addition to information that is related to services and applications that can be gathered from the Task Manager, you can also gather information that is related to system performance. Three Task Manager tabs provide information about various aspects of system performance:
- Performance: This tab as shown below shows the general system resource utilization. It contains a graph of CPU utilization and a second graph of memory consumption. It also contains more detailed memory utilization counters.
- Networking: This tab shows a graphical representation of network utilization for each network adapter on the system. It also shows a table of the processes consuming network resources as a percentage of the total. This can be helpful in tracking down applications or processes consuming large amounts of network bandwidth.
- Users: This tab shows the users who are currently logged in to the host. It gives you the option to disconnect users that are remotely logged in or log them off entirely.
The Task Manager provides a lot of information about the system at-a-glance.
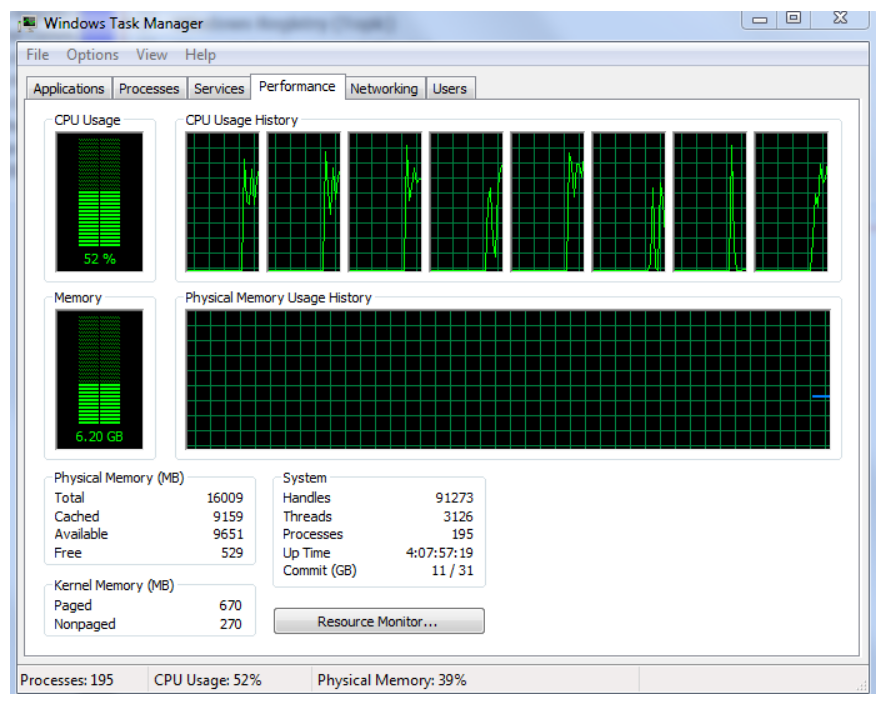
Resource Monitor
If you need to dig deeper to get more detailed information, Windows ships with a tool that is called Resource Monitor that provides just that. The figure shows an example of Resource Monitor from a Windows 7 installation. This application is available on all the most current versions of Windows, however, its functionality is unchanged from prior versions. You can access this application several ways: open it from the Start menu->All Programs->Accessories->System Tools->Resource Monitor, or type resmon.exe into the Start Menu search box, or you can call it up from the Performance tab of the task manager.
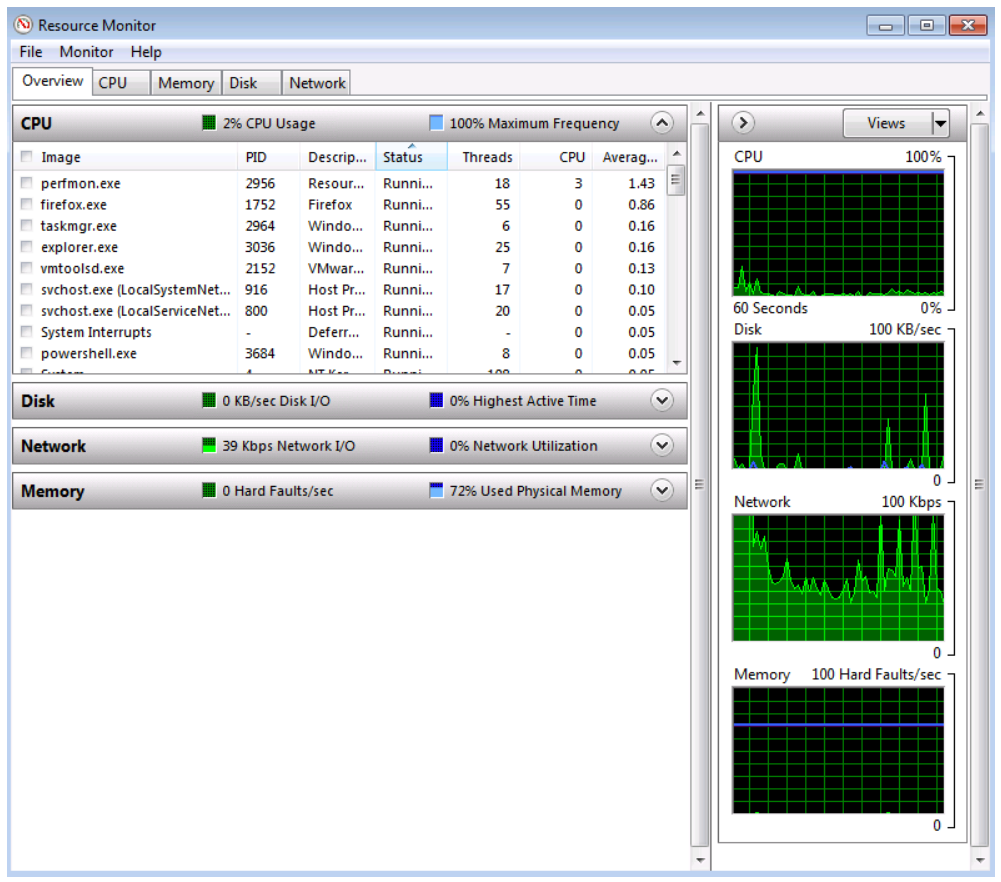
This tool gives you a detailed view of resource utilization on your system. The application is focused on the major resources on your system: CPU, memory, disk, and network resources. The first section of the application is represented by the contents of the Overview tab. This tab provides general utilization statistics for each of the resources. You can also select a process from the process list at the top of the page by clicking the checkbox in front of the item. This has the effect of filtering utilization data on the selected item or items and lets you see, on a per process basis, how an item is utilizing available resources.
When you select an item, expand each of the remaining sections to show utilization statistics for each of the resource categories. In the figure that follows, the user has selected the Firefox process in the top portion of the window and has expanded the network section by clicking the arrow button in the right side of the section title bar.
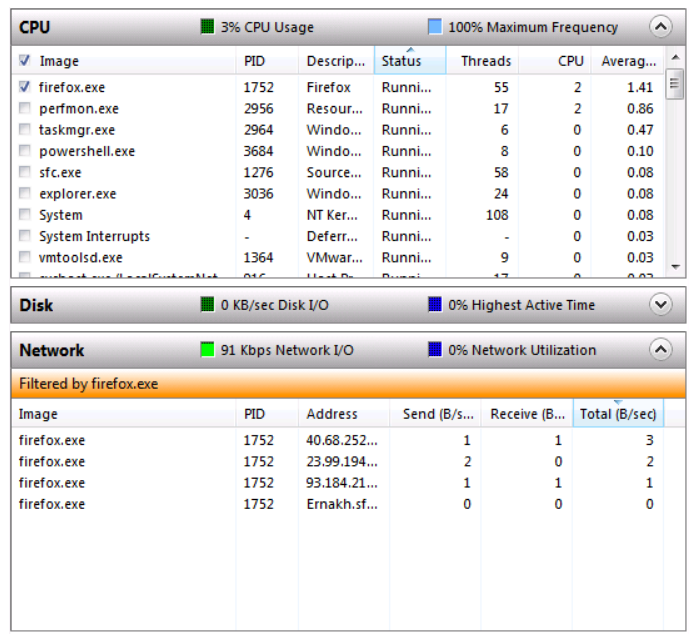
The network section inserts a message to indicate that the results are filtered on firefox.exe. This gives you a means for understanding the resource utilization of specific applications and processes. The filter persists across all the tabs, so if you want greater detail on CPU utilization for a selected application, click the CPU tab, and the statistics that are rendered by the resource monitor remain filtered by the selected application, as seen below.
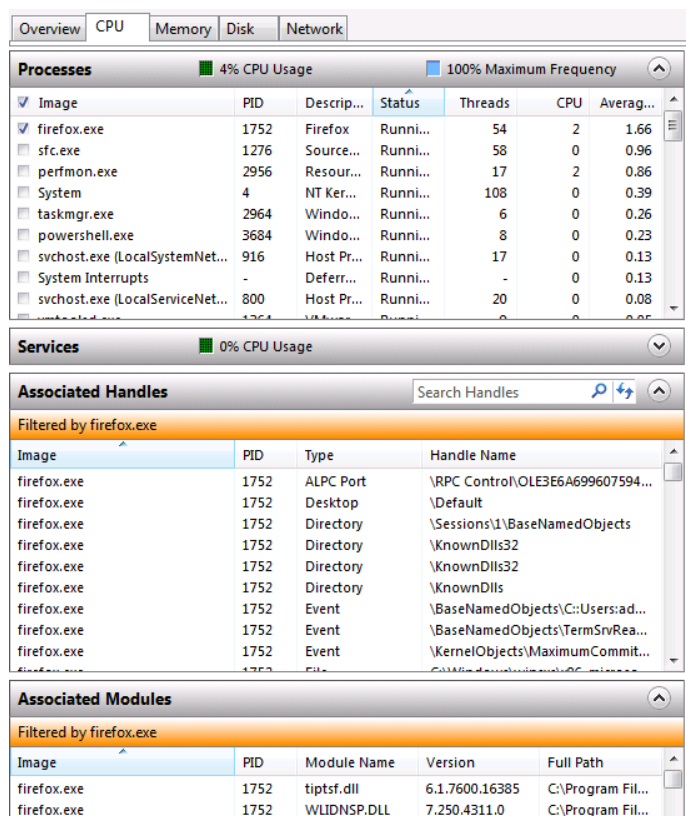
Remove the filter by de-selecting the item in the top portion of the window. Doing so reverts the resource monitor to showing statistics that are based on all the running applications and processes. Each of the remaining tabs provide greater detail regarding the resource that you selected. If you need to investigate a system that is exhibiting erratic behavior, this tool can help you track down the source of the behavior.
Windows Boot Process
The figure that is shown below shows the three main phases of the Windows boot process:
- During the BIOS Initialization phase, the platform firmware identifies and initializes the hardware devices, and then runs a power-on self-test (POST). The POST process ends when the BIOS detects a valid system disk, reads the master boot record (MBR), and starts Bootmgr.exe. Bootmgr.exe finds and starts Winload.exe on the Windows boot partition, which begins the OS Loader phase.
- During the OS Loader phase, the Windows loader binary (Winload.exe) loads essential system drivers that are required to read minimal data from the disk, and initializes the system so the Windows kernel can begin execution.
- During the OS Initialization phase, most of the operating system work occurs. This phase involves kernel initialization, Plug and Play activity, service start, logon, and Explorer (desktop) initialization.

The Windows boot process actually begins at system installation time. The Windows setup builds the structures that are necessary for the system to boot properly. Therefore, these structures must be in place for any subsequent successful system initializations to take place. There are also some differences in the boot sequence that take into account the type of BIOS that is in place. BIOS-based systems are essentially legacy but they are still very common. The newer type of BIOS is known as the EFI (Extensible Firmware Interface). A more recent version of EFI, known as UEFI (Unified Extensible Firmware Interface), is rapidly becoming the new standard.
When an instance of Windows is installed on a host, the setup application does some preliminary preparation of the disk that the system will boot from. It will use the first sector of the disk to create an area that is known as the MBR, which contains some executable instructions and the partition table that is used to map out the structure of the disk. Once MBR is created and present on the system disk, the host can begin the boot process.
When the system boots, it executes code that is stored in the flash memory of the BIOS. The code that it executes is enough to identify the boot disk it will then communicate with and load the partition table information from the MBR into memory. It also transfers control to the executable code in the MBR to continue the boot sequence. With the partition table loaded into memory, the system can locate the Bootmgr file. When the Bootmgr is found, the MBR executable code transfers control to the Bootmgr. Bootmgr starts in “real mode,” which is the original MS-DOS memory model where programs ran in a memory space of 1MB. Bootmgr’s job is to switch the system to “protected mode,” which makes the remaining memory of the system available so the boot sequence can continue. If Bootmgr is not found at this point, the boot process will fail and the system will respond with the message Bootmgr not found.
Next, the Bootmgr reads the BCD to read in any options that are required to start the system. The BCD also contains information about whether the system was put into hibernation the last time that it was used, rather than fully shutdown. If a hibernation state is detected, the BCD redirects the boot process to execute Winresume.exe, which reads the hibernation file (Hiberfil.sys) to rebuild the state of the system to the state it had when it was put into hibernation.
At this point, Bootmgr executes Winload.exe to continue the boot sequence. The Winload.exe program queries the system BIOS to get information about devices connected to the system. The hardware information is held so the system knows what is there as the boot sequence continues and is later written to the registry so the system can have a record of the hardware configuration at boot time. Next, Winload.exe begins loading the files that are needed to start initializing the kernel. It will also begin reading in the device drivers of the hardware devices connected to the host.
An important part of what Winload.exe does at this point is to enforce the KMCS (Kernel Mode Code Signing) infrastructure. The KMCS is there to ensure that all the drivers and components that Winload.exe reads in are digitally signed to maintain the security of the system as it boots.
Systems that use UEFI BIOS do things a bit differently. In UEFI-based systems, the boot code is stored and executed in the UEFI firmware itself. Therefore, the system never goes into the real mode memory management system. Instead, it goes directly to protected mode, which improves the host’s security at boot time.
The last thing Winload.exe does is call up Ntoskrnl to initialize the Windows kernel memory and set up the HAL (Hardware Abstraction Layer) so the system can communicate with the connected hardware. Once the kernel is initialized, control is handed off to the Session Manager Subsystem (SMSS), which is in charge of initializing the user environment. The SMSS reads in values from the registry files to prepare the system to present the environment in the state that it was last left in. The SMSS also invokes Winlogon at this point to wait for a user to log in. When a user successfully logs in, Winlogon reads the registry keys for the user to prepare the user’s desktop environment.
Starting Services at Boot Time
Part of the system initialization process is to start the services that the system needs to run, including system services and services required by user-installed applications. The user space initialization process, handled primarily by SMSS and Winlogon, reads the registry keys that identify which services to load and which to start. Much of this information is stored in the Windows registry.
Registry hives can influence the services and applications that automatically start:
- HKEY_LOCAL_MACHINE: This hive stores system-wide information. Services that are registered in this hive start with each boot.
- HKEY_CURRENT_USER: This hive stores information about the user that is currently logged in. Services in this hive start when the user logs in.
In each hive, various registry locations define the services to auto-start. Some may not be present in a default installation because they are created by applications, but the following list includes services that you are likely to encounter:
- Run
- RunOnce
- RunServices
- RunServicesOnce
- Userinit
You can add these keys to these locations yourself, or applications that you install may populate them automatically if they are required for the application to run. These are also interesting areas to investigate if you suspect some unwanted application is automatically starting at boot time or after you log in. For example, use the registry editor to view applications or services that start when the system boots, in the HKEY_LOCAL_MACHINE hive:

Entries for any application or services that auto-start at boot time are in this location. 64-bit Windows installations also reserve a registry location for starting 32-bit applications, as follows:

The figure below is an example of an entry in these registry locations:

Windows Networking
One of the first tasks to perform when setting up a Windows host is to configure its networking properties. You should also be familiar with the basic tools for testing whether your network configuration is working properly. With the network configuration in place and operational, you will want to begin using network resources to get things done.
Configuring Basic Networking Properties
As with many Windows features, there are several ways to access network properties. One way is to click the network adapter icon in the system tray, which opens a list of options that are related to the type of network adapter that you are using. You will also see an option to open the Network and Sharing Center (the precise verbiage may differ among Windows versions). From the window that opens, select change adapter settings. The first figure below shows a portion of this window from a Windows 7 installation. The second figure shows a portion of this window from a Windows 10 installation.
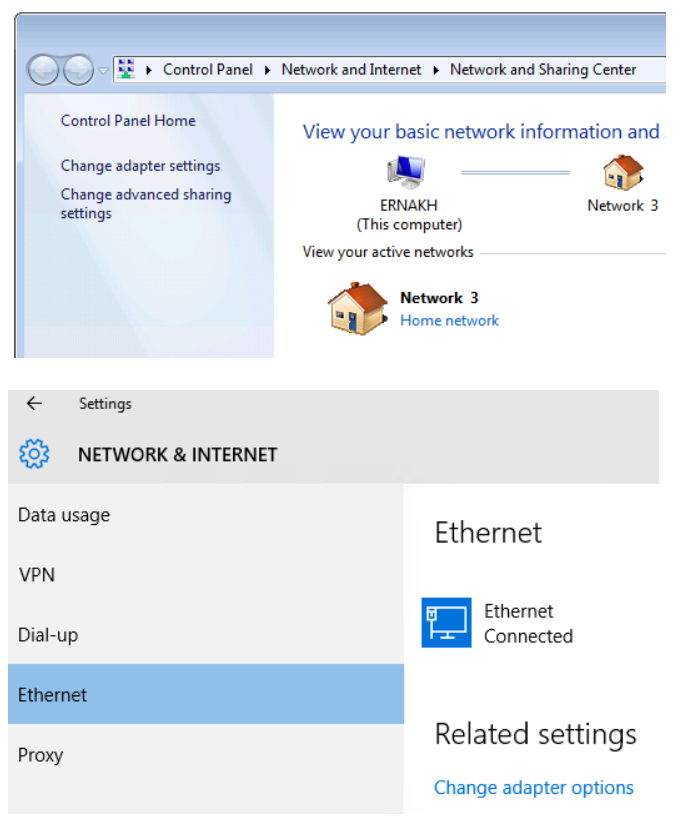
In either Windows 7 or Windows 10, select Change adapter options to open a window that shows each of the network adapters that you have installed on the host. Right-click the icon of the adapter that you wish to configure and select Properties from the context menu to open the properties box for the adapter.
From the properties box, select the IP version that you wish to configure and click the Properties button. The example below uses IPv4.
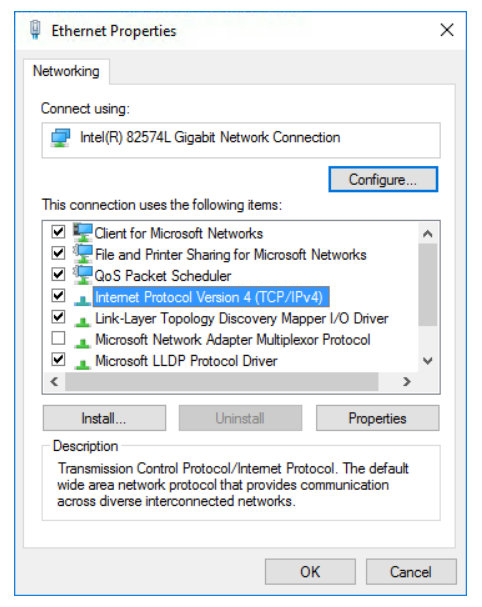
With the IPv4 properties window open, you can enter the values that are appropriate for your network, or choose Obtain IP address automatically to get your IP information dynamically from a local DHCP server. If you choose to statically assign the network values, you must enter the following:
- IP address: The IPv4 address that you wish to assign to the network adapter
- Subnet mask: The subnet mask that you wish to assign to the network adapter
- Default gateway: The IP address of the default gateway that the network adapter will use to access networks beyond the local network
- Preferred/alternate DNS server: The IP address of your DNS server. You can enter an alternate server here as well.
The netsh.exe tool can also configure networking parameters from the cmd shell. This scripting utility can display and modify the network configuration of the system.
Testing Network Connectivity
After configuring your network settings, test the host to make sure that it has connectivity to the local network, and if the host requires access to external resources or the Internet, test that as well. Two utilities are available to quickly perform these tests from the command line. First, to test basic connectivity to the network, use the ping command. The ping command sends an ICMP echo request message to the remote host that you are testing with. The example command line session follows:
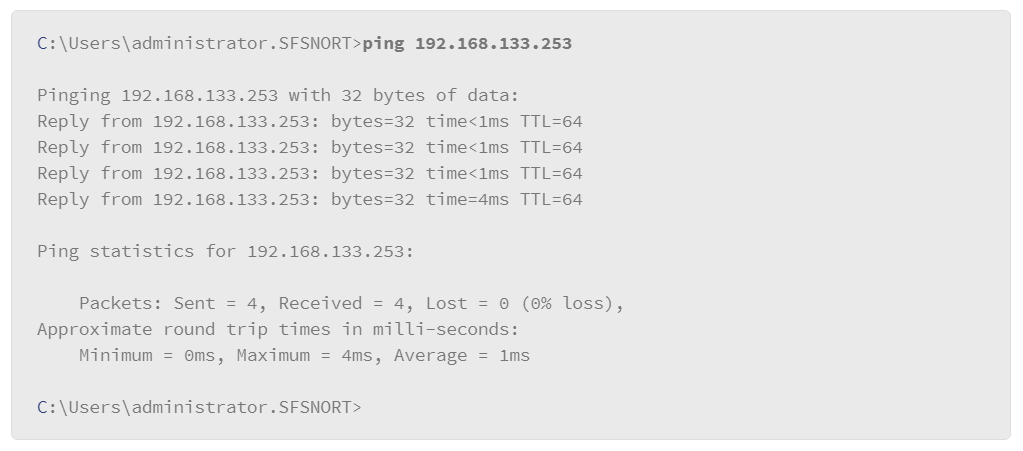
The ping command in Windows issues four ICMP echo request messages. If the host that is targeted in the command replies, you will see one reply for each request. Then the command will return some general statistics of the ICMP traffic that is generated in the session. This simple test has confirmed that you have connectivity at least to the local network. Test connectivity to networks that are beyond the local network by pinging hosts in other networks.
The nslookup Command
You should also test DNS to make sure it is working properly, because applications that use network resources will likely reference hosts by their names, rather than their IP addresses. In Windows, use the nslookup command to quickly test your DNS settings as follows:

This command simply uses the DNS servers that you configured in the network properties to resolve the name of the host that you specified in the command to its IP address. If it returns an address, you know that DNS is working properly on the host.
With both IP connectivity and DNS resolution confirmed, the host is properly configured to use network resources. As the administrator of a Windows host, you can use other tools to check other aspects of networking, such as ports and services that the host is running. The netstat tool that ships with Windows allows you to do this, and lists connections to and from the host.
Windows netstat Command
With the IP connectivity and DNS resolution confirmed, the host is properly configured to use network resources. As the administrator of a Windows host, you can use other tools to check other aspects of networking, such as ports and services that the host is running. The netstat command allows you to do this, and list connections to and from the host.
If malware is present, the netstat command is a useful analytical tool for recognizing abnormal inbound or outbound network connections. Malware will typically open backdoor network communication ports on the host to generate outbound traffic to CnC servers under the attacker’s control. The figure below shows the help screen for the netstat command with all the options.
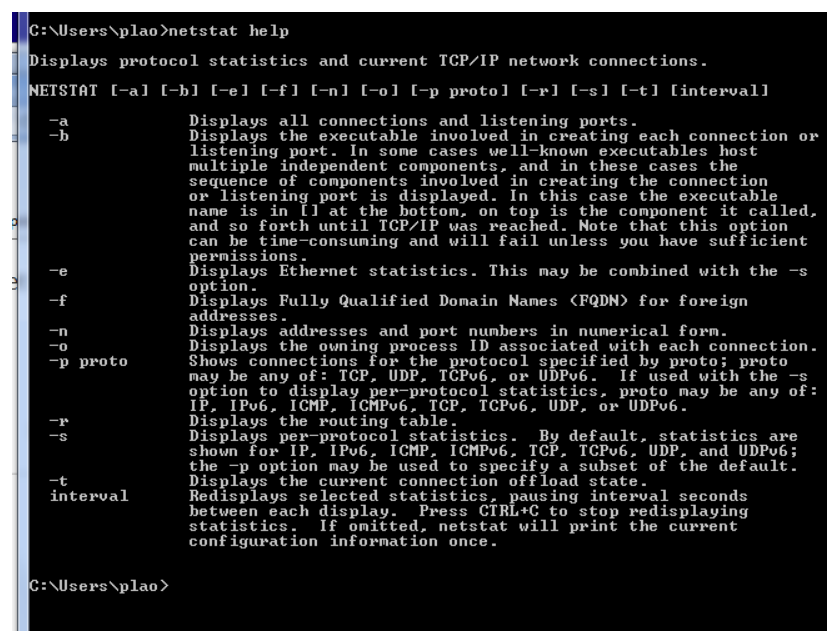
The netstat command displays active TCP connections—ports on which the computer is listening—Ethernet statistics, the IP routing table, IPv4 statistics (for the IP, ICMP, TCP, and UDP protocols), and IPv6 statistics (for the IPv6, ICMPv6, TCP over IPv6, and UDP over IPv6 protocols).
When used without parameters, netstat displays active TCP connections.
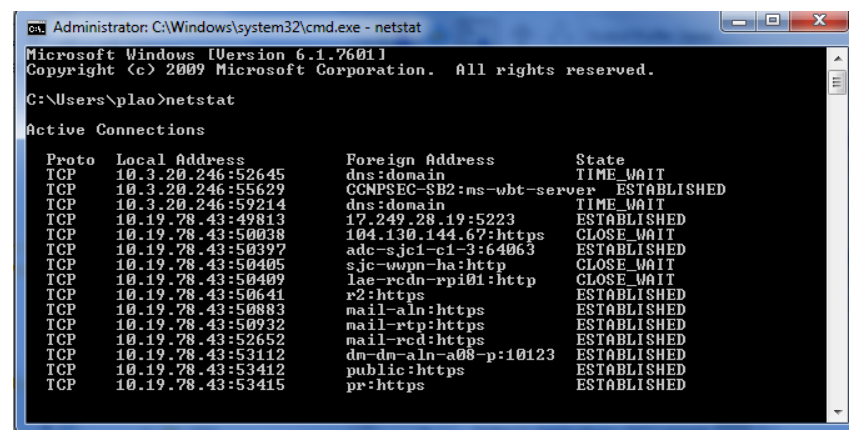
By examining the active TCP connections, an analyst should be able to determine if there are any suspicious programs that are listening for incoming connections on the host. You can also trace that process to the Windows Task Manager and cancel the process.
To link a connection that is displayed by netstat to a process that is listed in Windows Task Manager, run netstat -abno and find the appropriate process name listed in Windows Task Manager. If there are two or more processes with the same name, use the PID to find an exact match. From the Windows Task Manager Processes tab, click View > Select Columns, then check the PID box to display the PID.
Accessing Network Resources with Windows
Networking is integral to the Windows OS. You can use all the typical client applications to access remote resources such as your browser application for web access or email client for email access like any other operating system. However, Microsoft pioneered the SMB protocol for sharing network resources. Though it was originally developed by IBM, Microsoft continued its development and has been a part of the Windows OS throughout its life cycle. SMB also has an open source counterpart, which is known as Samba, that allows other OSs to share resources with Windows-based hosts.
One of the primary uses of SMB is for accessing files or file systems on remote hosts. Windows uses the UNC (Universal Naming Convention) format to identify the remote resource, expressed as follows:

The servername component identifies the server hosting the remote resource. The server name can be an IP address, the host’s NetBIOS name (NetBIOS names are used to uniquely identify hosts in Windows networking environments) or the host’s DNS name (ernakh.sfsnort.com for example). The sharename component refers to the root of the file system that is reserved for sharing the resource. The file component is the actual resource the client is seeking. The file can also contain a path of subdirectories if that’s where the file resides.
Another note about the share name is that you must identify the portion of the file system that you wish to share. You can use access control features to restrict what remote users can do in the share, or grant them full permissions to read, write, and execute files from the share. Kshares, which are known as administrative shares, are a special group that allow only those users with administrative privileges to access these shares. Common administrative shares include shares that represent entire disk drives. For example, the share that represents the C: drive is called C$. The ADMIN$ share points to the c:\windows directory. An administrative share that is called IPC$ is used for inter-process communications.
Use the net share command to view the shares that are available on a Windows host.
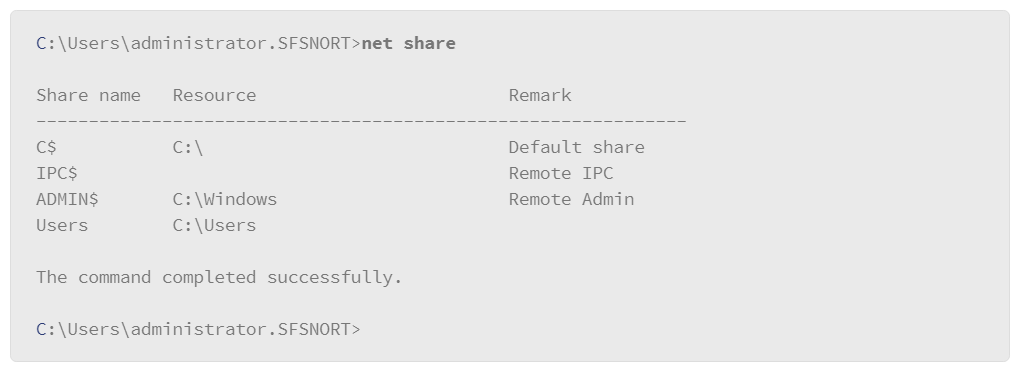
In the example above, the host is showing three administrative shares and a user-created share. The user-created share is called Users, and points to the c:\Users directory. So, users with credentials on the host can access that share from remote locations. One way to access the share is from the file explorer window. Simply enter the UNC name of the share and you will be prompted to enter the credentials on the remote host as shown in the figure.
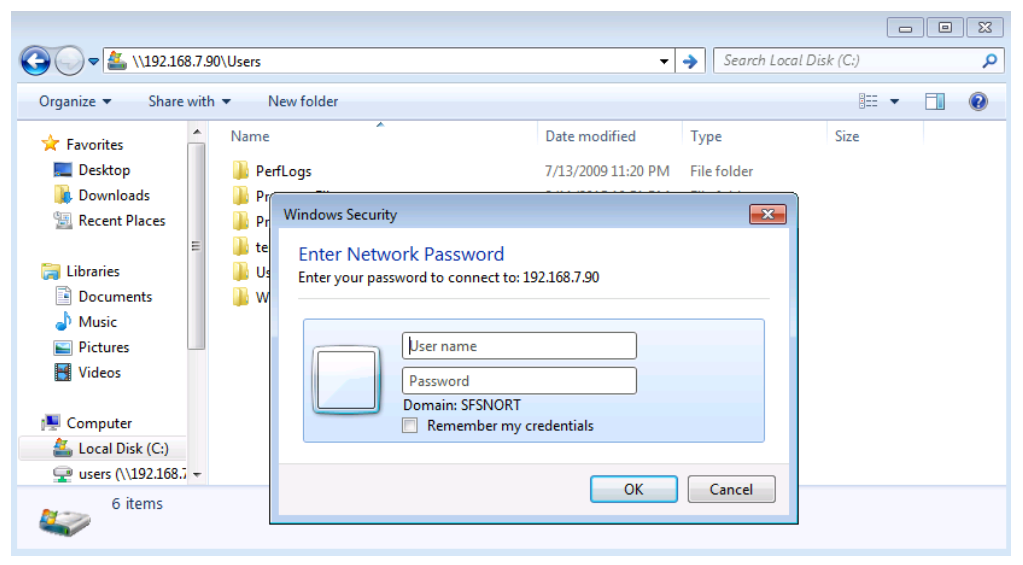
After entering the credentials, you will be able to access the files and folders stored in that directory on the remote host.
You can also mount the remote share as if it were a disk drive. From the perspective of the local host, it will appear as if it is just another disk drive. In reality, it uses the disk resources on the remote host. One way to mount the remote share is from the command line as follows:

In this example, the net use command was used to map drive letter z: to the share on the remote host. The user name was also supplied as an argument in the command. If the user had previously mounted a share with valid credentials, the credentials are cached on the local host and the user is not prompted for a password. If the credentials are not cached, the user is prompted for a password before the operation can complete successfully.
Another commonly used network resource is the ability to log in to remote hosts and remotely operate the host’s desktop. Windows ships with a client application that allows you to do this using the RDP. Professional and business-oriented versions of Windows only allow one remote session at a time. However, Windows server products with terminal services allow many concurrent sessions.
As a security analyst investigating security incidents on the remote Windows machines, RDP is often used to access the remote Windows machines.
The client application that you use to access a remote desktop is called Remote Desktop Connection. The following figure provides an example of the application interface.
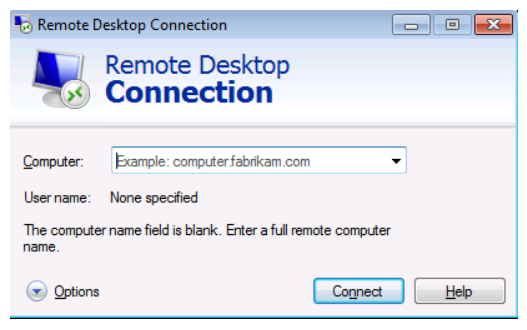
If you previously used the RDP client to connect to another host, you may see the host and user account already listed in the application window. If you want greater control over the connection, click the Options button to expose settings to customize the remote access experience.
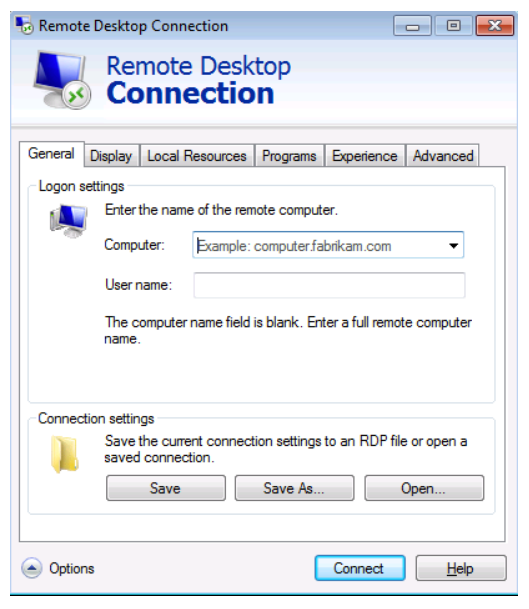
With the options exposed, you can control various aspects of the session, such as which computer to access, the user name for logging in to the remote host, properties to display, or even if you wish to share any local resources, such as sound, files, or printers, with the remote desktop. Once you have configured the properties of the session, save the properties if you want to simply recall the session profile the next time.
Windows Registry
Windows registry is a central hierarchical database in which Microsoft Windows stores information that is necessary to configure the system for one or more users, applications, and hardware devices.
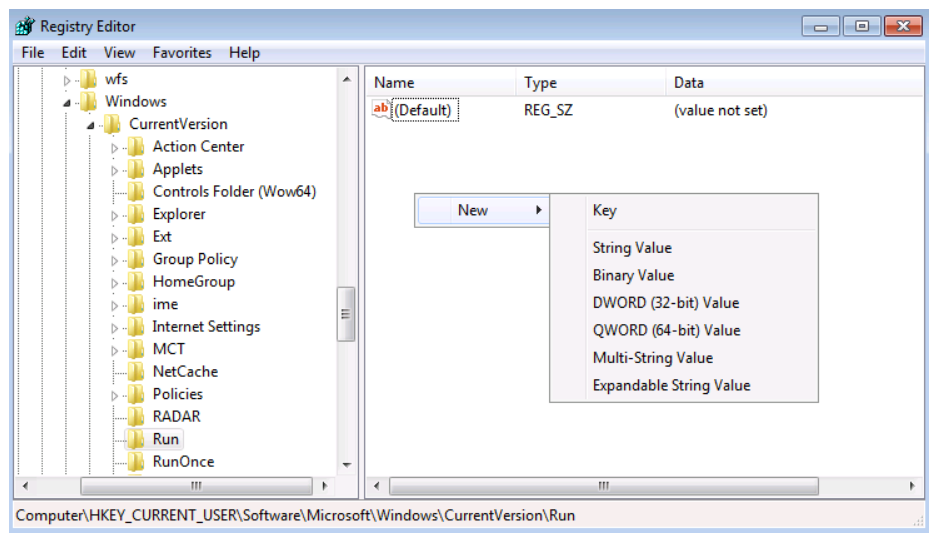
The registry contains information that Windows continually references during operation, such as profiles for each user, applications that are installed on the computer, types of documents that each can create, property sheet settings for folders and application icons, hardware that exists on the system, and the ports that are being used.
The registry is organized in a hierarchical manner. The highest element of the hierarchy is known as a hive, which maps to a file in the file system that contains a binary database of registry keys and values. Hives are designed to store specific types of information.
Hives and their intended purpose are described below:
- HKEY_CURRENT_USER (HKCU): Stores data that is associated with the currently logged in user.
- HKEY_USERS (HKU): Stores information about all the user accounts on the host.
- HKEY_CLASSES_ROOT (HKCR): Stores information about file associations and object linking and embedding (OLE) registrations.
- HKEY_LOCAL_MACHINE (HKLM): Stores system-related information.
- HKEY_CURRENT_CONFIG (HKCC): Stores information about the current hardware profile.
The names in the list are written in their actual long form as you would see them in the registry editor, but they also include abbreviations that are commonly used to reference a given hive in documentation or reference material. You cannot create or delete a hive, however, as an administrator, you can delete or modify registry keys and values.
The names of the hives are derived in the following manner: the letter H represents handles to keys; the format HKEY is followed by the specific name of the hive. For example, HKEY_CURRENT_USER contains the root of the configuration information for the user who is currently logged on. The user's folders, screen colors, and control panel settings are stored here. This information is associated with the user's profile.
The Windows registry cannot be modified by a non-administrative user on the system. Windows ships with an administrative tool that is called called regedit.exe, that will allow an administrator to view or edit the registry. An administrator can also use a tool that is called regedt32.exe, that will ultimately launch the regedit.exe tool. To open the registry editor, click the Start button and enter regedit.exe in the search field. An example of the registry editor is shown below:
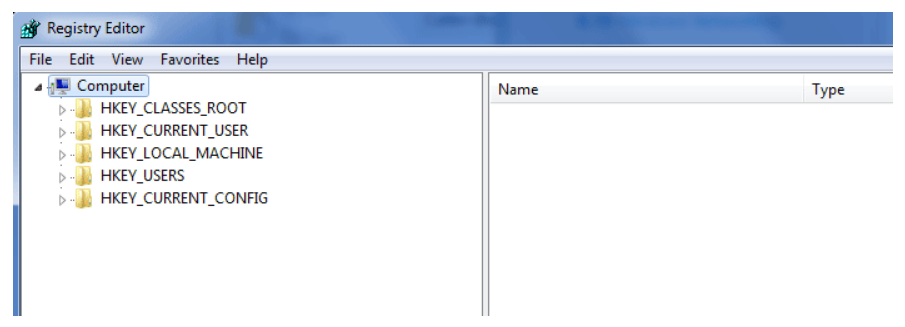
To navigate the registry, use the same technique as the Windows file explorer where the left panel lists the hives and you click the triangular icon to drill into the structures within a hive. The main panel exposes a detailed view of an item that you select on the left. One difference between regedit and the file explorer is that the main panel only shows what is in the currently selected item. If that item has sub-keys, they will not show in the main panel, but they will be listed in the left navigation panel. The example that follows uses regedit to access a specific registry key:
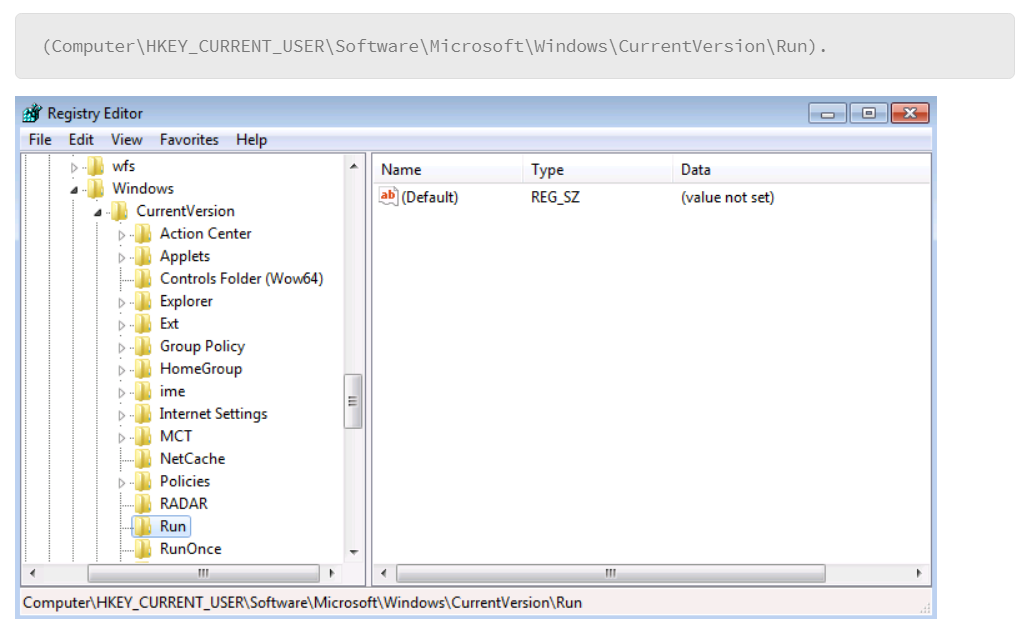
The key path is rather lengthy, but you can see the folders that represent keys and their sub-keys in the left panel. Also note that the entire path is displayed in the lower portion of the regedit application window.
In this example, the Run registry key is used to cause programs to run each time a user logs on. This is a good place to look for potentially unwanted applications that start when you reboot your system.
In general, you should not modify registry settings unless you are an experienced Windows user or acting under the guidance of an experienced user. It is easy to induce a problem if you set something incorrectly or delete a critical registry key.
A registry key is a container object. It acts as if it is a folder in the file system. It can contain key/value pairs or sub-keys. Therefore, a registry key reference looks like a path in the file system, and keys and their sub-keys are delimited with the same backslash (\) character that you would use in a Windows file path.
A key can hold a value or another key. Values that are assigned to a key can be in several formats, so you can express values using various data types. Some of the more common types are listed below:
- REG_BINARY: Stores numbers or Boolean values (on or off).
- REG_DWORD: Stores numbers greater than 32 bits or raw data.
- REG_SZ: Stores string values in Unicode format.
In the registry editor, the key/values displayed in the main panel indicate the format that the system is expecting as the value for a given key. For example, in the previous figure the Run registry key is expecting a REG_SZ value. The REG_SZ value in this example is the blank default value.
You can define the REG_SZ value by right-clicking the main panel to bring up the context menu. Then select New followed by the key type that you wish to use, as shown in the following example:
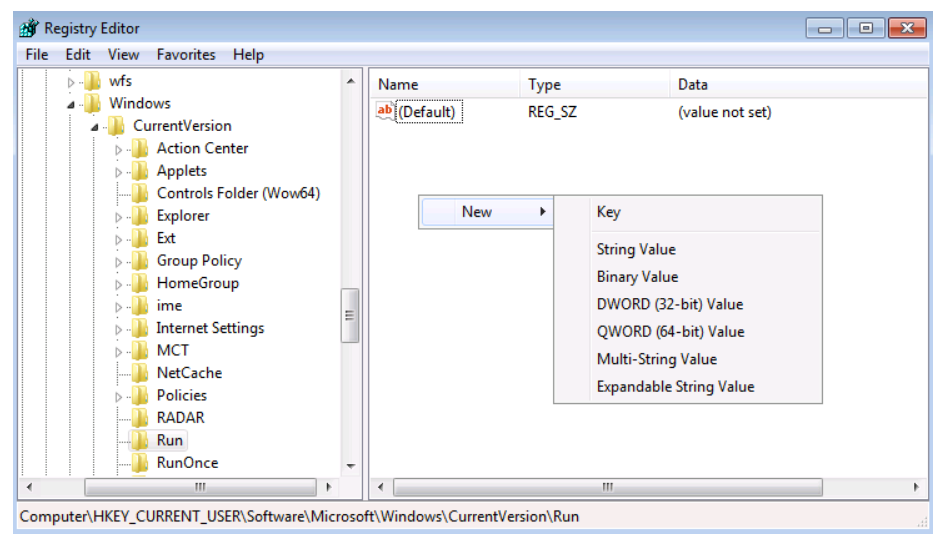
Select String Value to add a value and you will be prompted to provide a name for the value. In this case, the user created a value that is named Notepad, and the value data is the path and filename to the Notepad executable.
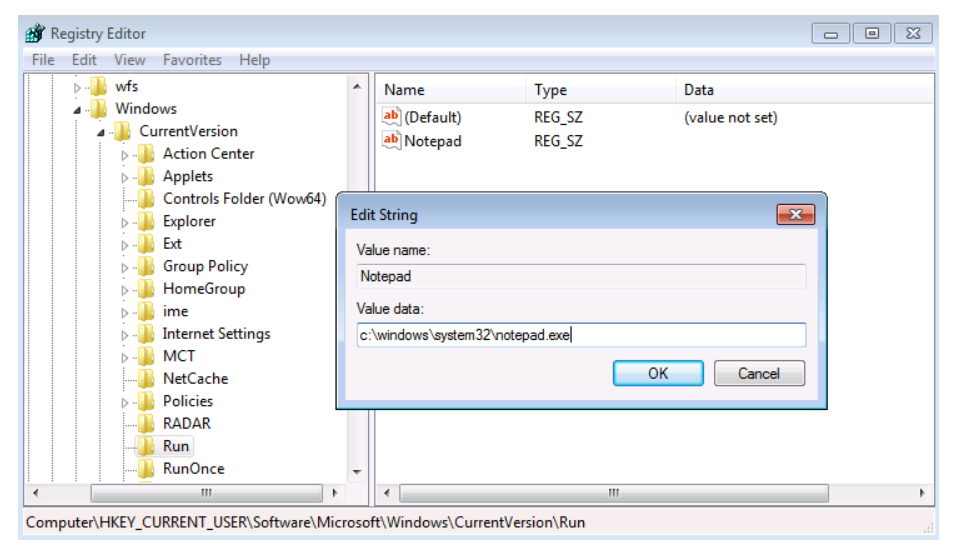
Security Concerns Regarding the Windows Registry
The Windows registry is a critical component to the security of a system. The registry controls virtually every aspect of the system’s configuration and operation. For example, malicious or potentially unwanted applications, such as browser tool bars, may add entries to the registry keys that start up applications at system boot time. A security administrator who is remediating an infected host may want to review the system registry keys to see if there are unwanted applications. Registry keys can be removed if the security administrator determines that they are malicious in nature.
Another key aspect of the registry is that it tracks much of the activity that is performed by users and applications on the host. Forensic analysts will find tracked activity to be a very useful place to investigate. For example, you can track the history of USB storage devices by examining the HKLM\SYSTEM\CurrentControlSet\Enum\USBSTOR key. Here you will find a list of all the USB devices that have connected to the system at some point. It also includes information such as the vendor, product number, and serial number of the device—all valuable forensic information in advancing a cyber investigation.
Windows Event Logs
Windows Event Viewer is a Microsoft management console snap-in that enables you to browse and manage event logs. It is an indispensable tool for monitoring the health of systems and troubleshooting issues.
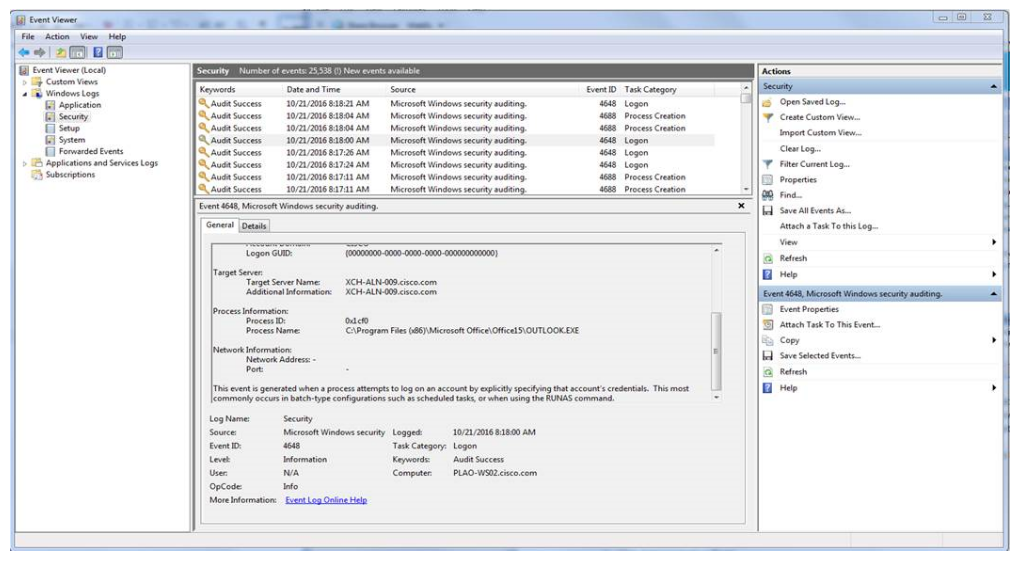
When you use Event Viewer to troubleshoot a problem, you need to locate events that are related to the problem, regardless of the event log they appear in. Event Viewer enables you to filter for specific events across multiple logs, to display all events that are potentially related to the issue you are investigating.
Windows includes two categories of event logs: Windows Logs, and Application and Services Logs.
To start Event Viewer using the Windows interface:
- Click the Start button
- Click Control Panel
- Click Administrative Tools
- Double-click Event Viewer
To start Event Viewer by using a command line, open a Windows command prompt and enter the eventvwr command.
Windows Management Instrumentation
WMI is the infrastructure for management data and operations on Windows-based operating systems. You can write WMI scripts or applications to automate administrative tasks on remote computers. WMI also supplies management data to other parts of the operating system and products.
An example of a network security device using WMI is to retrieve the Windows user log in and log off security events from the Windows domain controller.
To avoid detection and to carry out broad commands on compromised systems, today's attacks often leverage the use of WMI to connect to remote systems, modify the registry, access event logs, and execute commands. Besides the initial logon event, remote WMI commands leave little evidence on the accessed system. Therefore, Windows administrators should follow the proper Windows guidelines to secure the WMI access.
WMI supports a limited form of security that validates each user before the user is allowed to connect to WMI, on a remote or local computer. This security is layered on top of the Windows operating system security. By default, only the local computer Administrator account has full control of the WMI services on the computer that is being managed. Members of the Administrators group have access to remote computers, but may not have access to all the data. Permissions can be changed by adding a user to the Administrators group on the managed computer or by authorizing users or groups in WMI and setting their permission level.
Common Windows Server Functions
Although Windows is used most often as a desktop computing platform, its server platforms are used extensively in enterprise data centers. Windows Server is actually a brand name that refers to the Microsoft family of server products, starting with Windows Server 2003. Windows Server products host many popular services, which makes the platform suitable for fulfilling many roles in the enterprise.
Windows Server services include the following:
- HTTP, HTTPS, and FTP
- DHCP
- DNS
- File services: NFS, SMB, and DFS
- Hyper-V: For hosting and managing virtual machines
- Terminal services for hosting remote desktop access
- Deployment services
- Group policy management
- AD domain services control
Microsoft also offers its Exchange Server product for email and calendaring, but among the services that are listed above, one of the most common applications for Windows Server products is the AD. AD is a service that is used to manage Windows domain-based networks.
Common Third-Party Tools
Although Windows ships with many tools to manage and monitor the system, some users find that these tools lack specific features. Therefore, many Windows administrators install their own preferred tools. This section explores several popular tools in use today to manage and monitor systems. Some can be particularly useful in environments with various OSs.
PuTTY Application
PuTTY is a very popular application that is on many Windows administrator desktops. PuTTY is an SSH client application. SSH is a protocol that is used to remotely access a host’s shell or command line. Linux OS and Mac OS X use this protocol because it encrypts the remote session, so that a third party cannot view the contents of the communication. Unfortunately, Windows does not ship with an SSH server or an SSH client. PuTTY is popular because it is free to download and easy to install. To download PuTTY, go to www.putty.org, find the version that matches your version of Windows, and install it.
WinSCP
WinSCP is an application used to securely copy files to and from a remote host. If the host is running Linux or OS X, it is probably running an SSH server that can be used to transfer files. This is another example of how the lack of SSH support on Windows can hamper an administrator’s efforts, especially in mixed OS environments. WinSCP is a simple solution.
To download WinSCP, browse to www.winscp.net, navigate to its download page, and find the installation package that matches the version of Windows that you are running. It installs like any other Windows application and, for most users, the default values at install time will suffice.
Wireshark
The Wireshark application is natively found on Unix-like OSs. Wireshark allows you to capture network traffic for further analysis. This feature is not natively found in Windows. However, the Wireshark application can be installed on the system to capture traffic on a Windows host.
To download Wireshark, go to www.wireshark.org, and navigate to its download page and find the installation package that matches the version of Windows that you are running. It installs like any other Windows application, however; you need to reboot your system when the installation completes.
Sysinternals
Sysinternals is a package of tools that is specifically designed for the Windows OS. The project was created by Mark Russinovich to overcome some of the shortcomings of the tools for monitoring and managing a Windows installation. There are over 70 tools in the entire package, and they have become very popular with Windows administrators over the years because they provide a higher degree of utility than their Windows counterparts. Microsoft acquired Sysinternals in 2006 and has since remained committed to maintaining the package, and making the tools available as a free download to anyone. Download the tools from http://technet.microsoft.com/en-us/sysinternals/default.aspx.
Sysinternal tools fall into three categories: tools to help programmers, tools for system troubleshooting, and tools for system management. With more than 70 in the set, this section focuses on the tools that are of most interest to a security professional.
To run many of these tools, you must have administrator privilege. Also, many of the tools are command line-based tools. To ensure that they run properly, open the command line as administrator so that what you execute in the command line session runs with administrator privilege.
One of the more popular tools in the set is Process Explorer. It has a graphical interface and can best be described as a combination of the Task Manager and the Resource Monitor. An example of its application window is shown in the figure below. Process Explorer shows parent/child process relationships in a tree view.
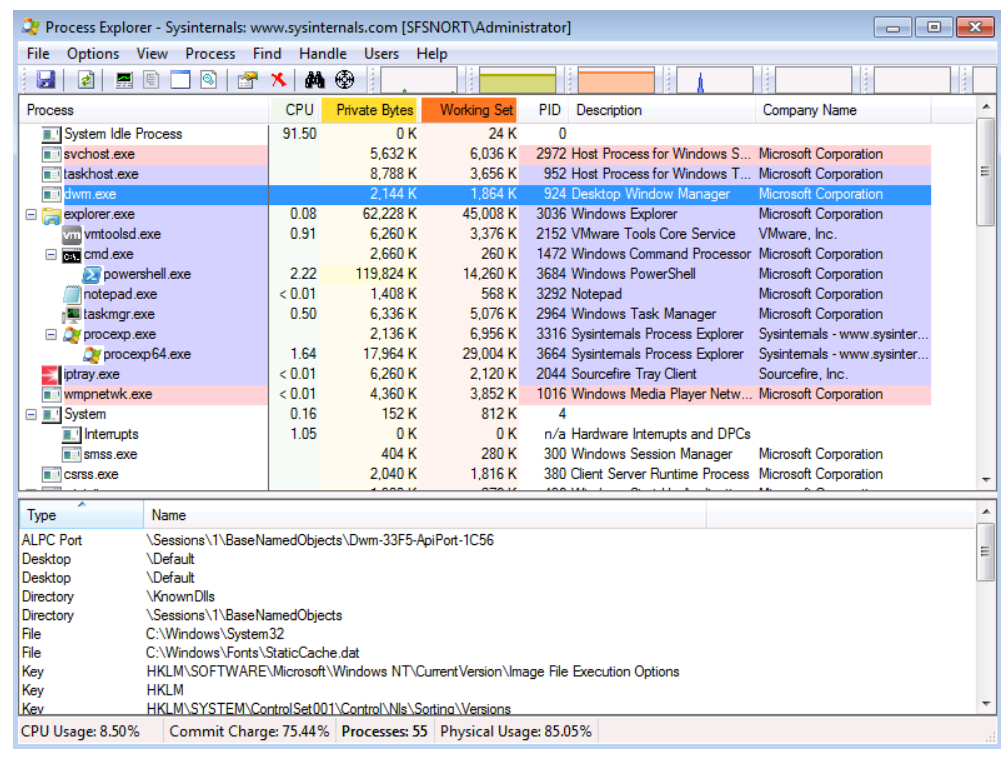
Right-click a process to open a context menu with several options, as shown in the next figure. Similar to Task Manager, you can select a process and kill it if it is misbehaving. You can also suspend or restart a process as well. If the process you are interested in is suspicious, select the Check Virus Total option to see if the file is known to be malicious. You can also select Search Online to initiate a web search that is based on the name of the process. Lastly, the Properties option opens a box detailing various properties that are related to the process.
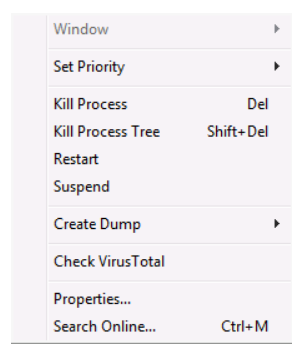
As shown in the figure below, many categories of properties are available, depending on the process that you selected. The Strings category yields potentially interesting information.
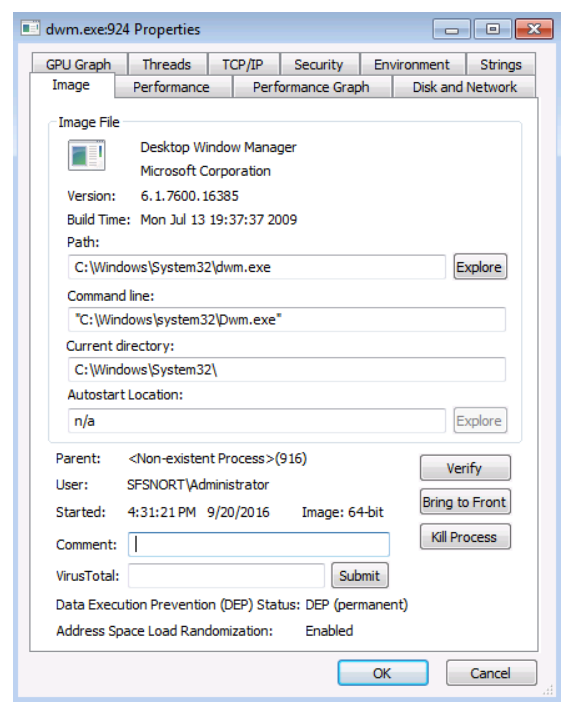
Strings exposes text strings that were found in the file that initiated the process. A string in this context is any sequence of three or more printable characters. Malware will sometimes embed text strings, such as IP addresses or URLs, in its code. For certain classes of malware, these could point to CnC sites or places to download other malware components.
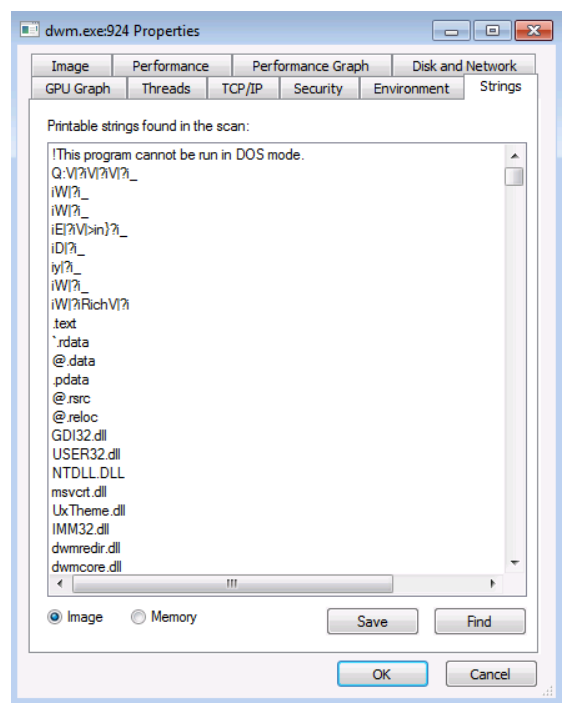
Another feature of the Process Explorer tool is that it more accurately indicates CPU consumption. Processes that show less than 1% utilization do not appear to be idle. Many more features are worth exploring. Review the download site for more Sysinternals tools and documentation on each.
You can configure the tool to replace the Task Manager, which lets you launch this tool anywhere that you would normally launch the Task Manager, such as from the context menu of the task bar or the Task Manager option when you press Ctrl+Alt+Delete.
Process Monitor
Process Monitor is a utility provided by Windows Sysinternals that can monitor system activity and events. ProcMon can report and monitor attempts to access the Windows registry and can be used to identify registry keys and files that are accessed by an application. ProcMon can provide insight into what a process is doing on a system and can also be used to identify a suspicious process that may indicate the presence of malicious software. ProcMon requires administrative right privileges in order to execute on a system.
TCPView
The TCPView tool shows processes that are communicating with other hosts, which may be normal behavior for many processes. But some malware hijacks the memory space of a running process and disguises itself as a legitimate process. For example, if you see the Windows calculator application suddenly making outbound connections, you may want to investigate further by doing a search to see if the sites that it is communicating with are known to host malware or known CnC servers.
- get-help